-
-
Notifications
You must be signed in to change notification settings - Fork 2.2k
fix(docs):多份文档汉译英并整理 #8001
New issue
Have a question about this project? Sign up for a free GitHub account to open an issue and contact its maintainers and the community.
By clicking “Sign up for GitHub”, you agree to our terms of service and privacy statement. We’ll occasionally send you account related emails.
Already on GitHub? Sign in to your account
Open
lingyun14beta
wants to merge
11
commits into
AstrBotDevs:master
Choose a base branch
from
lingyun14beta:patch-2
base: master
Could not load branches
Branch not found: {{ refName }}
Loading
Could not load tags
Nothing to show
Loading
Are you sure you want to change the base?
Some commits from the old base branch may be removed from the timeline,
and old review comments may become outdated.
Open
fix(docs):多份文档汉译英并整理 #8001
Changes from all commits
Commits
Show all changes
11 commits
Select commit
Hold shift + click to select a range
6f56b1e
docs(en): translate plugin-platform-adapter.md from Chinese to English
lingyun14beta 3e6a523
docs(en): translate plugin-platform-adapter.md from Chinese to English
lingyun14beta ccb498d
Update ppio.md
lingyun14beta b389977
Update provider-lmstudio.md
lingyun14beta d7ce0f6
Update function-calling.md
lingyun14beta 586d2bf
Update skills.md
lingyun14beta 31b223a
Update ai.md
lingyun14beta 5984bfe
Update simple.md
lingyun14beta e6de97c
Update mcp.md
lingyun14beta 01c7cac
Update config.mjs kook
lingyun14beta 69e2db9
fix(docs): fix MessageSesion import path in platform adapter example
lingyun14beta File filter
Filter by extension
Conversations
Failed to load comments.
Loading
Jump to
Jump to file
Failed to load files.
Loading
Diff view
Diff view
There are no files selected for viewing
This file contains hidden or bidirectional Unicode text that may be interpreted or compiled differently than what appears below. To review, open the file in an editor that reveals hidden Unicode characters.
Learn more about bidirectional Unicode characters
This file contains hidden or bidirectional Unicode text that may be interpreted or compiled differently than what appears below. To review, open the file in an editor that reveals hidden Unicode characters.
Learn more about bidirectional Unicode characters
This file contains hidden or bidirectional Unicode text that may be interpreted or compiled differently than what appears below. To review, open the file in an editor that reveals hidden Unicode characters.
Learn more about bidirectional Unicode characters
This file contains hidden or bidirectional Unicode text that may be interpreted or compiled differently than what appears below. To review, open the file in an editor that reveals hidden Unicode characters.
Learn more about bidirectional Unicode characters
This file contains hidden or bidirectional Unicode text that may be interpreted or compiled differently than what appears below. To review, open the file in an editor that reveals hidden Unicode characters.
Learn more about bidirectional Unicode characters
| Original file line number | Diff line number | Diff line change |
|---|---|---|
| @@ -1,21 +1,21 @@ | ||
| # 接入 302.AI | ||
| # Connect 302.AI | ||
|
|
||
| 302.AI 是企业级 AI 应用平台,支持快捷接入全球各类 AI 模型。 | ||
| [302.AI](https://302.ai) is an enterprise-grade AI application platform that provides quick access to a wide range of AI models worldwide. | ||
|
|
||
| ## 使用 | ||
| ## Getting Started | ||
|
|
||
| 点击[此链接](https://share.302.ai/rr1M3l) 注册账户。 | ||
| Click [this link](https://share.302.ai/rr1M3l) to register an account. | ||
|
|
||
| 注册完毕之后,点击[此链接](https://302.ai/apis/)选择需要接入的模型。 | ||
| After registering, click [this link](https://302.ai/apis/) to select the model you want to use. | ||
|
|
||
| 根据需求,进入[此链接](https://dash.302.ai/charge) 充值对应的金额。 | ||
| If needed, visit [this link](https://dash.302.ai/charge) to top up your account balance. | ||
|
|
||
| ## 接入 | ||
| ## Connect | ||
|
|
||
| 打开 AstrBot 控制台 -> 服务提供商页面,点击新增提供商,找到并点击 `302.AI`(需要版本 >= 3.5.18) | ||
| Open the AstrBot dashboard → Service Providers page, click **Add Provider**, find and click `302.AI` (requires version >= 3.5.18). | ||
|
|
||
| 修改 ID,并将 API Key 和模型名称填入对话框表单,点击保存,即可完成创建。 | ||
| Set an ID, fill in the API Key and model name in the dialog form, then click **Save** to complete the setup. | ||
|
|
||
| ## 使用 | ||
| ## Usage | ||
|
|
||
| 对机器人输入 `/provider` 指令,将提供商切换到刚刚添加的 302.AI 提供商,即可使用。 | ||
| Send the `/provider` command to the bot to switch to the 302.AI provider you just added. |
This file contains hidden or bidirectional Unicode text that may be interpreted or compiled differently than what appears below. To review, open the file in an editor that reveals hidden Unicode characters.
Learn more about bidirectional Unicode characters
| Original file line number | Diff line number | Diff line change |
|---|---|---|
| @@ -1,43 +1,41 @@ | ||
| # 接入 PPIO 派欧云 | ||
| # Connect PPIO Cloud | ||
|
|
||
| PPIO 派欧云是中国领先的独立分布式云计算服务商,您可以在派欧云上使用稳定、低价甚至免费的模型服务。 | ||
| PPIO Cloud is a leading independent distributed cloud computing provider in China, offering stable, affordable, and even free model services. | ||
|
|
||
| ## 准备 | ||
| ## Preparation | ||
|
|
||
| 打开 [PPIO 派欧云官网](https://ppio.cn/user/register?invited_by=AIOONE),并注册账户(通过此链接注册的账户将会获得 15 元人民币的代金券)。 | ||
| Open the [PPIO Cloud website](https://ppio.cn/user/register?invited_by=AIOONE) and register an account (accounts registered through this link will receive a ¥15 voucher). | ||
|
|
||
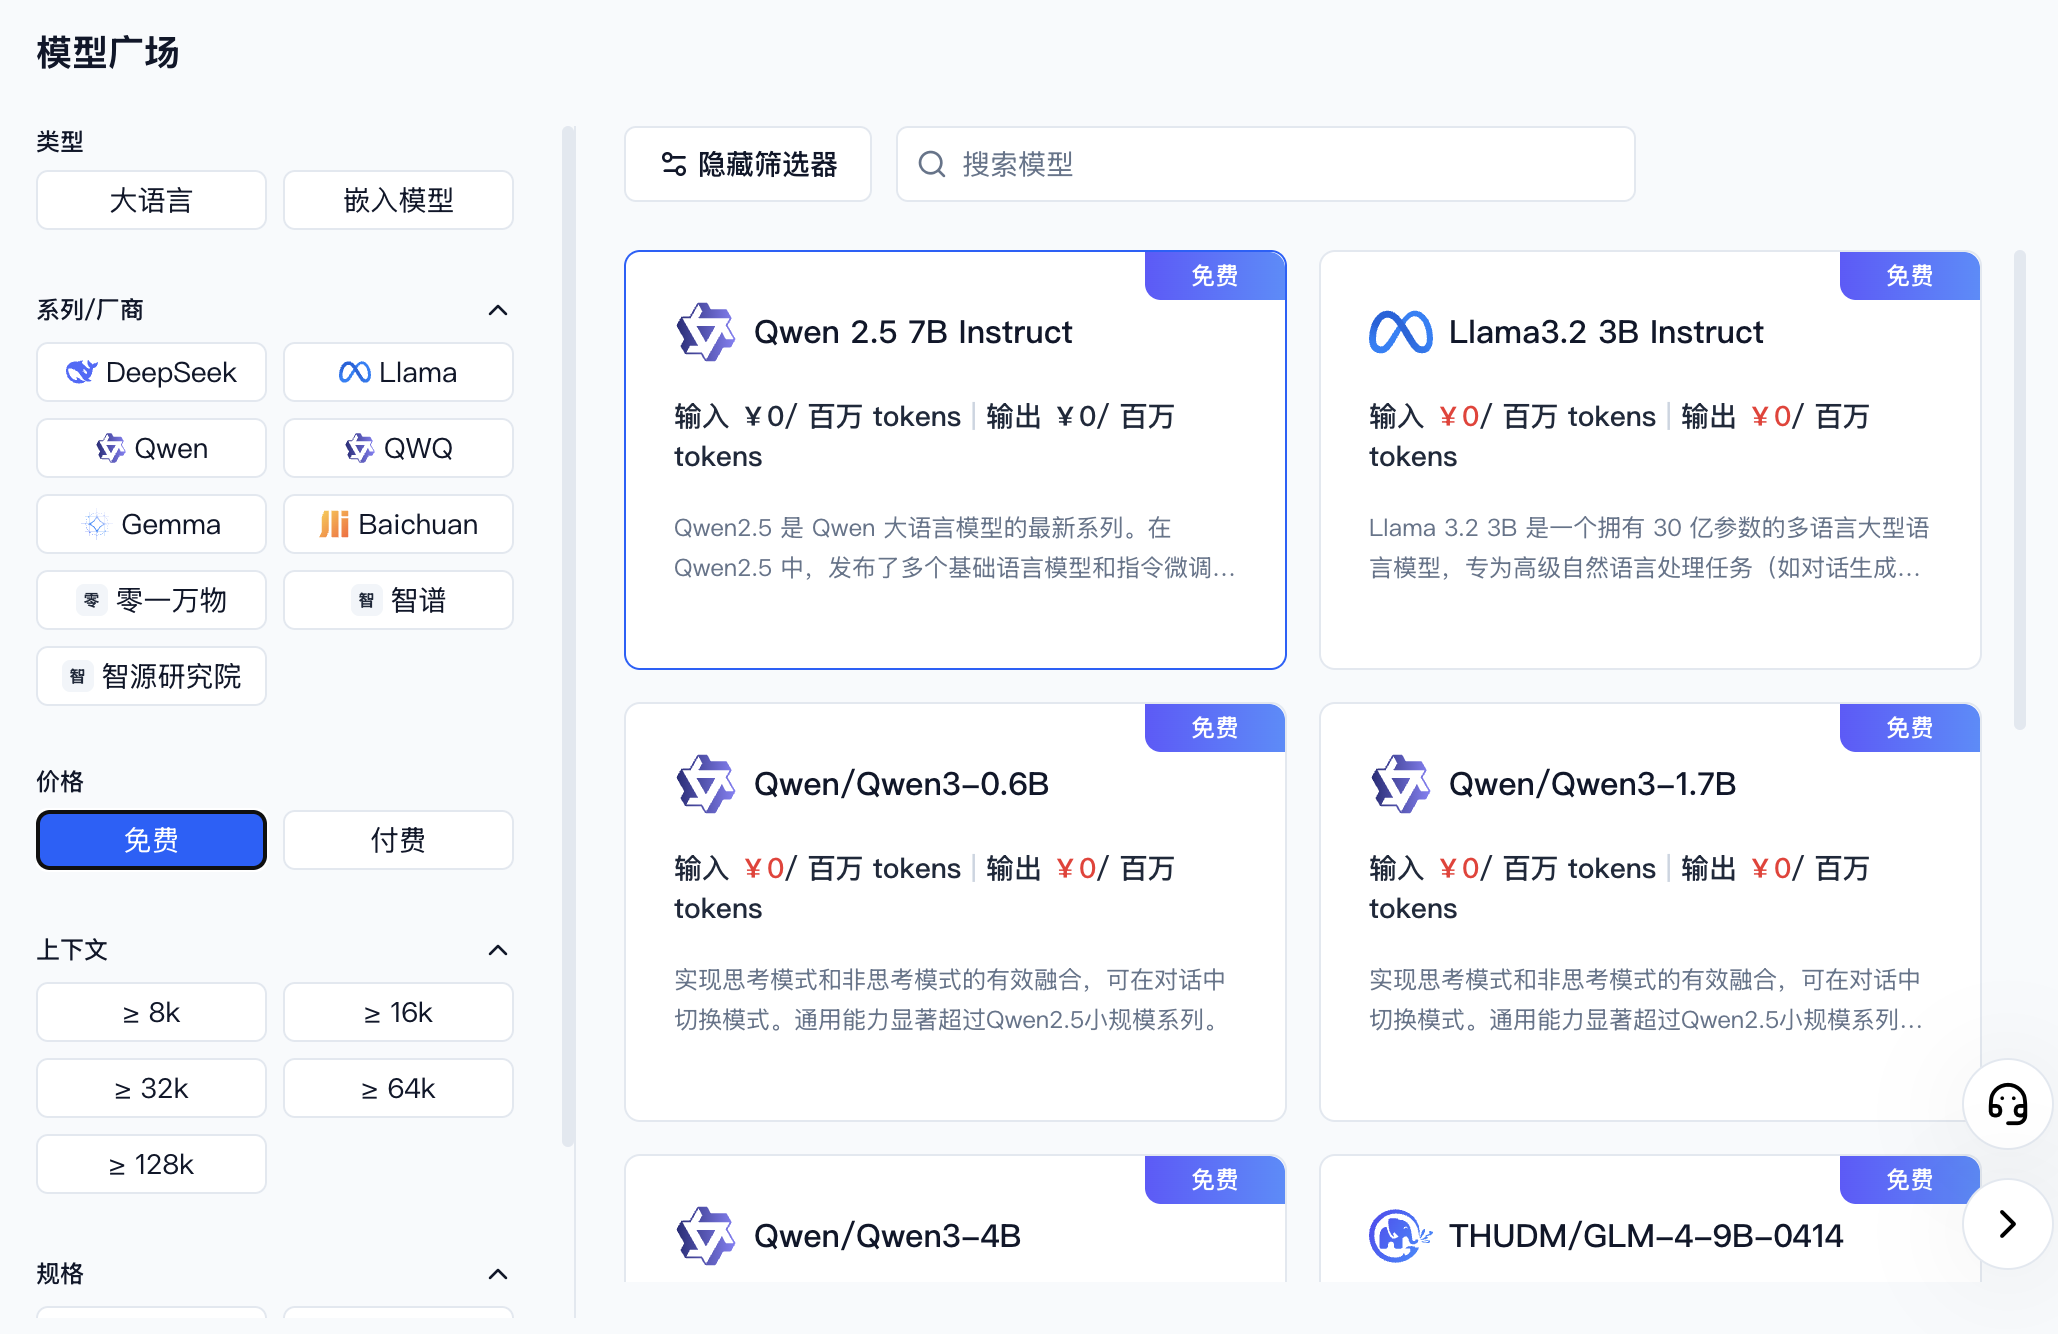
| 进入 [模型 API 服务](https://ppio.cn/model-api/console),找到你想接入的模型。你可以通过筛选器选择不同厂商或者免费的模型。 | ||
| Go to [Model API Service](https://ppio.cn/model-api/console) and find the model you want to use. You can filter by provider or select free models. | ||
|
|
||
|  | ||
|
|
||
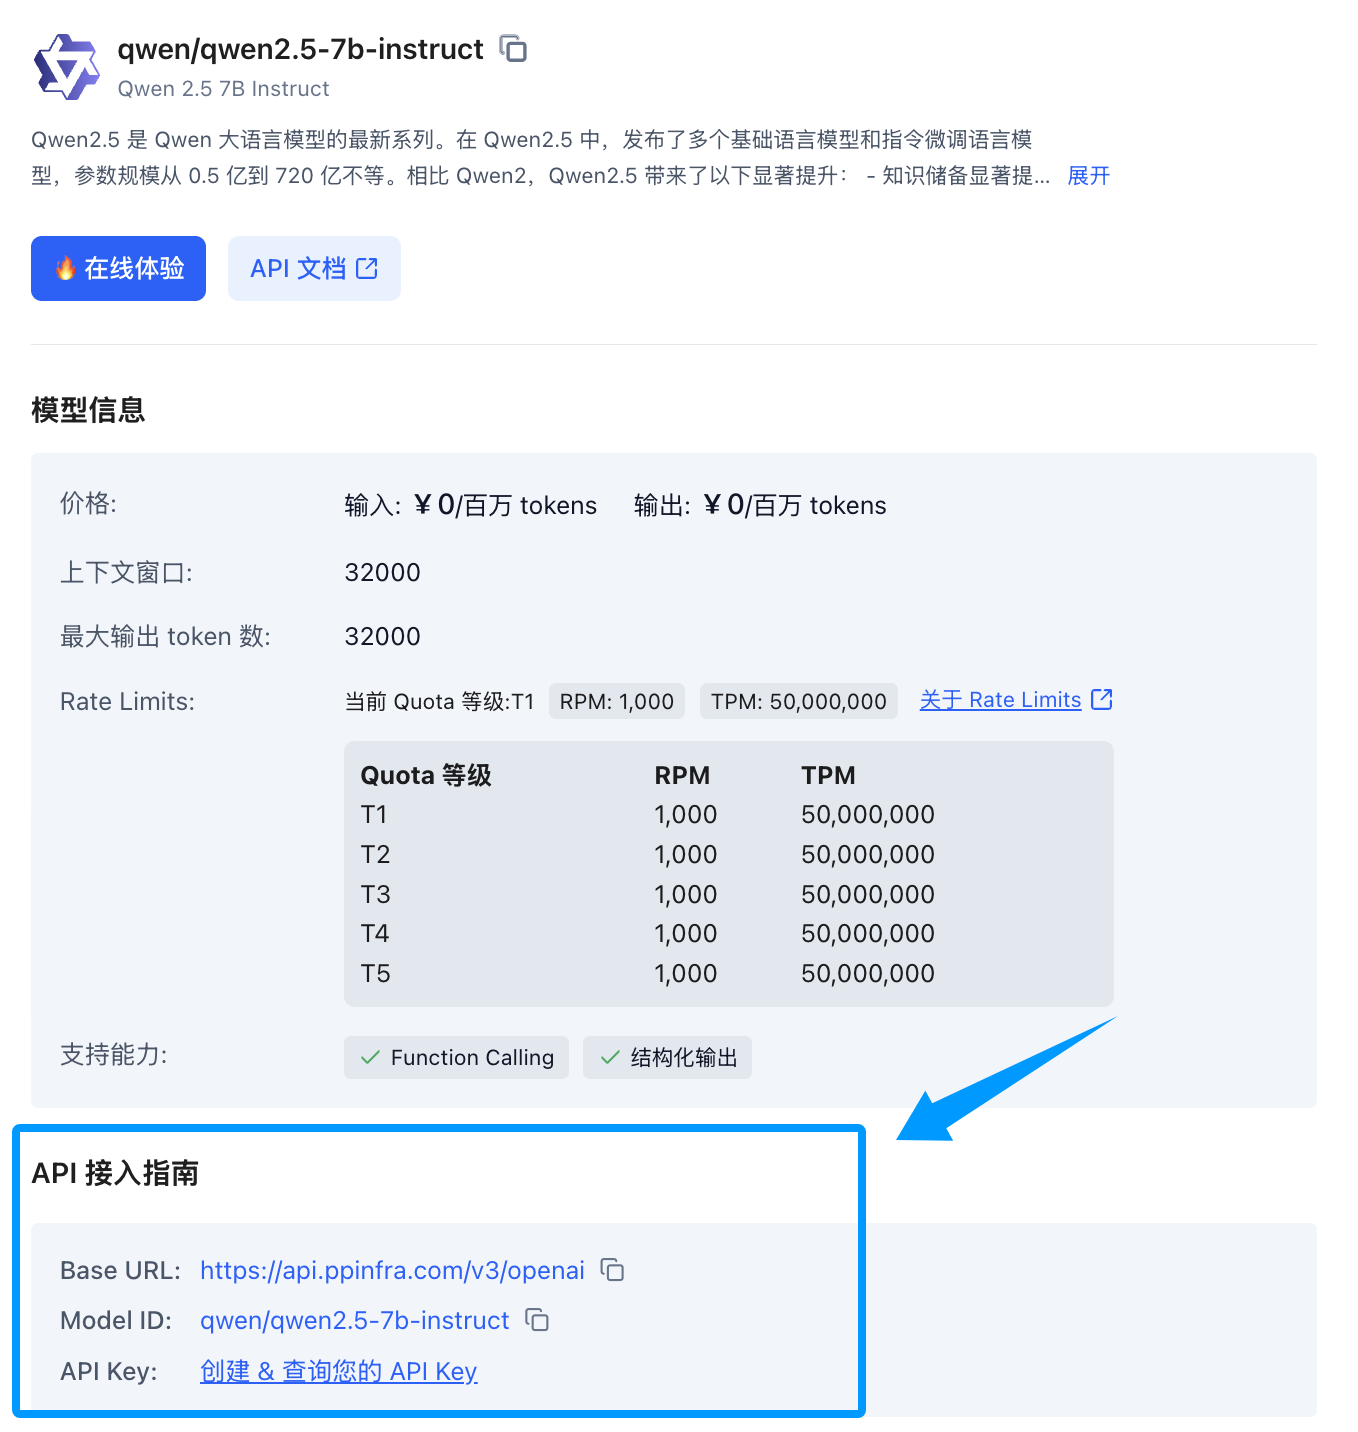
| 找到你想要接入的模型后,点击模型卡片,侧边会展开一个模型详情卡片,找到下方的 API 接入指南,如果您还没创建过 Key 可以点击创建。 | ||
| Once you find the model, click its card to expand a detail panel on the right. Scroll down to the API integration guide — if you haven't created a key yet, click to create one. | ||
|
|
||
|  | ||
|
|
||
| 打开 AstrBot 控制台 -> 服务提供商页面,点击新增提供商,找到并点击 `PPIO派欧云`(需要版本 >= 3.5.10,旧版本也可使用,见下文)。 | ||
| Open the AstrBot dashboard → Service Providers page, click **Add Provider**, find and click `PPIO Cloud` (requires version >= 3.5.10; older versions are also supported, see below). | ||
|
|
||
|  | ||
|
|
||
| 将 API Key 和模型名称填入对话框表单,点击保存,即可完成创建。 | ||
| Fill in the API Key and model name in the dialog form, then click **Save** to complete the setup. | ||
|
|
||
| > [!TIP] | ||
| > 如果您是 AstrBot 旧版本(< 3.5.10)的用户,请打开 AstrBot 控制台 -> 服务提供商页面,点击新增提供商,找到 `OpenAI`,点击进入。 | ||
| > 1. 将 ID 命名为 `ppio`(随意) | ||
| > 2. 然后将 `API Base URL` 设置为 `https://api.ppinfra.com/v3/openai` | ||
| > 3. 然后将 API Key 和模型名称填入对话框表单,点击保存,即可完成创建。 | ||
| > If you are using an older version of AstrBot (< 3.5.10), open the AstrBot dashboard → Service Providers page, click **Add Provider**, find `OpenAI`, and click to enter. | ||
| > 1. Set the ID to `ppio` (any name works) | ||
| > 2. Set `API Base URL` to `https://api.ppinfra.com/v3/openai` | ||
| > 3. Fill in the API Key and model name in the dialog form, then click **Save** to complete the setup. | ||
|
|
||
| ## Usage | ||
|
|
||
| ## 使用 | ||
| Send the `/provider` command to the bot to switch to the PPIO Cloud provider you just added. | ||
|
|
||
| 对机器人输入 `/provider` 指令,将提供商切换到刚刚添加的 PPIO 派欧云提供商,即可使用。 | ||
| ## FAQ | ||
|
|
||
| ## 常见问题 | ||
|
|
||
| #### 显示 `400` 错误 | ||
| #### `400` Error | ||
|
|
||
| ```log | ||
| Error code: 400 - {'code': 400, 'message': '"auto" tool choice requires --enable-auto-tool-choice and --tool-call-parser to be set', 'type': 'BadRequestError'} | ||
| ``` | ||
|
|
||
|
|
||
| 请暂时使用 `/tool off_all` 禁用所有的函数调用工具即可使用,或者换用其他模型。 | ||
| Temporarily disable all function calling tools with `/tool off_all`, or switch to a different model. |
Oops, something went wrong.
Oops, something went wrong.
Add this suggestion to a batch that can be applied as a single commit.
This suggestion is invalid because no changes were made to the code.
Suggestions cannot be applied while the pull request is closed.
Suggestions cannot be applied while viewing a subset of changes.
Only one suggestion per line can be applied in a batch.
Add this suggestion to a batch that can be applied as a single commit.
Applying suggestions on deleted lines is not supported.
You must change the existing code in this line in order to create a valid suggestion.
Outdated suggestions cannot be applied.
This suggestion has been applied or marked resolved.
Suggestions cannot be applied from pending reviews.
Suggestions cannot be applied on multi-line comments.
Suggestions cannot be applied while the pull request is queued to merge.
Suggestion cannot be applied right now. Please check back later.
Uh oh!
There was an error while loading. Please reload this page.