
NVIDIA® Jetson AGX Xavier™ | NVIDIA® Jetson Xavier™ NX
- Flash JetPack on Jetson Xavier
- Check installed
- Change the Python3 default version
- Install python3-pip
- Jetson stats
- Tensorflow
- Opencv 4.5
- Opencv 3.4 (No opencv_contrib)
- PyAudio & Sounddevice
- Librosa 0.6.3
- PyTorch
- Torchaudio
- PyQt5
- Others
- Clone SD card
- AGX Fast Backup
Host電腦端: 準備一台系統為linux的電腦
-
在Host電腦端下載並安裝SDK Manager
-
硬體連接
- 使用盒內Type-c線連接Host電腦端與AGX, 將AGX連接上電腦螢幕.
- 進入Recovery Mode: AGX接上電源並保持關機狀態下, 按住中間的按鍵(Force Recovery)不放開, 再按下左邊的電源(Power)不放開, 等待約兩秒後同時放開.
- 在Host電腦端上輸入lsusb查看是否連線上AGX(NVIDIA Corp.)
-
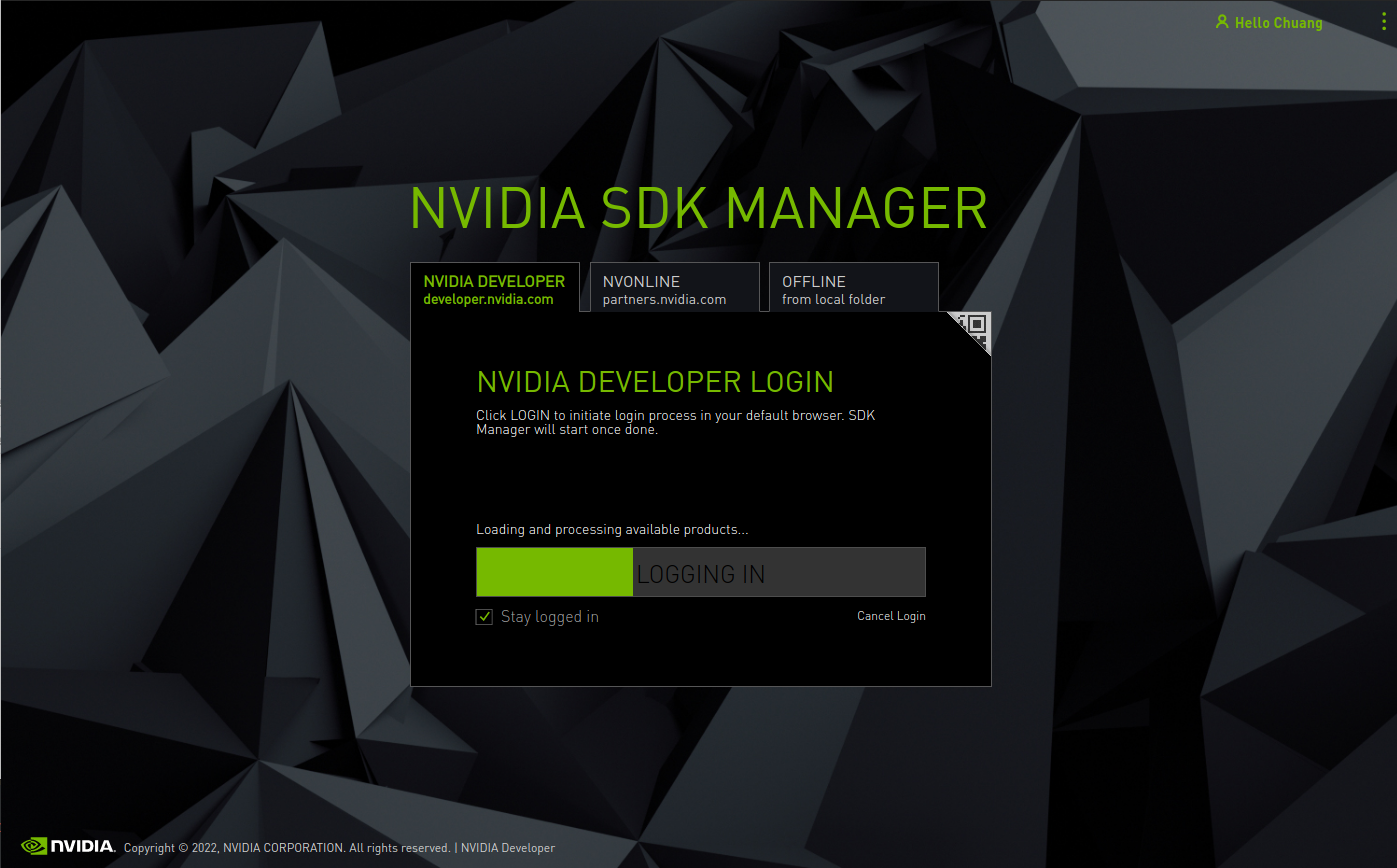
開啟SDK Manager, 登入NVIDIA 帳戶
-
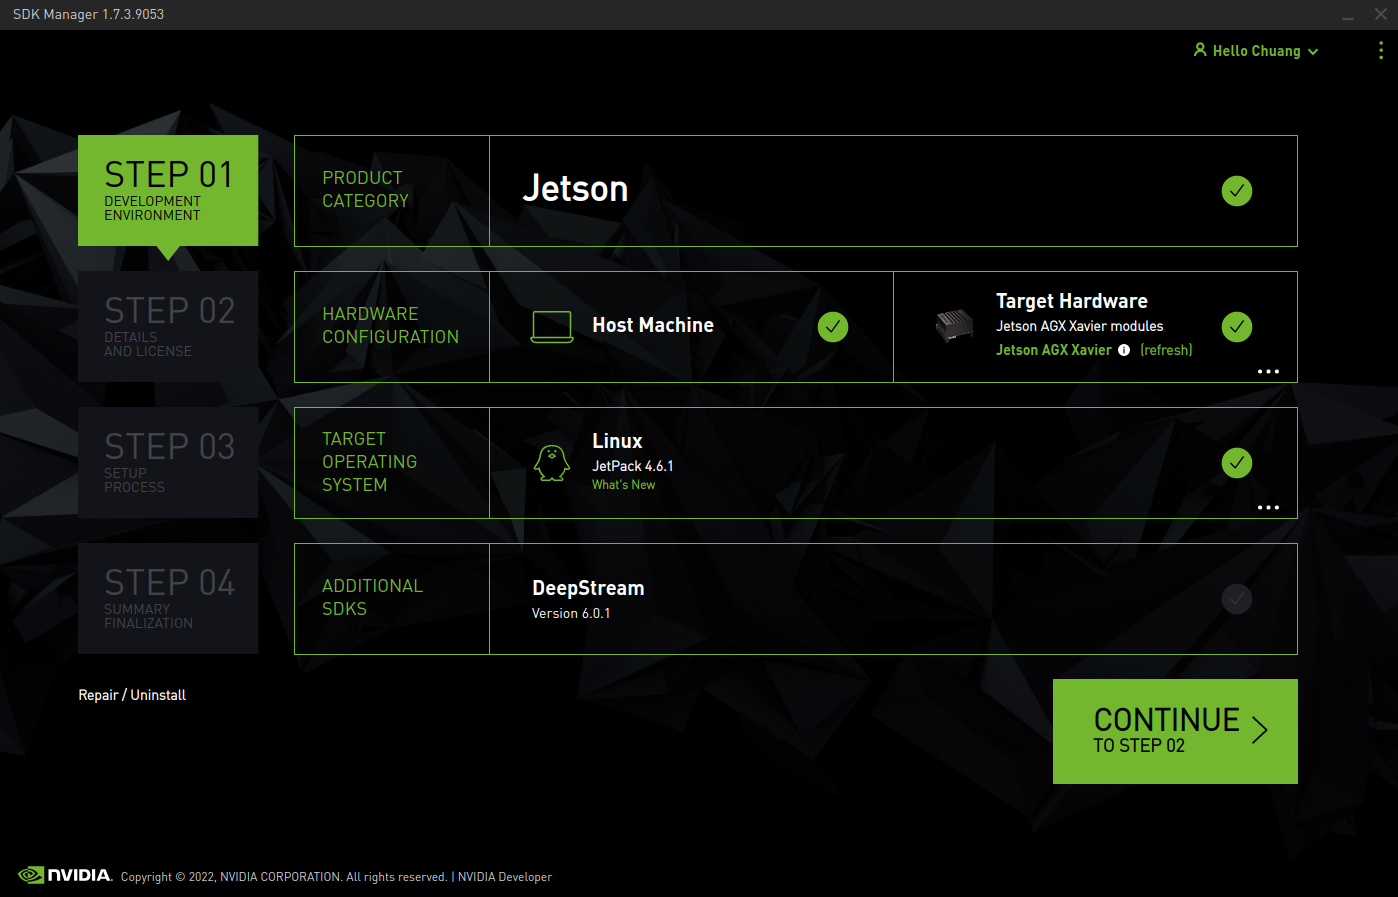
如下圖設定 Jetson AGX , JetPack 4.6.1 , 可勾可不勾DeepStream, 點擊CONTINUE
-
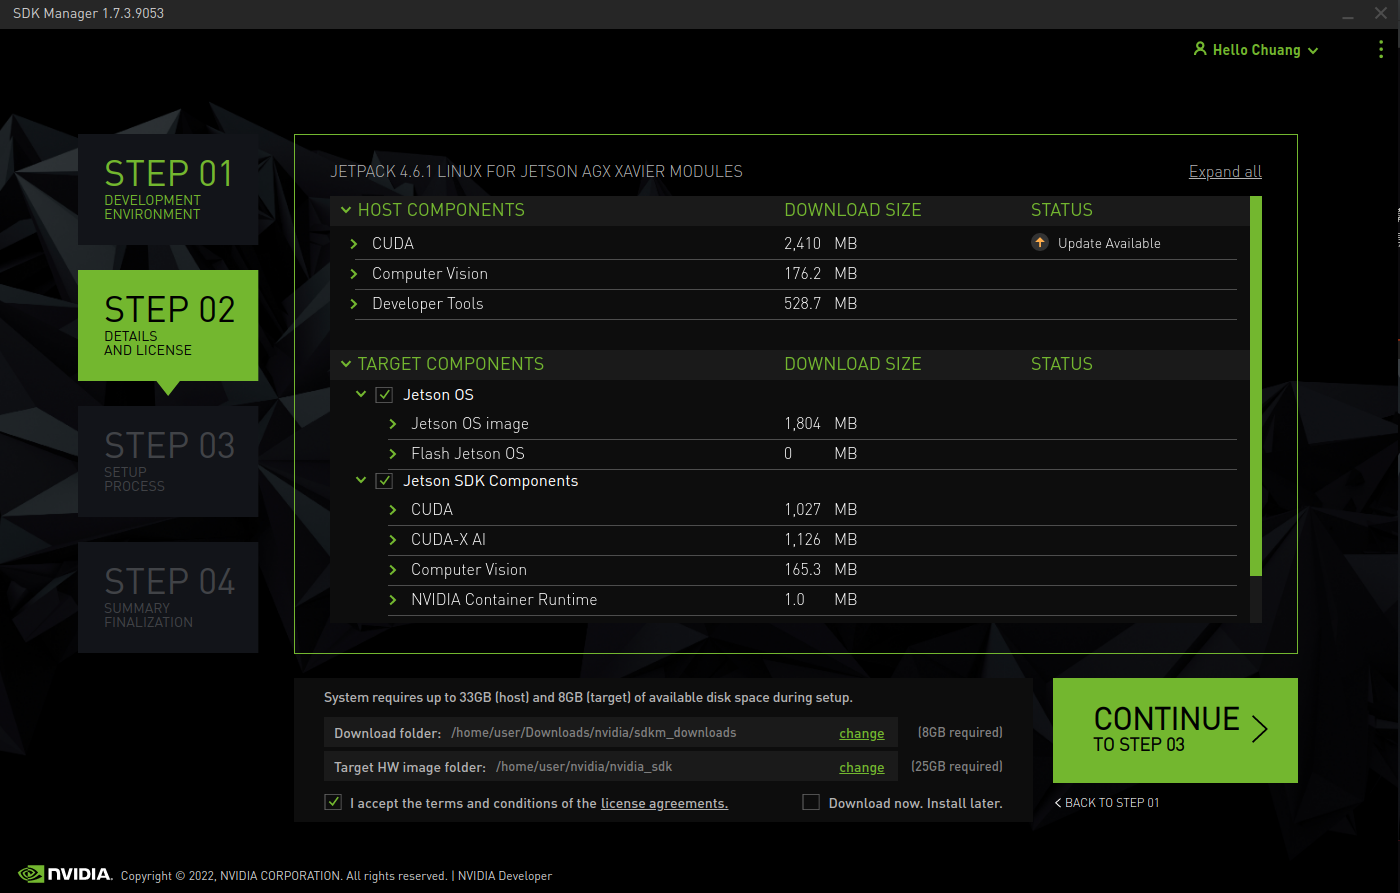
點擊左下 I accept t..., 點擊 CONTINE
-
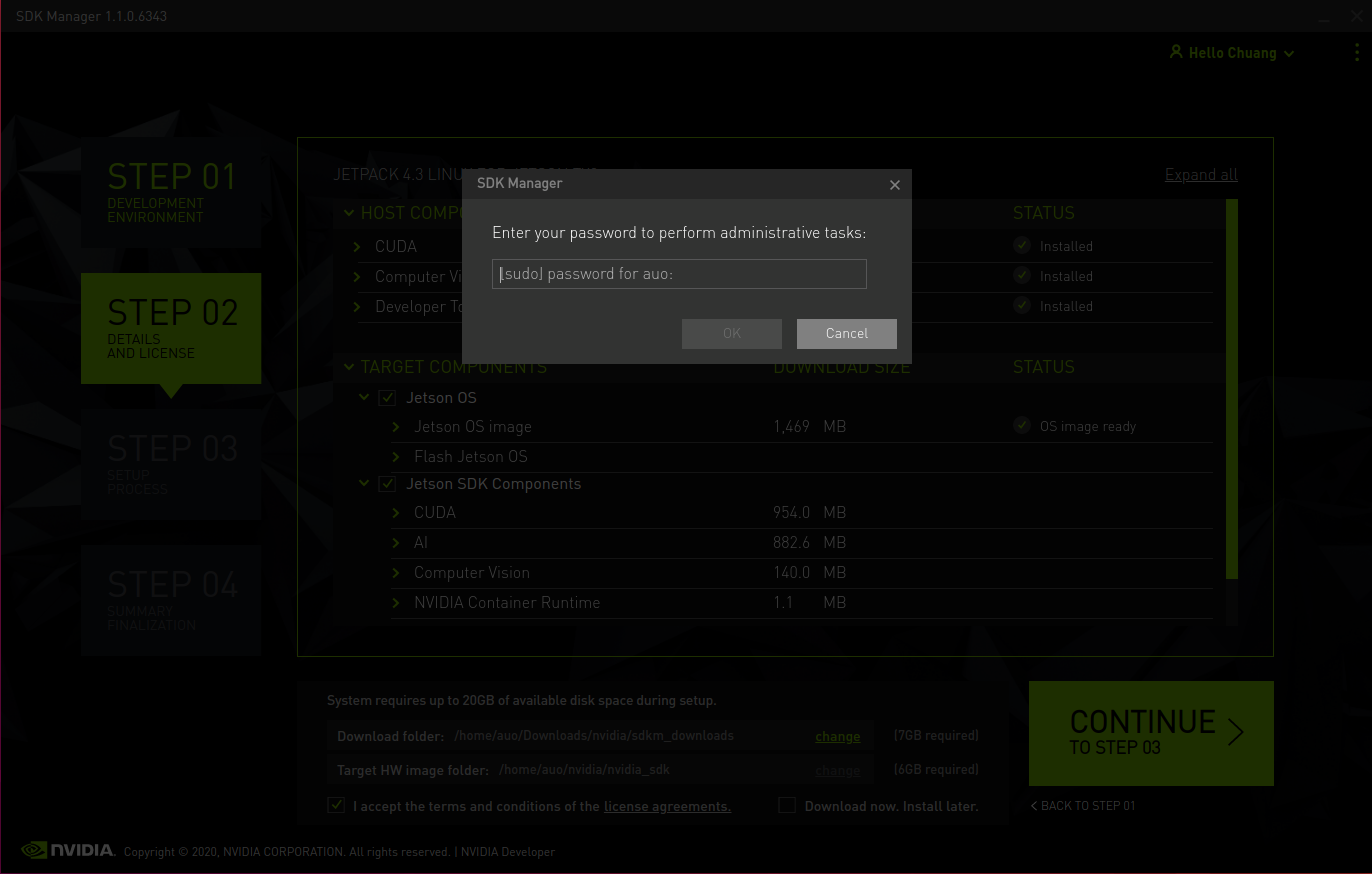
跳出一個視窗要求輸入系統密碼, 輸入系統密碼後以繼續安裝
-
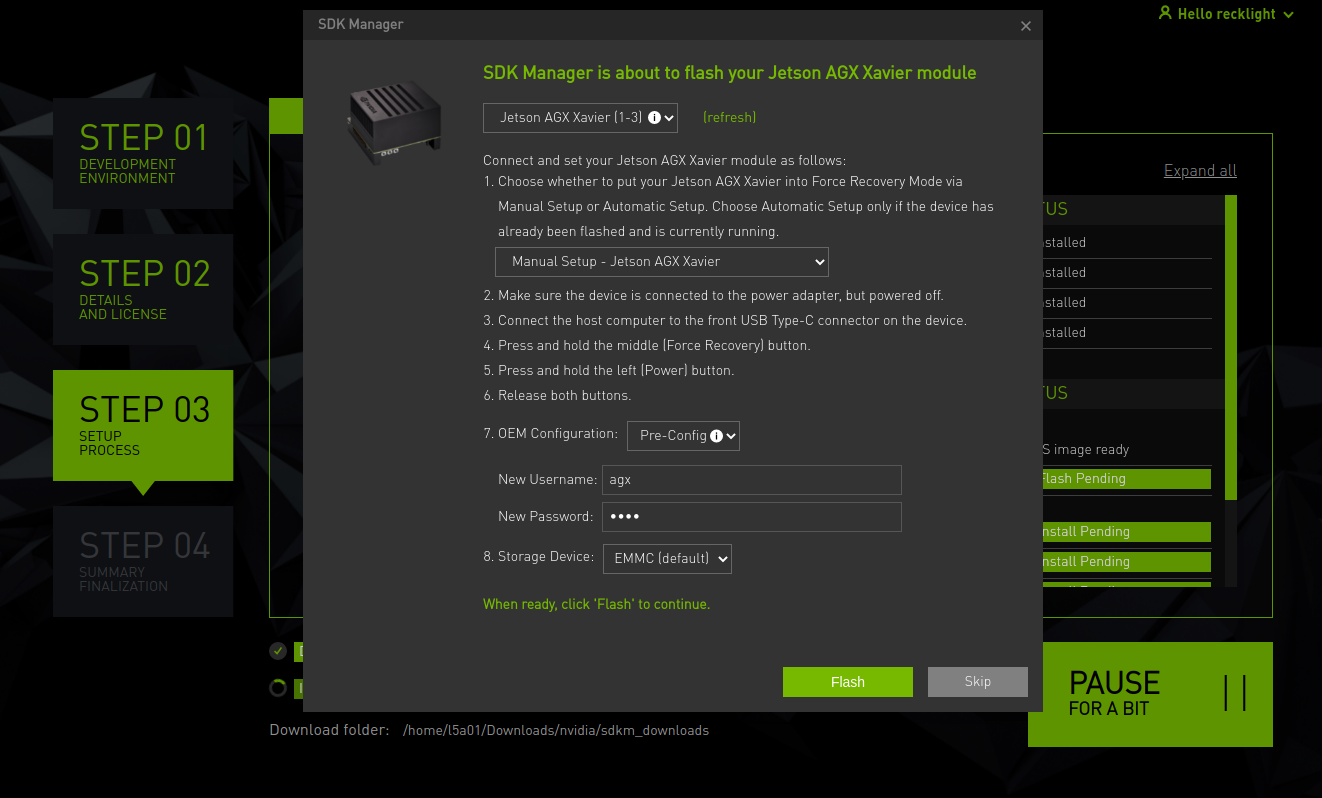
進入 STEP 03, 等待下載及安裝至出現出視窗如下, 點選Manual Setup並按照提示操作後, 點擊Flash
-
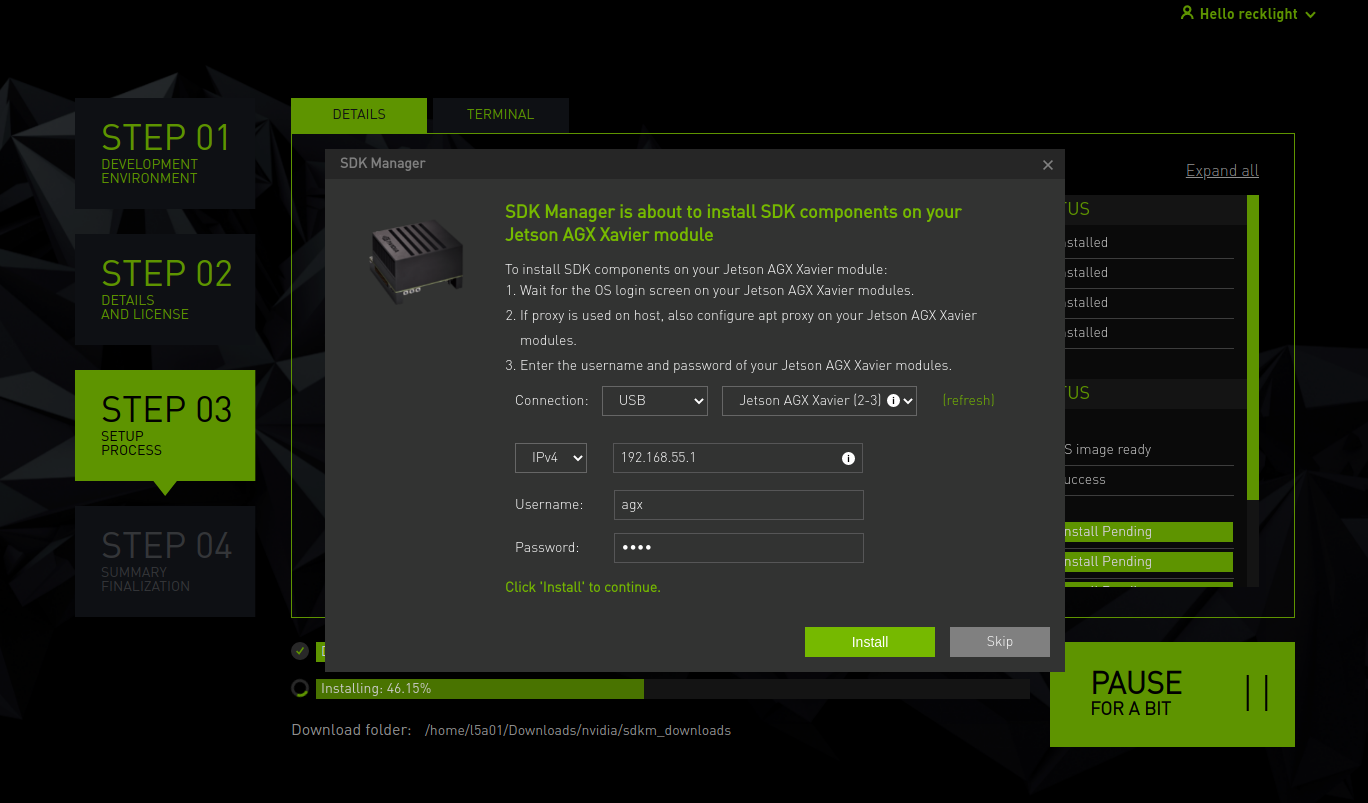
等待出現視窗如下後, 移至AGX, 可以看到系統登入畫面, 請設定系統名稱、密碼等, 自動重開機後, 畫面停留至桌面
-
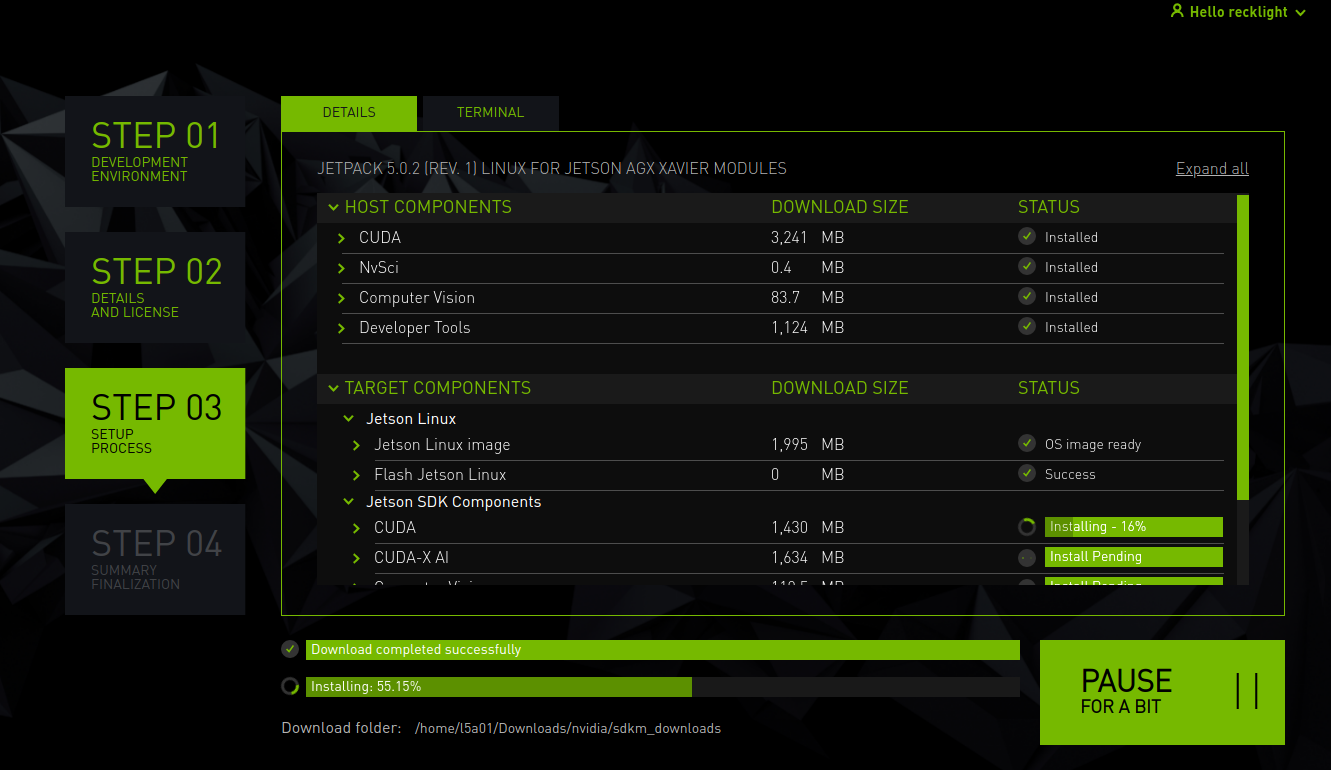
回到Host電腦端輸入剛才在TX2的設定的使用者名稱與密碼, 點擊Install
-
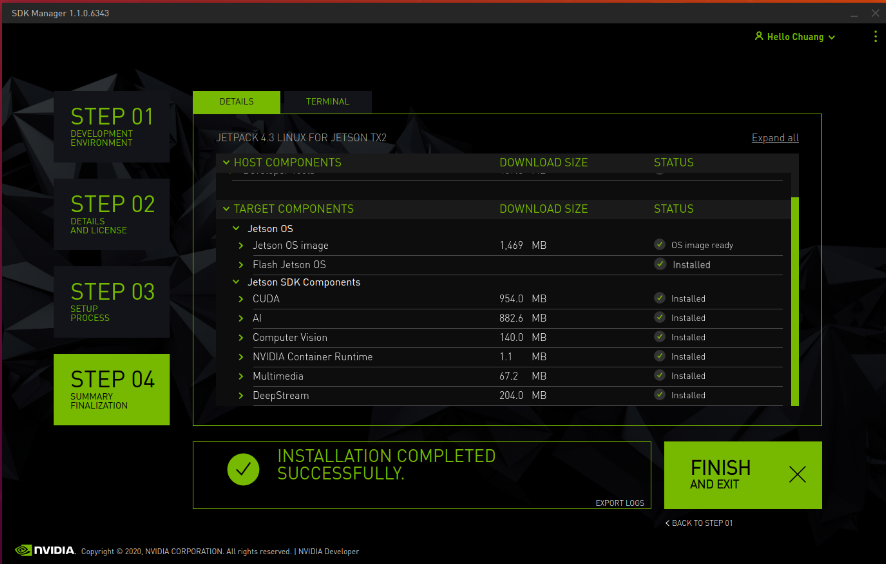
安裝結束, 點擊Finish and exit, 安裝完成
- CUDA
sudo find / -name cudaOr
## set an environment variable for cuda
export PATH=$PATH:/usr/local/cuda/bin
nvcc -V- cuDNN
sudo find / -name libcudnn*- TensorRT
sudo find / -name tensorrt使用alternatives管理多版本軟體 將python版本指定為python2.7
sudo update-alternatives --install /usr/bin/python python /usr/bin/python2.7 100將python版本指定為python3.6
sudo update-alternatives --install /usr/bin/python python /usr/bin/python3.6 150如需切換python版本
sudo update-alternatives --config pythonsudo apt update && sudo apt upgradesudo apt install python3-pipjetson-stats is a package for monitoring and control your NVIDIA Jetson [Xavier NX, Nano, AGX Xavier, TX1, TX2] Works with all NVIDIA Jetson ecosystem
sudo pip3 install jetson-stats-
Install JetPack on your Jetson device.
-
Install system packages required by TensorFlow:
sudo apt install libhdf5-serial-dev hdf5-tools libhdf5-dev zlib1g-dev zip libjpeg8-dev liblapack-dev libblas-dev gfortran
-
Install and upgrade pip3
sudo apt-get install python3-pip
sudo pip3 install -U pip testresources setuptools==49.6.0
-
Install the Python package dependencies
sudo pip3 install -U --no-deps numpy==1.19.4 future==0.18.2 mock==3.0.5 \
keras_preprocessing==1.1.2 keras_applications==1.0.8 gast==0.4.0 \
protobuf pybind11 cython pkgconfig
sudo env H5PY_SETUP_REQUIRES=0 pip3 install -U h5py==3.1.0
-
Install TensorFlow using the pip3 command.
-
對應 Jetpack 版本 - TENSORFLOW VERSION
-
[安裝範例1] 在 Jetpack 4.6 安裝最新版 TensorFlow
sudo pip3 install --pre --extra-index-url https://developer.download.nvidia.com/compute/redist/jp/v46 tensorflow
-
[安裝範例2] 在 Jetpack 4.6 安裝 TensorFlow 版本小於2
sudo pip3 install --pre --extra-index-url https://developer.download.nvidia.com/compute/redist/jp/v46 'tensorflow<2' -
[安裝範例3] 安裝指定版本的 TensorFlow
sudo pip3 install --extra-index-url https://developer.download.nvidia.com/compute/redist/jp/v$JP_VERSION tensorflow==$TF_VERSION+nv$NV_VERSION```
sudo apt install \
python3-dev python3-pip python3-tk \
build-essential make cmake cmake-curses-gui \
g++ libavformat-dev libavutil-dev \
libswscale-dev libv4l-dev libeigen3-dev \
libglew-dev libgtk2.0-dev libdc1394-22-dev libxine2-dev \
libgstreamer1.0-dev libgstreamer-plugins-base1.0-dev \
libjpeg8-dev libjpeg-turbo8-dev libtiff5-dev \
libavcodec-dev libxvidcore-dev libx264-dev libgtk-3-dev \
libatlas-base-dev gfortran libopenblas-dev liblapack-dev liblapacke-dev qt5-default
sudo apt purge libopencv*wget https://github.com/opencv/opencv/archive/4.5.0.zip -O opencv-4.5.0.zip \
&& unzip opencv-4.5.0.zip && cd opencv-4.5.0wget https://github.com/opencv/opencv_contrib/archive/4.5.0.zip -O opencv_contrib-4.5.0.zip \
&& unzip opencv_contrib-4.5.0.zipmkdir build && cd buildcmake \
-D CMAKE_BUILD_TYPE=RELEASE \
-D CMAKE_INSTALL_PREFIX=/usr/local/ \
-D OPENCV_EXTRA_MODULES_PATH=../opencv_contrib-4.5.0/modules \
-D CUDA_ARCH_BIN='7.2' \
-D WITH_CUDA=1 \
-D WITH_V4L=ON \
-D WITH_QT=ON \
-D WITH_FFMPEG=ON \
-D WITH_OPENGL=ON \
-D CUDA_FAST_MATH=1 \
-D WITH_CUBLAS=1 \
-D OPENCV_GENERATE_PKGCONFIG=1 \
-D BUILD_opencv_python2=1 \
-D BUILD_opencv_python3=1 \
-D CUDA_TOOLKIT_ROOT_DIR=/usr/local/cuda \
-D WITH_GTK_2_X=ON ..sudo make -j$(nproc) && sudo make install- 由於AGX系統刷完後空間剩下10GB, 沒有足夠空間安裝opencv額外套件(opencv_contrib)
- 參考 JK Jung's blog
- 參考 Jetsonhacks
sudo apt purge libopencv*sudo apt install --only-upgrade g++-5 cpp-5 gcc-5sudo apt install \
python3-dev python3-pip python3-tk \
build-essential make cmake cmake-curses-gui \
g++ libavformat-dev libavutil-dev \
libswscale-dev libv4l-dev libeigen3-dev \
libglew-dev libgtk2.0-dev libdc1394-22-dev libxine2-dev \
libgstreamer1.0-dev libgstreamer-plugins-base1.0-dev \
libjpeg8-dev libjpeg-turbo8-dev libtiff5-dev \
libavcodec-dev libxvidcore-dev libx264-dev libgtk-3-dev \
libatlas-base-dev gfortran libopenblas-dev liblapack-dev liblapacke-dev qt5-default sudo pip3 install matplotlib==3.3.4 # 注意: 會自動安裝其他matplotlib所需套件, 如果要指定套件版本請自行個別安裝sudo vim /usr/local/lib/python3.6/dist-packages/matplotlib/mpl-data/matplotlibrcsudo vim /usr/local/cuda/include/cuda_gl_interop.h//#if defined(__arm__) || defined(__aarch64__)
//#ifndef GL_VERSION
//#error Please include the appropriate gl headers before including cuda_gl_interop.h
//#endif
//#else
#include <GL/gl.h>
//#endifNext, download opencv-3.4.0 source code, cmake and compile. Note that opencv_contrib modules (cnn/dnn stuffs) would cause problem on pycaffe, so after some experiments I decided not to include those modules at all.
wget https://github.com/opencv/opencv/archive/3.4.0.zip -O opencv-3.4.0.zipunzip opencv-3.4.0.zip && cd opencv-3.4.0mkdir build && cd buildcmake -D CMAKE_BUILD_TYPE=RELEASE \
-D CMAKE_INSTALL_PREFIX=/usr/local \
-D WITH_CUDA=ON \
-D CUDA_ARCH_BIN="7.2" \
-D CUDA_ARCH_PTX="" \
-D WITH_CUBLAS=ON \
-D ENABLE_FAST_MATH=ON \
-D CUDA_FAST_MATH=ON \
-D ENABLE_NEON=ON \
-D WITH_LIBV4L=ON \
-D BUILD_TESTS=OFF \
-D BUILD_PERF_TESTS=OFF \
-D BUILD_EXAMPLES=OFF \
-D WITH_QT=ON \
-D WITH_OPENGL=ON ..
sudo make -j$(nproc) && sudo make installls /usr/local/lib/python3.6/dist-packages/cv2.*
ls /usr/local/lib/python2.7/dist-packages/cv2.*
python3 -c 'import cv2; print(cv2.__version__)'
python2 -c 'import cv2; print(cv2.__version__)'sudo apt install python-all-dev portaudio19-dev libffi-devsudo pip3 install pyaudio sounddevice
# pip install pipwin
# pipwin install pyaudio- How to install the Librosa library in Jetson Nano or aarch64 module
- numba/llvmlite
- llvmlite documents
| llvmlite versions | compatible LLVM versions |
|---|---|
| 0.34.0 - ... | 10.0.x (9.0.x for aarch64 only) |
| 0.33.0 | 9.0.x |
| 0.29.0 - 0.32.0 | 7.0.x, 7.1.x, 8.0.x |
| 0.27.0 - 0.28.0 | 7.0.x |
| 0.23.0 - 0.26.0 | 6.0.x |
| 0.21.0 - 0.22.0 | 5.0.x |
| 0.17.0 - 0.20.0 | 4.0.x |
| 0.16.0 - 0.17.0 | 3.9.x |
| 0.13.0 - 0.15.0 | 3.8.x |
| 0.9.0 - 0.12.1 | 3.7.x |
| 0.6.0 - 0.8.0 | 3.6.x |
| 0.1.0 - 0.5.1 | 3.5.x |
sudo pip3 install -U setuptools
sudo pip3 install cythonwget http://releases.llvm.org/7.0.1/llvm-7.0.1.src.tar.xz \
tar -xvf llvm-7.0.1.src.tar.xz \
cd llvm-7.0.1.src && mkdir llvm_build_dir && cd llvm_build_dir/ \
cmake ../ -DCMAKE_BUILD_TYPE=Release -DLLVM_TARGETS_TO_BUILD="ARM;X86;AArch64" \
sudo make -j$(nproc) && sudo make installcd bin/ \
echo "export LLVM_CONFIG=\""`pwd`"/llvm-config\"" >> ~/.bashrc \
echo "alias llvm='"`pwd`"/llvm-lit'" >> ~/.bashrc \
source ~/.bashrcsudo pip3 install llvmlite==0.32.1sudo apt install libblas-dev liblapack-dev libatlas-base-dev gfortransudo pip3 install numba==0.38.0 # numba==0.48.0sudo pip3 install scipy==1.1.0 # scipy==1.4.1sudo pip3 install joblib==0.12 # joblib==0.14sudo pip3 install scikit-learn==0.21.1sudo pip3 install librosa==0.6.3 # librosa==0.7.2- 如果 joblib 有問題 可以嘗試更新 joblib
sudo apt install python3-pip libopenblas-base libopenmpi-dev
sudo apt install libjpeg-dev zlib1g-dev
sudo pip3 install Cython
wget https://nvidia.box.com/shared/static/cs3xn3td6sfgtene6jdvsxlr366m2dhq.whl -O torch-1.7.0-cp36-cp36m-linux_aarch64.whl
sudo pip3 install torch-1.7.0-cp36-cp36m-linux_aarch64.whl
git clone --branch v0.8.1 https://github.com/pytorch/vision torchvision
cd torchvision && sudo python setup.py installwget https://nvidia.box.com/shared/static/p57jwntv436lfrd78inwl7iml6p13fzh.whl -O torch-1.8.0-cp36-cp36m-linux_aarch64.whl
sudo pip3 install torch-1.8.0-cp36-cp36m-linux_aarch64.whl
git clone --branch v0.9.0 https://github.com/pytorch/vision torchvision
cd torchvision && sudo python setup.py installwget https://nvidia.box.com/shared/static/fjtbno0vpo676a25cgvuqc1wty0fkkg6.whl -O torch-1.10.0-cp36-cp36m-linux_aarch64.whl
sudo pip3 install torch-1.10.0-cp36-cp36m-linux_aarch64.whl
git clone --branch v0.11.3 https://github.com/pytorch/vision torchvision
cd torchvision && sudo python setup.py install
git clone https://github.com/pytorch/audio.git torchaudio --branch v0.7.2sudo apt install sox libsox-dev libsox-fmt-allcd torchaudio && sudo python setup.py installIf build wheel error, try Method 2
sudo apt install qt5-default python3-pyqt5 pyqt5-dev-tools qttools5-dev-toolssudo pip3 install pyqt5==5.15.6 # 測試中
# pyqt5-sip==12.9.1
# sudo pip3 install sip==5.0.1If you have an old version of SIP
sudo apt remove python3-sipwget https://www.riverbankcomputing.com/static/Downloads/sip/4.19.25/sip-4.19.25.tar.gz
tar -xvf sip-4.19.25.tar.gz
cd sip-4.19.25python3 configure.py
make -j$(nproc) && sudo make installpython3 configure.py
make -j$(nproc) && sudo make installsudo apt install python3-pyqt5.qtmultimediapip install kudio- 如果遇到ubuntu20.04系統無法安裝PyAudio
sudo apt -y install portaudio19-dev
# pip install PyAudio-0.2.11-cp38-cp38-linux_x86_64.whlsudo pip install pyusb click xlsxwriter tqdm imutils qdarkstylesudo pip install pandas==1.1.4 PyYAML==5.3.1 --ignore-installedsudo pip install seaborn==0.11.0 # 注意, 會自動安裝相關套件!!sudo dpkg-reconfigure dashsudo apt install filezilla curl- 不推薦, 但是如果你真的裝不起來再試試這個
sudo apt install python3-matplotlib
sudo pip install pyqtgraph==0.11.1sudo apt install vsftpd
# systemctl status vsftpd
# netstat -tupln | grep ftpsudo vi /etc/vsftpd.conf
# Allow anonymous FTP? (Disabled by default).
anonymous_enable=YES
# Uncomment this to enable any form of FTP write command.
write_enable=YES
# Uncomment this to allow the anonymous FTP user to upload files. This only
# has an effect if the above global write enable is activated. Also, you will
# obviously need to create a directory writable by the FTP user.
anon_upload_enable=YESsudo systemctl restart vsftpdsudo apt install firefoxsudo apt install kolourpaint4sudo add-apt-repository universe && sudo apt install exfat-fuse exfat-utilssudo apt install default-jre # sudo apt install default-jdksudo fdisk -lsudo dd if=/dev/sda conv=sync,noerror bs=1M status=progress | gzip -c > ./backup.img.gzsudo gunzip -c ./backup.img.gz | sudo dd of=/dev/sda bs=1M status=progress- AGX快速備份與平展, 不須透過 NVIDIA SDK Manager, 平均20分鐘內可安裝完成一台
Coming soon