
![]()


![]()


EMHASS is a Python module designed to optimize your home energy interfacing with Home Assistant.
EMHASS (Energy Management for Home Assistant) is an optimization tool designed for residential households. The package uses a Linear Programming approach to optimize energy usage while considering factors such as electricity prices, power generation from solar panels, and energy storage from batteries. EMHASS provides a high degree of configurability, making it easy to integrate with Home Assistant and other smart home systems. Whether you have solar panels, energy storage, or just a controllable load, EMHASS can provide an optimized daily schedule for your devices, allowing you to save money and minimize your environmental impact.
The complete documentation for this package is available here.
EMHASS and Home Assistant provide a comprehensive energy management solution that can optimize energy usage and reduce costs for households. By integrating these two systems, households can take advantage of advanced energy management features that provide significant cost savings, increased energy efficiency, and greater sustainability.
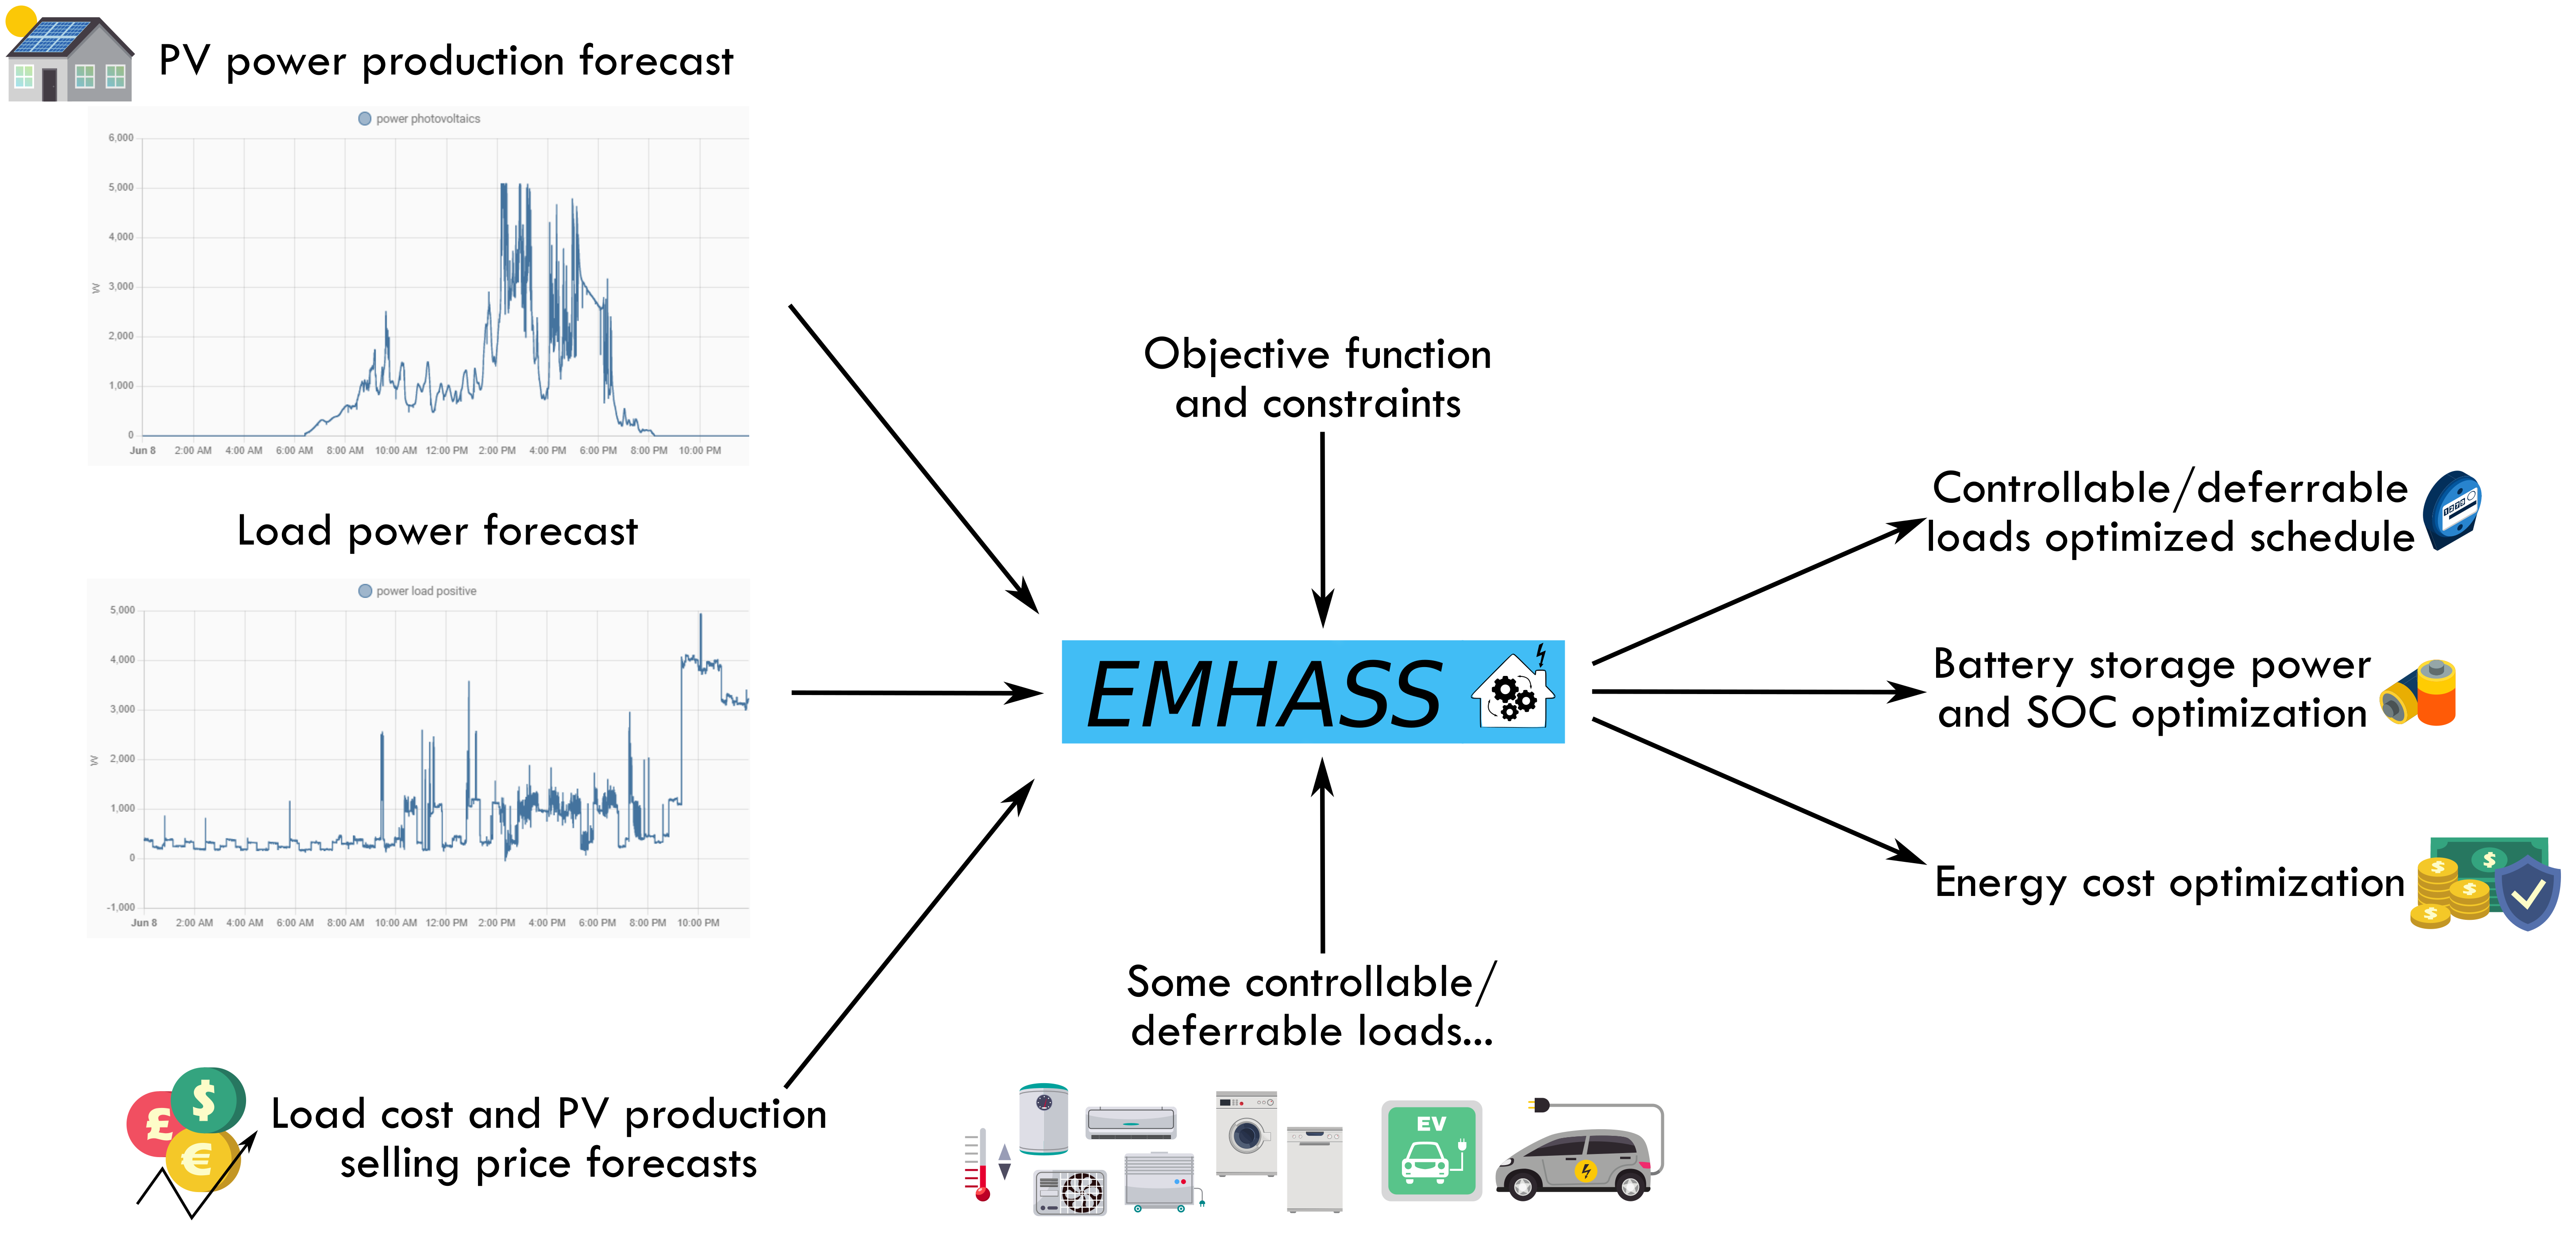
EMHASS is a powerful energy management tool that generates an optimization plan based on variables such as solar power production, energy usage, and energy costs. The plan provides valuable insights into how energy can be better managed and utilized in the household. Even if households do not have all the necessary equipment, such as solar panels or batteries, EMHASS can still provide a minimal use case solution to optimize energy usage for controllable/deferrable loads.
Home Assistant provides a platform for the automation of household devices based on the optimization plan generated by EMHASS. This includes devices such as batteries, pool pumps, hot water heaters, and electric vehicle (EV) chargers. By automating EV charging and other devices, households can take advantage of off-peak energy rates and optimize their EV charging schedule based on the optimization plan generated by EMHASS.
One of the main benefits of integrating EMHASS and Home Assistant is the ability to customize and tailor the energy management solution to the specific needs and preferences of each household. With EMHASS, households can define their energy management objectives and constraints, such as maximizing self-consumption or minimizing energy costs, and the system will generate an optimization plan accordingly. Home Assistant provides a platform for the automation of devices based on the optimization plan, allowing households to create a fully customized and optimized energy management solution.
Overall, the integration of EMHASS and Home Assistant offers a comprehensive energy management solution that provides significant cost savings, increased energy efficiency, and greater sustainability for households. By leveraging advanced energy management features and automation capabilities, households can achieve their energy management objectives while enjoying the benefits of more efficient and sustainable energy usage, including optimized EV charging schedules.
The package flow can be graphically represented as follows:
The package is meant to be highly configurable with an object-oriented modular approach and a main configuration file defined by the user. EMHASS was designed to be integrated with Home Assistant, hence its name. Installation instructions and example Home Assistant automation configurations are given below.
You must follow these steps to make EMHASS work properly:
-
Install and run EMHASS.
- There are multiple methods of installing and Running EMHASS. See Installation Method below to pick a method that best suits your use case.
-
Define all the parameters in the configuration file (
config.json) or configuration page (YOURIP:5000/configuration).- Since EMHASS v0.12.0: the default configuration does not need to retrieve any data from Home Assistant! After installing and running the add-on, EMHASS should start and it will be ready to launch an optimization.
- See the description for each parameter in the configuration docs.
- EMHASS has a default configuration with 2 deferrable loads, no solar PV, no batteries and a basic load power forecasting method.
- If you want to consider solar PV and more advanced load power forecast methods, you will need to define the main data entering EMHASS. This will be the Home Assistant sensor/variable
sensor.power_load_no_var_loads, for the load power of your household excluding the power of the deferrable loads that you want to optimize, and the sensor/variablesensor.power_photovoltaicsfor the name of your Home Assistant variable containing the PV produced power (if solar PV is activated). - If you have a PV installation then this dedicated web app can be useful for finding your inverter and solar panel models: https://emhass-pvlib-database.streamlit.app/
- If you want to consider solar PV and more advanced load power forecast methods, you will need to define the main data entering EMHASS. This will be the Home Assistant sensor/variable
-
Launch the optimization and check the results.
- This can be done manually using the buttons in the web UI
- Or with a
curlcommand like this:curl -i -H 'Content-Type:application/json' -X POST -d '{}' http://localhost:5000/action/dayahead-optim.
-
If you’re satisfied with the optimization results then you can set the optimization and data publish task commands in an automation.
- You can read more about this in the usage section below.
-
The final step is to link the deferrable loads variables to real switches on your installation.
- An example code for this using automations and the shell command integration is presented below in the usage section.
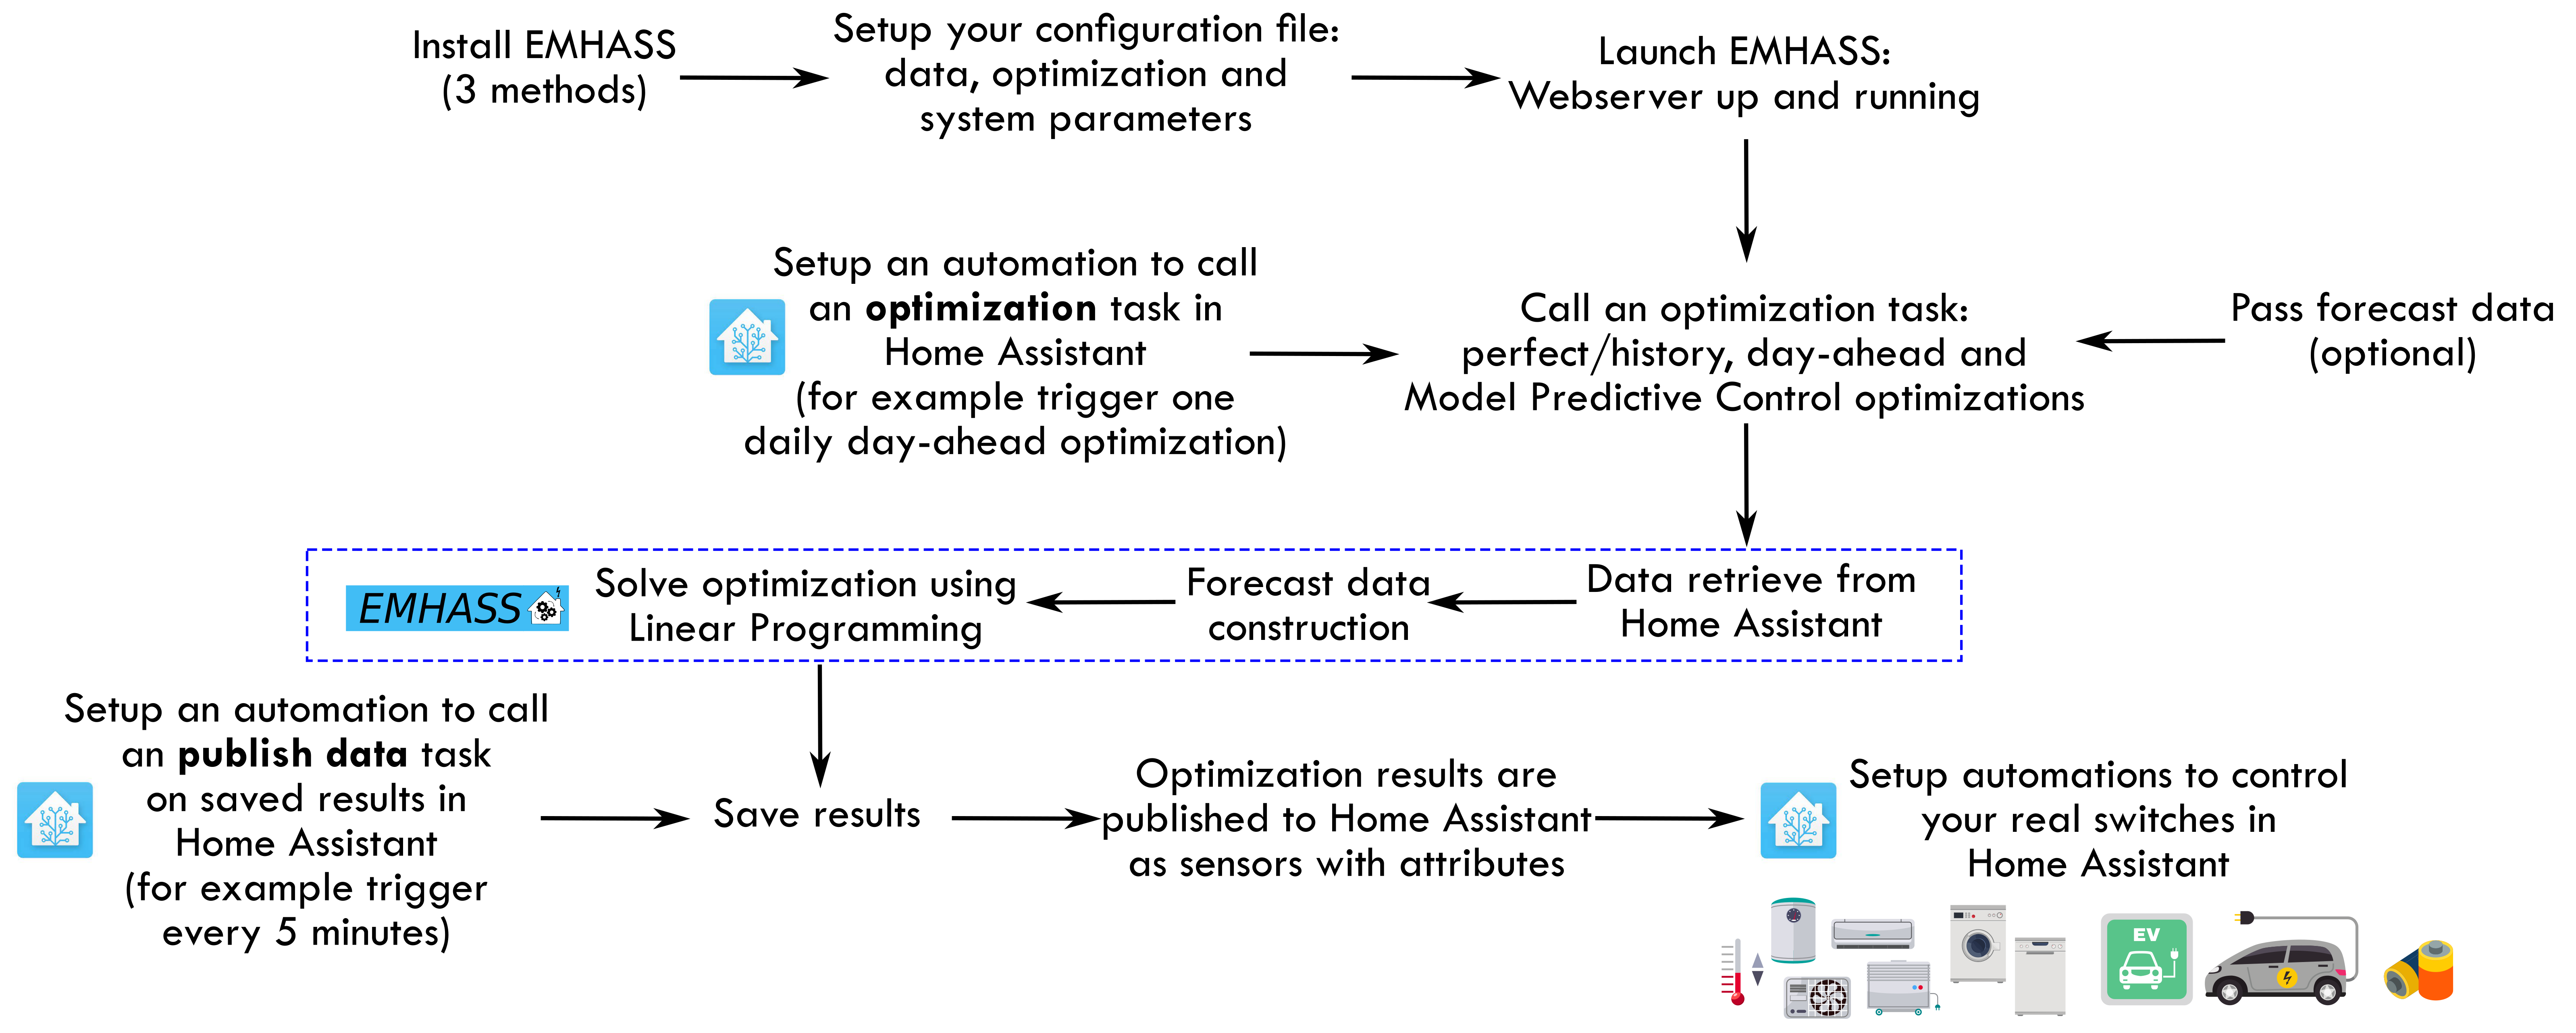
A more detailed workflow is given below:
For Home Assistant OS and HA Supervised users, A EMHASS an add-on repository has been developed to allow the EMHASS Docker container to run as a Home Assistant Addon. The add-on is more user-friendly as the Home Assistant secrets (URL and API key) are automatically placed inside of the EMHASS container, and web server port (default 5000) is already opened.
You can find the add-on with the installation instructions here: https://github.com/davidusb-geek/emhass-add-on
These architectures are supported: amd64 and aarch64 (currently armv7 and armhf are not supported).
Note: Both EMHASS via Docker and EMHASS-Add-on contain the same Docker image. The EMHASS-Add-on repository however, stores Home Assistant addon specific configuration information and maintains EMHASS image version control.
You can also install EMHASS using Docker as a container. This can be in the same machine as Home Assistant (if your running Home Assistant as a Docker container) or in a different distant machine. The "share" folder is where EMHASS stores the config.json file. In the examples below adjust the "-v" volume mappings to reflect where your path to the local host directory needs to be mapped to. To install first pull the latest image:
# pull Docker image
docker pull ghcr.io/davidusb-geek/emhass:latest
# run Docker image, mounting the dir storing config.json and secrets_emhass.yaml from host
docker run --rm -it --restart always  -p 5000:5000 --name emhass-container -v /emhass/share:/share/ -v /emhass/secrets_emhass.yaml:/app/secrets_emhass.yaml ghcr.io/davidusb-geek/emhass:latest
Note it is not recommended to install the latest EMHASS image with :latest (as you would likely want to control when you update EMHASS version). Instead, find the latest version tag (E.g: v0.2.1) and replace latest
You can also build your image locally. For this clone this repository, and build the image from the Dockerfile:
# git clone EMHASS repo
git clone https://github.com/davidusb-geek/emhass.git
# move to EMHASS directory
cd emhass
# build Docker image
# may need to set architecture tag (docker build --build-arg TARGETARCH=amd64 -t emhass-local .)
docker build -t emhass-local .
# run built Docker image, mounting config.json and secrets_emhass.yaml from host
docker run --rm -it -p 5000:5000 --name emhass-container -v /emhass/share:/share -v /emhass/secrets_emhass.yaml:/app/secrets_emhass.yaml emhass-local
Before running the docker container, make sure you have a designated folder for emhass on your host device and a secrets_emhass.yaml file. You can get a example of the secrets file from secrets_emhass(example).yaml file on this repository.
# cli example of creating an emhass directory and appending a secrets_emhass.yaml file inside
mkdir ~/emhass
cd ~/emhass
cat <<EOT >> ~/emhass/secrets_emhass.yaml
hass_url: https://myhass.duckdns.org/
long_lived_token: thatverylongtokenhere
time_zone: Europe/Paris
lat: 45.83
lon: 6.86
alt: 4807.8
EOT
docker run --rm -it --restart always -p 5000:5000 --name emhass-container -v /emhass/share:/share -v /emhass/secrets_emhass.yaml:/app/secrets_emhass.yaml ghcr.io/davidusb-geek/emhass:latest-
You can create a
config.jsonfile prior to running emhass. (obtain a example from: config_defaults.json Alteratively, you can insert your parameters into the configuration page on the EMHASS web server. (for EMHASS to auto create a config.json) With either option, the volume mount-v /emhass/share:/shareshould be applied to make sure your config is stored on the host device. (to be not deleted when the EMHASS container gets removed/image updated)* -
If you wish to keep a local, semi-persistent copy of the EMHASS-generated data, create a local folder on your device, then mount said folder inside the container.
#create data folder
mkdir -p ~/emhass/data
docker run -it --restart always -p 5000:5000 -e LOCAL_COSTFUN="profit" -v /emhass/share:/share -v /emhass/data:/data  -v /emhass/secrets_emhass.yaml:/app/secrets_emhass.yaml --name DockerEMHASS <REPOSITORY:TAG>
-
If you wish to set the web_server's homepage optimization diagrams to a timezone other than UTC, set
TZenvironment variable on docker run:docker run -it --restart always -p 5000:5000 -e TZ="Europe/Paris" -v /emhass/share:/share -v /emhass/secrets_emhass.yaml:/app/secrets_emhass.yaml --name DockerEMHASS <REPOSITORY:TAG>
If you wish to run EMHASS optimizations with cli commands. (no persistent web server session) you can run EMHASS via the python package alone (not wrapped in a Docker container).
With this method it is recommended to install on a virtual environment.
-
Create and activate a virtual environment:
python3 -m venv ~/emhassenv
cd ~/emhassenv
source bin/activate
-
Install using the distribution files:
python3 -m pip install emhass
-
Create and store configuration (config.json), secret (secrets_emhass.yaml) and data (/data) files in the emhass dir (
~/emhassenv)
Note: You may wish to copy theconfig.json(config_defaults.json),secrets_emhass.yaml(secrets_emhass(example).yaml) and/or/scripts/files from this repository to the~/emhassenvfolder for a starting point and/or to run the bash scripts described below. -
To upgrade the installation in the future just use:
python3 -m pip install --upgrade emhass
If using the add-on or the Docker installation, it exposes a simple webserver on port 5000. You can access it directly using your browser. (E.g.: http://localhost:5000)
With this web server, you can perform RESTful POST commands on multiple ENDPOINTS with the prefix action/*:
- A POST call to
action/perfect-optimto perform a perfect optimization task on the historical data. - A POST call to
action/dayahead-optimto perform a day-ahead optimization task of your home energy. - A POST call to
action/naive-mpc-optimto perform a naive Model Predictive Controller optimization task. If using this option you will need to define the correctruntimeparams(see "Passing data to EMHASS" section). - A POST call to
action/publish-datato publish the optimization results data for the current timestamp. - A POST call to
action/forecast-model-fitto train a machine learning forecaster model with the passed data (see the dedicated section for more help). - A POST call to
action/forecast-model-predictto obtain a forecast from a pre-trained machine learning forecaster model (see the dedicated section for more help). - A POST call to
action/forecast-model-tuneto optimize the machine learning forecaster models hyperparameters using Bayesian optimization (see the dedicated section for more help).
A curl command can then be used to launch an optimization task like this: curl -i -H 'Content-Type:application/json' -X POST -d '{}' http://localhost:5000/action/dayahead-optim.
To run a command simply use the emhass CLI command followed by the needed arguments.
The available arguments are:
--action: This is used to set the desired action, options are:perfect-optim,dayahead-optim,naive-mpc-optim,publish-data,forecast-model-fit,forecast-model-predictandforecast-model-tune.--config: Define the path to the config.json file (including the yaml file itself)--secrets: Define secret parameter file (secrets_emhass.yaml) path--costfun: Define the type of cost function, this is optional and the options are:profit(default),cost,self-consumption--log2file: Define if we should log to a file or not, this is optional and the options are:TrueorFalse(default)--params: Configuration as JSON.--runtimeparams: Data passed at runtime. This can be used to pass your own forecast data to EMHASS.--debug: UseTruefor testing purposes.--version: Show the current version of EMHASS.--root: Define path emhass root (E.g. ~/emhass )--data: Define path to the Data files (.csv & .pkl) (E.g. ~/emhass/data/ )
For example, the following line command can be used to perform a day-ahead optimization task:
emhass --action 'dayahead-optim' --config ~/emhass/config.json --costfun 'profit'Before running any valuable command you need to modify the config.json and secrets_emhass.yaml files. These files should contain the information adapted to your own system. To do this take a look at the special section for this in the documentation.
To automate EMHASS with Home Assistant, we will need to define some shell commands in the Home Assistant configuration.yaml file and some basic automations in the automations.yaml file.
In the next few paragraphs, we are going to consider the dayahead-optim optimization strategy, which is also the first that was implemented, and we will also cover how to publish the optimization results.
Additional optimization strategies were developed later, that can be used in combination with/replace the dayahead-optim strategy, such as MPC, or to expand the functionalities such as the Machine Learning method to predict your household consumption. Each of them has some specificities and features and will be considered in dedicated sections.
We can use the shell_command integration in configuration.yaml:
shell_command:
  dayahead_optim: "curl -i -H \"Content-Type:application/json\" -X POST -d '{}' http://localhost:5000/action/dayahead-optim"
  publish_data: "curl -i -H \"Content-Type:application/json\" -X POST -d '{}' http://localhost:5000/action/publish-data"
An alternative that will be useful when passing data at runtime (see dedicated section), we can use the the rest_command instead:
rest_command:
  url: http://127.0.0.1:5000/action/dayahead-optim
  method: POST
  headers:
    content-type: application/json
  payload: >-
{}In configuration.yaml:
shell_command:
  dayahead_optim: ~/emhass/scripts/dayahead_optim.sh
  publish_data: ~/emhass/scripts/publish_data.sh
Create the file dayahead_optim.sh with the following content:
#!/bin/bash
. ~/emhassenv/bin/activate
emhass --action 'dayahead-optim' --config ~/emhass/config.json
And the file publish_data.sh with the following content:
#!/bin/bash
. ~/emhassenv/bin/activate
emhass --action 'publish-data' --config ~/emhass/config.json
Then specify user rights and make the files executables:
sudo chmod -R 755 ~/emhass/scripts/dayahead_optim.sh
sudo chmod -R 755 ~/emhass/scripts/publish_data.sh
sudo chmod +x ~/emhass/scripts/dayahead_optim.sh
sudo chmod +x ~/emhass/scripts/publish_data.shIn automations.yaml:
- alias: EMHASS day-ahead optimization
  trigger:
    platform: time
    at: '05:30:00'
  action:
  - service: shell_command.dayahead_optim
- alias: EMHASS publish data
  trigger:
  - minutes: /5
    platform: time_pattern
  action:
  - service: shell_command.publish_data
In these automations the day-ahead optimization is performed once a day, every day at 5:30am, and the data (output of automation) is published every 5 minutes.
In automations.yaml:
- alias: EMHASS day-ahead optimization
  trigger:
    platform: time
    at: '05:30:00'
  action:
  - service: shell_command.dayahead_optim
  - service: shell_command.publish_data
in configuration page/config.json
"method_ts_round": "first"
"continual_publish": true
In this automation, the day-ahead optimization is performed once a day, every day at 5:30am.
If the optimization_time_step parameter is set to 30 (default) in the configuration, the results of the day-ahead optimization will generate 48 values (for each entity), a value for every 30 minutes in a day (i.e. 24 hrs x 2).
Setting the parameter continual_publish to true in the configuration page will allow EMHASS to store the optimization results as entities/sensors into separate json files. continual_publish will periodically (every optimization_time_step amount of minutes) run a publish, and publish the optimization results of each generated entities/sensors to Home Assistant. The current state of the sensor/entity being updated every time publish runs, selecting one of the 48 stored values, by comparing the stored values' timestamps, the current timestamp and 'method_ts_round': "first" to select the optimal stored value for the current state.
option 1 and 2 are very similar, however, option 2 (continual_publish) will require a CPU thread to constantly be run inside of EMHASS, lowering efficiency. The reason why you may pick one over the other is explained in more detail below in continual_publish.
Lastly, we can link an EMHASS published entity/sensor's current state to a Home Assistant entity on/off switch, controlling a desired controllable load.
For example, imagine that I want to control my water heater. I can use a published deferrable EMHASS entity to control my water heater's desired behavior. In this case, we could use an automation like the below, to control the desired water heater on and off:
on:
automation:
- alias: Water Heater Optimized ON
  trigger:
  - minutes: /5
    platform: time_pattern
  condition:
  - condition: numeric_state
    entity_id: sensor.p_deferrable0
    above: 0.1
  action:
    - service: homeassistant.turn_on
      entity_id: switch.water_heater_switch
off:
automation:
- alias: Water Heater Optimized OFF
  trigger:
  - minutes: /5
    platform: time_pattern
  condition:
  - condition: numeric_state
    entity_id: sensor.p_deferrable0
    below: 0.1
  action:
    - service: homeassistant.turn_off
      entity_id: switch.water_heater_switch
These automations will turn on and off the Home Assistant entity switch.water_heater_switch using the current state from the EMHASS entity sensor.p_deferrable0. sensor.p_deferrable0 being the entity generated from the EMHASS day-ahead optimization and published by examples above. The sensor.p_deferrable0 entity's current state is updated every 30 minutes (or optimization_time_step minutes) via an automated publish option 1 or 2. (selecting one of the 48 stored data values)
Pull requests are very much accepted on this project. For development, you can find some instructions here Development.
MIT License
Copyright (c) 2021-2025 David HERNANDEZ
Permission is hereby granted, free of charge, to any person obtaining a copy of this software and associated documentation files (the "Software"), to deal in the Software without restriction, including without limitation the rights to use, copy, modify, merge, publish, distribute, sublicense, and/or sell copies of the Software, and to permit persons to whom the Software is furnished to do so, subject to the following conditions:
The above copyright notice and this permission notice shall be included in all copies or substantial portions of the Software.
THE SOFTWARE IS PROVIDED "AS IS", WITHOUT WARRANTY OF ANY KIND, EXPRESS OR IMPLIED, INCLUDING BUT NOT LIMITED TO THE WARRANTIES OF MERCHANTABILITY, FITNESS FOR A PARTICULAR PURPOSE AND NONINFRINGEMENT. IN NO EVENT SHALL THE AUTHORS OR COPYRIGHT HOLDERS BE LIABLE FOR ANY CLAIM, DAMAGES OR OTHER LIABILITY, WHETHER IN AN ACTION OF CONTRACT, TORT OR OTHERWISE, ARISING FROM, OUT OF OR IN CONNECTION WITH THE SOFTWARE OR THE USE OR OTHER DEALINGS IN THE SOFTWARE.