Source: https://docs.layercode.com/api-reference/cli
Layercode CLI command reference and usage guide.
You’ll need npm installed to use the CLI.
We recommend running commands with npx instead of installing globally.
npx @layercode/cli <command>npx @layercode/cli loginOpens a browser window to log in and link your terminal to your Layercode account.
npx @layercode/cli init [--agent <agent_id>]Initializes Layercode locally, creating an example project and linking an agent.
Flags
--agent <agent_id>: (optional) Link an existing agent.
If not provided, a new agent will be created.
$ layercode tunnel [--agent-id <value>] [--path <value>] [--port <value>] [--tail]Runs local project with cloudflared tunnel and updates your agent’s webhook URL in the Layercode dashboard.
Flags
agent-id=<value>Specify the unique identifier of the agent. If no agent-id is provided, it will look for an env variable ending withLAYERCODE_AGENT_IDfrom the .env file. If also not found, command will fail.path=<value>[default: /api/agent] Set the API path to append for the agent endpoint.port=<value>[default: 3000] Port number to run the tunnel on.tailContinuously stream logs, including CLI messages
Equivalent to:
cloudflared tunnel --url http://localhost:<port_number># Log in
npx @layercode/cli login
# Initialize a new local setup
npx @layercode/cli init
# Start a tunnel for agent abc123 on port 5173 with the api found at /api/voice-agent
npx @layercode/cli tunnel --agent=dtv3x3d2 --port=5173 path=/api/voice-agent --tailIf you encounter issues:
- Ensure npm and Node.js are installed and up-to-date.
- Try logging out and back in with
npx @layercode/cli login. - By default, your tunnel will set your webhook url path as /api/agent. You should update this with the --path flag based on where your webhook endpoint is inside your application e.g. '/api/agent' or at the root '/' or '/voice-agent'. See our guide on webhooks for more details
Source: https://docs.layercode.com/api-reference/frontend-ws-api
Layercode WebSocket API for browser and mobile based voice agent experiences.
The Layercode Frontend WebSocket API is used to create browser and mobile based voice agent experiences. The client browser streams chunks of base64 microphone audio down the WebSocket. In response, the server returns audio chunks of the assistant's response to be played to the user. Additional trigger and data event types allow control of turns and UI updates.
For most use cases, we recommend using our SDKs for React ([React Guide](/tutorials/react)) or Vanilla JS ([Vanilla JS Guide](/tutorials/vanilla_js)). This API reference is intended for advanced users who need to implement the WebSocket protocol directly.The client browser connects to the Layercode WebSocket API at the following URL:
wss://api.layercode.com/v1/agents/web/websocket
When establishing the WebSocket connection, the following query parameter must be included in the request URL:
client_session_key: A unique session key obtained from the Layercode REST API/authorizeendpoint.
Example full connection URL:
wss://api.layercode.com/v1/agents/web/websocket?client_session_key=your_client_session_key
To obtain a client_session_key, you must first create a new session for the user by calling the Layercode REST API /authorize endpoint. This endpoint returns a client_session_key which must be included in the WebSocket connection parameters. This API call should be made from your backend server, not the client browser. This ensures your LAYERCODE_API_KEY is never exposed to the client, and allows you to do any additional user authorization checks required by your application.
When the client has established the WebSocket connection and is ready to begin streaming audio, it should send a ready message:
{ "type": "client.ready" }At WebSocket connection, the client should constantly send audio chunks of the user's microphone in the format below. The content must be the following format:
- Base64 encoded
- 16-bit PCM audio data
- 8000 Hz sample rate
- Mono channel
See the Vanilla JS SDK code for an example of how browser microphone audio is correctly encoded to base64.
{ "type": "client.audio", "content": "base64audio" }The client can send Voice Activity Detection (VAD) events to inform the server about speech detection. This will improve the speed and accuracy of automatic turn taking:
VAD detects voice activity: Note: The client is responsible for stopping any in-progress assistant audio playback when the user interrupts.
{
  "type": "vad_events",
  "event": "vad_start"
}
Detected voice activity ends:
{
  "type": "vad_events",
  "event": "vad_end"
}
Client could not load the VAD model, so VAD events won't be sent:
{
  "type": "vad_events",
  "event": "vad_model_failed"
}The client will receive audio chunks of the assistant's response (see Audio Response). When the client has finished replaying all assistant audio chunks in its buffer it must reply with 'client.response_audio_replay_finished' Note that the assistant webhook can return response.tts events (which are turned into speech and received by the client as response.audio events) at any point during a long response (in between other text or json events), so the client must handle situations where it's played all the audio in the buffer, but then receives more to play. This will result in the client sending multiple 'trigger.response.audio.replay_finished' completed events over a single turn.
{
  "type": "trigger.response.audio.replay_finished",
  "reason": "completed",
  "turn_id": "UUID of assistant response"
}In push-to-talk mode (read more about Turn Taking), the client must send the following events to start and end a user turn to speak. This is typically connected to a button which is held down for the user to speak. In this mode, the client can also preemptively halt the assistant's audio playback when the user interrupts. Instead of waiting to receive a turn.strat event (which indicates a turn change), send a trigger.audio.replay_finished event when the user interrupts the assistant.
Start user turn (user has pressed the button):
{ "type": "trigger.turn.start", "role": "user" }End user turn (user has released the button):
{ "type": "trigger.turn.end", "role": "user" }To enable your users to sent text messages (as an alternative to voice), send a text user message from your frontend in the client.response.text event. Layercode will send the user text message to your agent backend in the same format as a regular user transcript message.
{
  "type": "client.response.text",
  "content": "Text input from the user"
}content: The full user message. Empty or whitespace-only payloads are ignored.
The client will receive the following events from Layercode:
When the server detects the start of the user's turn:
{ "type": "turn.start", "role": "user", "turn_id": "UUID of user turn" }When it's the assistant's turn:
{ "type": "turn.start", "role": "assistant", "turn_id": "UUID of assistant turn" }The client will receive audio chunks of the assistant's response, which should be buffered and played immediately.
The content will be audio in the following format:
- Base64 encoded
- 16-bit PCM audio data
- 16000 Hz sample rate
- Mono channel
See the Vanilla JS SDK code for an example of how to play the audio chunks.
{
  "type": "response.audio",
  "content": "base64audio",
  "delta_id": "UUID unique to each delta msg",
  "turn_id": "UUID of assistant response turn"
}The client will receive text chunks of the assistant's response for display or processing:
{
  "type": "response.text",
  "content": "Text content from assistant",
  "turn_id": "UUID of assistant response turn"
}Layercode streams back transcription updates for the user's speech so you can render the live transcript in your UI.
Interim updates refine the current transcript in place as the speech recognizer gains confidence. Each user.transcript.interim_delta replaces the previous one (with a matching delta_counter) until a user.transcript.delta arrives (with a matching delta_counter). Subsequent user.transcript.interim_delta will have an incremented delta_counter and should now be appended to the previous finalized user.transcript.delta text.
{
  "type": "user.transcript.interim_delta",
  "content": "Partial user text",
  "turn_id": "user-UUID of the speaking turn",
  "delta_counter": 6
}content: Latest partial text heard for the in-progress user utterance.turn_id: The user turn identifier (prefixed with the role for clarity).delta_counter: Monotonic counter forwarded from the underlying transcriptiondelta.counterto help you discard out-of-order updates.
Once the recognizer finalizes a span of text, it is emitted as a user.transcript.delta. Any subsequent user.transcript.interim_delta start a new span until the next finalized delta arrives.
{
  "type": "user.transcript.delta",
  "content": "Stabilized transcript segment",
  "turn_id": "user-UUID of the speaking turn",
  "delta_counter": 6
}content: Stabilized transcript segment that should replace the previous interim text.turn_id: The user turn identifier (prefixed with the role for clarity).delta_counter: Monotonic counter forwarded from the underlying transcriptiondelta.counterso you can detect missed or out-of-order deltas.
#### Final Transcript
One the user's turn has deemed completed a final transcript is emitted. This contains the full text of the user's turn.
{
  "type": "user.transcript",
  "content": "Complete transcript of user turn",
  "turn_id": "user-UUID of the speaking turn"
}Your Webhook can return response.data SSE events, which will be forwarded to the browser client. This is ideal for updating UI and state in the browser. If you want to pass text or json deltas instead of full objects, you can simply pass a json object like { "delta": "text delta..." } and accumulate and render the delta in the client browser.
{
  "type": "response.data",
  "content": { "json": "object" },
  "turn_id": "UUID of assistant response"
}Source: https://docs.layercode.com/api-reference/introduction
Layercode API Reference
- Frontend WebSocket API (for building web and mobile voice AI applications): Enables seamless connection between your frontend applications and Layercode's real-time agents. Use this API with our Frontend SDKs to stream audio and receive responses.
- Webhook SSE API (for connecting your own backend to Layercode): This is a webhook endpoint you implement in your backend, to receive transcriptions from the user, then respond with SSE messages containing text to be converted to speech and spoken to the user.
Source: https://docs.layercode.com/api-reference/rest-api
API reference for the Layercode REST API.
To connect a client (browser or mobile app) to a Layercode voice agent, you must first authorize the session. This is done by calling the Layercode REST API endpoint below from your backend.
How the authorization flow works:
When using a Layercode frontend SDK (such as @layercode/react-sdk or @layercode/js-sdk), the SDK will automatically make a POST request to the authorizeSessionEndpoint URL that you specify in your frontend code.
This authorizeSessionEndpoint should be an endpoint on your own backend (not Layercode's). Your backend receives this request from the frontend, then securely calls the Layercode REST API (https://api.layercode.com/v1/agents/web/authorize_session) using your LAYERCODE_API_KEY. Your backend then returns the client_session_key to the frontend.
conversation\_id instead of session\_id. Until then, you will continue to receive session\_id. Plan your upgrade accordingly.
Your Layercode API key should never be exposed to the frontend. Always call this endpoint from your backend, then return the client\_session\_key to your
frontend.
POST https://api.layercode.com/v1/agents/web/authorize_sessionLAYERCODE\_API\_KEY.
Must be application/json.
The ID of the Layercode agent the client should connect to.
(Optional) The conversation ID to resume an existing conversation. If not provided, a new conversation will be created.
The key your frontend uses to connect to the Layercode WebSocket API.
The unique conversation ID.
Optional configuration for this session used by the frontend SDK. When present, it can include:
transcription.trigger, transcription.automatic, transcription.can_interrupt, and VAD settings such as vad.enabled, vad.gate_audio, vad.buffer_frames, vad.model, vad.positive_speech_threshold, vad.negative_speech_threshold, vad.redemption_frames, vad.min_speech_frames, vad.pre_speech_pad_frames, vad.frame_samples.
# Example with only agent_id (creates a new session)
curl -X POST https://api.layercode.com/v1/agents/web/authorize_session \
  -H "Authorization: Bearer $LAYERCODE_API_KEY" \
  -H "Content-Type: application/json" \
  -d '{"agent_id": "ag-123456"}'

# Example with agent_id and conversation_id (resumes an existing conversation)
curl -X POST https://api.layercode.com/v1/agents/web/authorize_session \
  -H "Authorization: Bearer $LAYERCODE_API_KEY" \
  -H "Content-Type: application/json" \
-d '{"agent_id": "ag-123456", "conversation_id": "lc_conv_abc123..."}'{
"client_session_key": "lc_sesskey_abc123...",
"conversation_id": "lc_conv_abc123..."
}Possible error cases:
400– Invalid or missing bearer token, invalid agent ID, missing or invalid conversation ID.402– Insufficient balance for the organization.
Example error response:
{
  "error": "insufficient balance"
}Here's how you might implement an authorization endpoint in your backend (Next.js example):
export const dynamic = 'force-dynamic';
import { NextResponse } from 'next/server';

export const POST = async (request: Request) => {
  // Here you could do any user authorization checks you need for your app
  const endpoint = 'https://api.layercode.com/v1/agents/web/authorize_session';
  const apiKey = process.env.LAYERCODE_API_KEY;
  if (!apiKey) {
    throw new Error('LAYERCODE_API_KEY is not set.');
  }
  const requestBody = await request.json();
  if (!requestBody || !requestBody.agent_id) {
    throw new Error('Missing agent_id in request body.');
  }
  try {
    const response = await fetch(endpoint, {
      method: 'POST',
      headers: {
        'Content-Type': 'application/json',
        Authorization: `Bearer ${apiKey}`
      },
      body: JSON.stringify(requestBody)
    });
    if (!response.ok) {
      const text = await response.text();
      throw new Error(text || response.statusText);
    }
    return NextResponse.json(await response.json());
  } catch (error: any) {
    console.log('Layercode authorize session response error:', error.message);
    return NextResponse.json({ error: error.message }, { status: 500 });
  }
};authorize\_session endpoint
with your API key, and return the client\_session\_key to your frontend.
GET https://api.layercode.com/v1/agentsLAYERCODE\_API\_KEY.
Returns all agents.
Each agent object includesid, name, type, agent\_template\_id, created\_at, updated\_at, and assigned\_phone\_numbers (array of phone number assignments with phone\_number, twilio\_sid, friendly\_name, assigned\_at).
curl -H "Authorization: Bearer $LAYERCODE_API_KEY" \
  https://api.layercode.com/v1/agents
{
"agents": [
{
"id": "ag-123456",
"name": "My Agent ag-123456",
"type": "voice",
"agent_template_id": "tmpl_default",
"created_at": "2024-04-01T12:00:00.000Z",
"updated_at": "2024-04-08T16:30:16.000Z",
"assigned_phone_numbers": [
{
"phone_number": "+15551234567",
"twilio_sid": "PNxxxxxxxxxxxxxxxxxxxxxxxxxxxxxxxx",
"friendly_name": "Support Line",
"assigned_at": "2024-04-02T09:21:00.000Z"
}
]
}
]
}POST https://api.layercode.com/v1/agentsLAYERCODE\_API\_KEY.
Must be application/json.
Optional template ID to initialize the agent configuration. If omitted, the default recommended template is used.
Returns the newly created agent record, including configuration and webhook secret.
Unique identifier for the agent.
Human-friendly name assigned by Layercode.
Agent type (currently voice).
Full pipeline configuration cloned from the template.
Secret used to validate incoming webhooks.
ID of the template used to create the agent.
curl -X POST https://api.layercode.com/v1/agents \
  -H "Authorization: Bearer $LAYERCODE_API_KEY" \
  -H "Content-Type: application/json" \
-d '{ "template_id": "tmpl_sales" }'GET https://api.layercode.com/v1/agents/{agent_id}LAYERCODE\_API\_KEY.
The ID of the agent.
Returns the agent.
Agent ID. Agent display name. Current pipeline configuration. Array of phone number assignments for this agent.
curl -H "Authorization: Bearer $LAYERCODE_API_KEY" \
https://api.layercode.com/v1/agents/ag-123456POST https://api.layercode.com/v1/agents/{agent_id}LAYERCODE\_API\_KEY.
Must be application/json.
The ID of the agent to update.
URL for production webhooks. When provided, demo\_mode is automatically disabled.
Returns the updated agent record with the new configuration.
curl -X POST https://api.layercode.com/v1/agents/ag-123456 \
  -H "Authorization: Bearer $LAYERCODE_API_KEY" \
  -H "Content-Type: application/json" \
  -d '{
    "webhook_url": "https://example.com/layercode-webhook"
}'GET https://api.layercode.com/v1/agents/{agent_id}/sessions/{session_id}LAYERCODE\_API\_KEY.
The ID of the agent.
The connection ID for the session. This is the unique connection identifier for a given session.
Returns JSON with details about the session, transcript, and recording status.
Connection ID for the session. ID of the agent. ISO timestamp when the connection started. ISO timestamp when the connection ended (if ended). Total connection duration in milliseconds. Custom metadata associated with the session. Caller phone number (Twilio), if applicable. Caller country code (Twilio), if applicable. Agent phone number (Twilio), if applicable. Agent phone number country code (Twilio), if applicable. IP address of the connection. Country code derived from IP address when available. Total seconds of user speech. Total seconds of generated speech. Processing latency in milliseconds.
Array of transcript entries. Each entry includes:timestamp, user\_message, assistant\_message, latency\_ms.
One of not\_available, in\_progress, completed.
If recording\_status is completed, a URL to download the WAV recording for this session connection.
curl -H "Authorization: Bearer $LAYERCODE_API_KEY" \
https://api.layercode.com/v1/agents/ag-123456/sessions/lc_conn_abc123GET https://api.layercode.com/v1/agents/{agent_id}/sessions/{session_id}/recordingLAYERCODE\_API\_KEY.
The ID of the agent.
The connection ID for the session.
Returns a WAV audio file if available.
curl -L -H "Authorization: Bearer $LAYERCODE_API_KEY" \
  -o session.wav \
https://api.layercode.com/v1/agents/ag-123456/sessions/lc_conn_abc123/recordingrecording\_status: "in\_progress".
Once your frontend receives the client\_session\_key, it can connect to the Layercode WebSocket API to start streaming audio.
POST https://api.layercode.com/v1/agents/ag-123456/calls/initiate_outbound curl -X POST https://api.layercode.com/v1/agents/ag-123456/calls/initiate_outbound \
-H 'Authorization: Bearer $LAYERCODE_API_KEY' \
-H 'Content-Type: application/json' \
-D '{
"from_phone_number": "NUMBER_ASSIGNED_TO_YOUR_AGENT",
"to_phone_number": "PHONE_NUMBER_TO_CALL"
}'{
"conversation_id": "lc_conv_abc123..."
}Possible error cases:
400– Invalid or missing bearer token, missing or request body, invalid from_phone_number (i.e. not assigned to the agent specified in the url).429– Account session concurrency limit reached.402– Insufficient balance for the organization.
Use this endpoint as the Voice webhook in your Twilio phone number configuration. Layercode validates the incoming request, authorizes a session, and returns TwiML that connects the call to your agent's WebSocket stream.
POST https://api.layercode.com/v1/agents/twilio/twimlinbound or outbound-api).
Caller phone number.
Caller country code supplied by Twilio.
Phone number assigned to your agent.
Destination country code supplied by Twilio.
Returns TwiML that streams the call to the Layercode Twilio WebSocket endpoint.
<?xml version="1.0" encoding="UTF-8"?>
<Response>
<Connect>
<Stream url="wss://twilio.layercode.com/v1/agents/twilio/websocket/{client_session_key}" />
</Connect>
</Response>Source: https://docs.layercode.com/api-reference/webhook-sse-api
Webhook SSE API
Layercode sends different webhook event types to your backend. Each request body is JSON. All requests include:
type(string): One ofmessage,session.start,session.end,session.update.session_id(string): Connection identifier for this session. Changes each reconnect.conversation_id(string): Stable conversation identifier.
Additional fields vary by event type, as described below.
text(string): Transcribed user text.session_id(string): A unique identifier for the current session.conversation_id(string): A unique identifier for the conversation.turn_id(string): Unique ID for this turn.from_phone_number(string, optional): Caller phone number if Twilio is used.to_phone_number(string, optional): Agent phone number if Twilio is used.
Example:
{
"type": "message",
"session_id": "sess_abc123",
"conversation_id": "conv_xyz789",
"turn_id": "turn_xyz123",
"text": "Hello, how are you?",
"from_phone_number": "+14155550123",
"to_phone_number": "+14155559876"
}Sent when a new session begins and your agent should optionally speak first.
session_id(string): A unique identifier for the current session.conversation_id(string): A unique identifier for the conversation.turn_id(string): Unique ID for the assistant welcome turn.from_phone_number(string, optional): Caller phone number if Twilio is used.to_phone_number(string, optional): Agent phone number if Twilio is used.
Example:
{
"type": "session.start",
"session_id": "sess_abc123",
"conversation_id": "conv_xyz789",
"turn_id": "turn_welcome_123",
"from_phone_number": "+14155550123",
"to_phone_number": "+14155559876"
}Sent when asynchronous session data becomes available (e.g., after a recording completes).
session_id(string): A unique identifier for the current session.conversation_id(string): A unique identifier for the conversation.recording_status(string):completedorfailed.recording_url(string, optional): API URL to download WAV whencompleted.recording_duration(number, optional): Duration in seconds.error_message(string, optional): Error details whenfailed.metadata(object): Session metadata originally provided during authorization (if any).from_phone_number(string, optional): Caller phone number if Twilio is used.to_phone_number(string, optional): Agent phone number if Twilio is used.
Example:
{
"type": "session.update",
"session_id": "sess_abc123",
"conversation_id": "conv_xyz789",
"from_phone_number": "+14155550123",
"to_phone_number": "+14155559876",
"recording_status": "completed",
"recording_url": "https://api.layercode.com/v1/agents/ag_123/sessions/sess_abc123/recording",
"recording_duration": 42.3,
"metadata": { "userId": "u_123" }
}Sent when the session finishes. Includes transcript and usage metrics.
session_id(string): A unique identifier for the current session.conversation_id(string): A unique identifier for the conversation.agent_id(string): Agent ID.started_at/ended_at(string): ISO timestamps.duration(number|null): Total milliseconds (if available).transcription_duration_seconds(number|null)tts_duration_seconds(number|null)latency(number|null)ip_address(string|null)country_code(string|null)recording_status(string):enabledordisabled(org setting for session recording).transcript(array): Items of{ role: 'user' | 'assistant', text: string, timestamp: number }.from_phone_number(string, optional): Caller phone number if Twilio is used.to_phone_number(string, optional): Agent phone number if Twilio is used.
Example:
{
"type": "session.end",
"session_id": "sess_abc123",
"conversation_id": "conv_xyz789",
"agent_id": "ag_123",
"from_phone_number": "+14155550123",
"to_phone_number": "+14155559876",
"started_at": "2025-08-28T10:00:00.000Z",
"ended_at": "2025-08-28T10:03:00.000Z",
"duration": 180000,
"transcription_duration_seconds": 20.1,
"tts_duration_seconds": 19.8,
"latency": 120,
"ip_address": "203.0.113.10",
"country_code": "US",
"recording_status": "enabled",
"transcript": [
{ "role": "user", "text": "Hello", "timestamp": 1724848800000 },
{ "role": "assistant", "text": "Hi there!", "timestamp": 1724848805000 }
]
}Source: https://docs.layercode.com/explanations/configuring-voice-agents
Key concepts and options for configuring transcription, TTS, and backend in a Layercode agent.
Use this page to choose transcription, text-to-speech (TTS), and backend settings for your agent.
Transcription converts user speech to text.
- Provider and model: match your language and latency needs.
- Turn taking: automatic or push to talk. See Turn taking.
- Interrupts (automatic mode): let users speak over the agent.
TTS converts the agent's text response to audio.
- Provider and model: balance speed and quality.
- Voice: choose one that fits your brand and language.
- Start with defaults and optimize after you have an end-to-end demo.
- Prefer low-latency models for real-time conversations.
- If using your own backend, test locally with a tunnel. See Tunnelling.
In the dashboard, open your agent and click Edit on Transcription, Text-to-Speech, or Backend. Changes apply immediately to new turns.
Source: https://docs.layercode.com/explanations/connect-backend
How to connect your own agent backend to a Layercode agent.
Layercode is designed for maximum flexibility: you can connect any backend that can receive an HTTP request and return a Server-Sent Events (SSE) stream. This allows you to use your own LLM-powered agent, business logic, or orchestration—while Layercode handles all the real-time voice infrastructure.
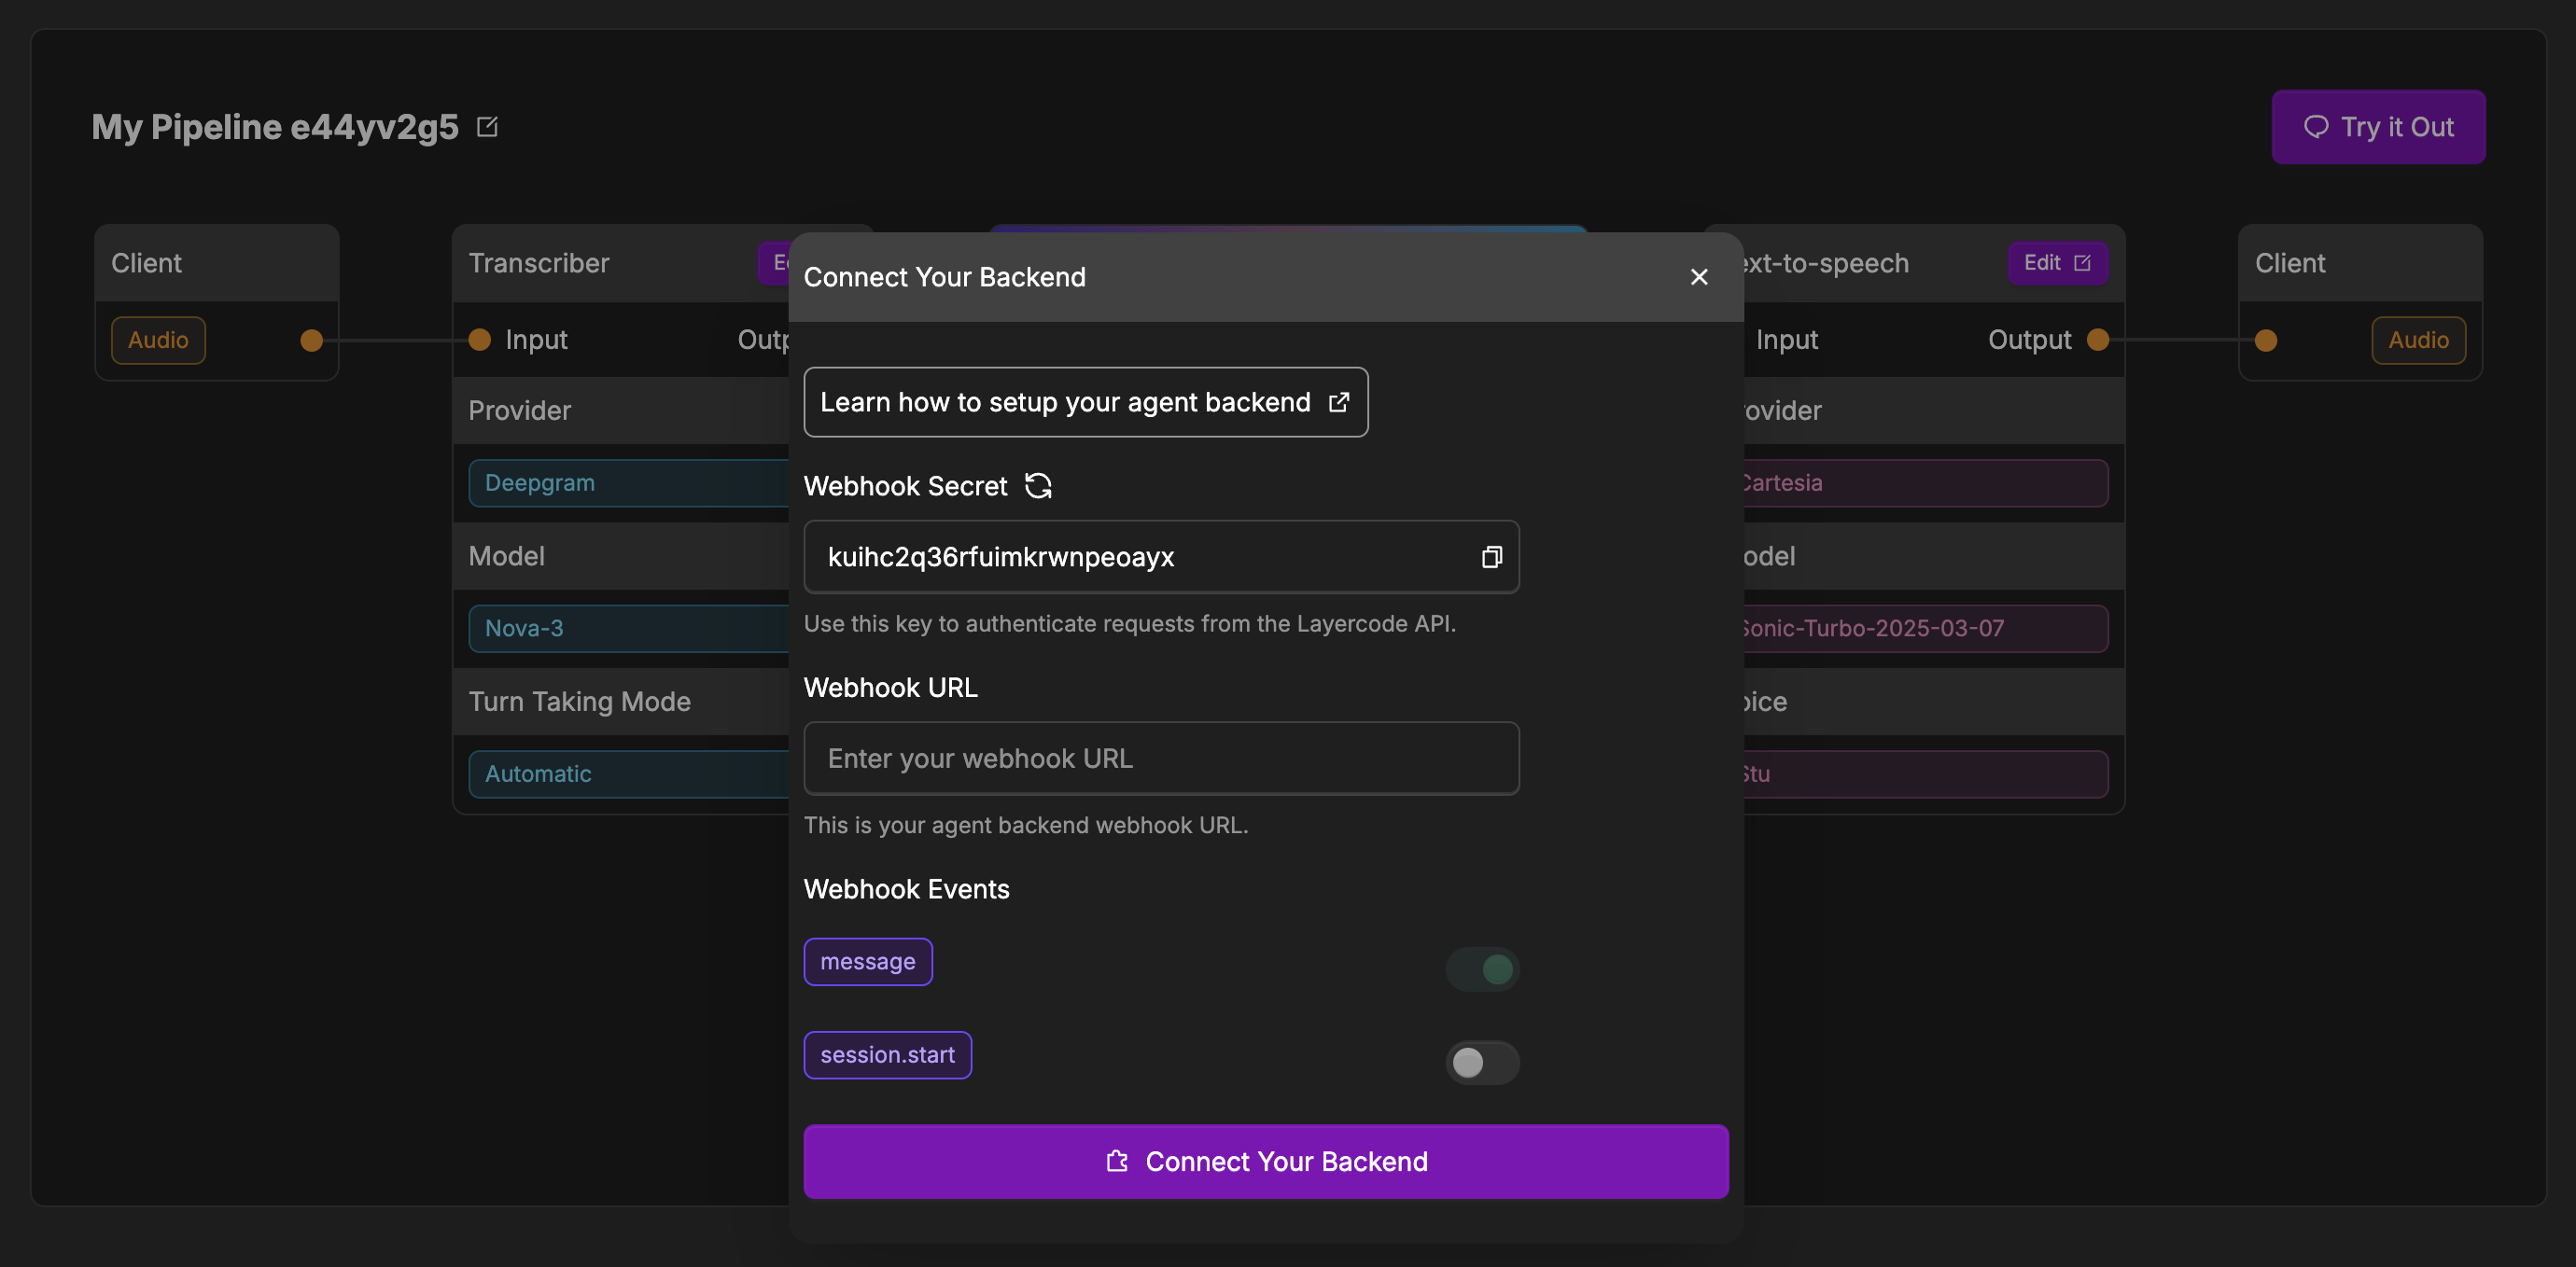
To use your own backend, click the "Connect Your Backend" button on your agent, and then set the Webhook URL to point to your backend's endpoint.
When a user interacts with your voice agent, Layercode will:
- Transcribe the user's speech to text.
- Send an HTTP POST request to your backend at the Webhook URL you provide.
- Your backend responds with a Server-Sent Events (SSE) stream containing the agent's reply (text to be spoken, and optional data).
- Layercode handles converting the text in your response to speech and streaming it back to the user in real time.
- Return of JSON data is also supported to allow you to pass state back to your UI.
- In the Layercode dashboard, open your agent and click Connect Your Backend (or click the edit button in the Your Backend box if you've already connected your backend previously).
- Enter your backend's Webhook URL in the configuration modal.
- Optionally, configure which webhook events you want to receive (see below).
- Save your changes.
- message (required):
Sent when the user finishes speaking. Contains the transcribed message and metadata. Your backend should respond with an SSE stream containing the agent's reply. - session.start (optional):
Sent when a new session is started (e.g., when a user connects). Use this to have your agent start the conversation. If disabled, the agent will wait for the user to speak first when a new session is started.
To ensure the security of your backend, it's crucial to verify that incoming requests are indeed from Layercode. This can be done by verifying the layercode-signature header, which contains a timestamp and a HMAC-SHA256 signature of the request body.
Here's how you can verify the signature in your backend:
- Retrieve the
layercode-signatureheader from the request. It will be in the format:t=timestamp,v1=signature. - Get your Layercode webhook secret from the Layercode dashboard (found by going to the appropriate agent and clicking the edit button in the Your Backend box, where you'll find the Webhook Secret).
- Reconstruct the signed payload by concatenating the timestamp, a period (
.), and the exact raw webhook request body:signed_payload = timestamp + "." + request_body. - Compute the HMAC-SHA256 signature of this signed payload using your webhook secret.
- Compare the computed signature with the
v1value from thelayercode-signatureheader. If they match, the request is valid. - (Recommended) Check that the timestamp is recent (for example, within 5 minutes) to prevent replay attacks.
When a user finishes speaking, Layercode will send a POST request to your webhook with the following JSON payload body:
{
"type": "message", // The type of webhook event: message or session.start
"session_id": "uuid", // Session ID is unique per conversation. Use this to know which conversation a webhook belongs to.
"turn_id": "uuid", // Turn ID is unique per turn of the conversation. This ID must be returned in all SSE events. It is unique per turn of the conversation.
"text": "What's the weather today?" // The user's transcribed message
}See the Webhook SSE API documentation for details
Your backend should respond with an SSE stream. Each SSE message contains a JSON payload with the following fields: type, content (when required) and turn_id. See the Webhook SSE API documentation for details.
Source: https://docs.layercode.com/explanations/conversation-history
How to persist turn-by-turn context when webhook requests can abort
Tracking conversation history seems easy. But there is one big gotcha - webhook requests can abort.
And it's common in voice because of interruptions.
And so we need to adjust our approach.
Let's start naively. A user sends a message, so we add it to an array.
[{ "role": "user", "turn_id": "turn-1", "content": "Hey, how do I make a hot dog?" }]And then when the assistant replies, we simply append it:
[
{ "role": "user", "turn_id": "turn-1", "content": "Hey, how do I make a hot dog?" },
{ "role": "assistant", "turn_id": "turn-2", "content": "You put the frankfurter in the bun and add some mustard." }
]When the user interrupts mid-response, the webhook request that was generating the assistant’s reply is abruptly terminated.
Unless we’ve already written something to memory, the assistant’s partial message could be lost.
In practice, this happens a lot with voice agents — users cut off the model to ask something new before the previous response finishes.
If we don’t handle this carefully, our in-memory state drifts out of sync with what actually happened in the conversation.
And you might not even realize, and think the LLM is just being a silly billy.
When a new user webhook arrives, persist in this order:
- Store the user message right away so the turn is anchored in history.
- Insert the assistant placeholder before you start streaming tokens back.
conversationMessages[conversation_id].push({
role: 'user',
turn_id,
content: userInput
});conversationMessages[conversation_id].push({
role: 'assistant',
turn_id,
content: '' // placeholder
});If the webhook completes successfully:
- Remove the placeholder and append final messages with the same
turn_id.
If the webhook is aborted:
- The placeholder remains, capturing the interrupted turn.
- The next
messagewebhook includesinterruption_context, which tells us whichassistant_turn_idwas cut off. - You can reconcile by marking that entry as interrupted.
if (interruption_context?.assistant_turn_id) {
const prev = conversationMessages[conversation_id];
const interrupted = prev.find((m) => m.role === 'assistant' && m.turn_id === interruption_context.assistant_turn_id);
if (interrupted) {
interrupted.content += ' [interrupted]';
}
}This ensures that when the next user turn arrives, the model still sees every turn — even those that were cut off.
When a user interrupts, Layercode immediately cancels the webhook request that was streaming the assistant response.
Because the request terminates, your worker never has a chance to finalize the response or append it to history.
There is currently no back-channel for Layercode to notify your backend gracefully — cancelling the request is the only interruption signal we can provide. This is why persisting the placeholder before you stream tokens is essential.
Layercode does not propagate a custom AbortSignal into your AI SDK calls.
Instead, the framework relies on the platform aborting the request (Cloudflare Workers receive the native ExecutionContext cancellation). Make sure any long-running model or fetch calls can tolerate the request being torn down mid-stream; the placeholder you stored lets you recover once the next webhook arrives.
Even if a user interrupts several turns back-to-back, Layercode only sends interruption_context for the immediately previous assistant turn.
Persist that context as soon as the new webhook starts (before any expensive work) so it survives if another interruption happens quickly afterward. The placeholder pattern above keeps your transcript accurate even during rapid-fire interrupts.
Every stored message (user and assistant) includes a turn_id corresponding to the webhook event that created it:
{ role: 'user', turn_id: <session.start turn>, content: '...' }
{ role: 'assistant', turn_id: <same turn_id>, content: '...' }The initial system message does not have a turn_id.
- There is no deduplication or idempotency handling yet in Layercode. So you will need to write logic to filter this.
✅ Always store user messages immediately.
✅ Add a placeholder assistant message before streaming.
✅ Replace or mark the placeholder when the turn finishes or is interrupted.
✅ Never rely on the webhook completing — it might abort anytime.
✅ Keep turn_id and conversation_id consistent for reconciliation.
Source: https://docs.layercode.com/explanations/how-connect-works
Visual diagram of how your app connects to Layercode
sequenceDiagram
participant UI as Browser UI
participant SDK as LayercodeClient (JS SDK)
participant Auth as POST /v1/agents/web/authorize_session
participant DB (conversations)
participant WS as GET /v1/agents/web/websocket
participant Pipeline as Voice Pipeline Worker
UI->>SDK: instantiate client.connect()
SDK->>Auth: POST { agent_id, metadata, sdk_version }
Auth->>DB: validate pipeline/org and insert conversation
DB-->>Auth: client_session_key + conversation_id
Auth-->>SDK: { client_session_key, conversation_id, config }
SDK->>WS: WebSocket upgrade ?client_session_key=...
WS->>DB: lookup conversation via client_session_key
WS->>Pipeline: start voicePipeline(session)
Pipeline-->>SDK: streaming audio + events
SDK-->>UI: onConnect({ conversationId })
authorizeSessioncreates the conversation record when noconversation_idexists and returns a 1-hourclient_session_key.- The browser client must include a valid bearer token (API key) when proxying to the authorize endpoint.
sequenceDiagram
participant UI as Browser UI (resuming)
participant SDK as LayercodeClient
participant Auth as POST /v1/agents/web/authorize_session
participant DB
participant WS as GET /v1/agents/web/websocket
participant Pipeline as Voice Pipeline Worker
UI->>SDK: client.connect()
SDK->>Auth: POST { agent_id, conversation_id }
Auth->>DB: fetch conversation and pipeline
DB-->>Auth: verify ownership, update session key expiry
Auth-->>SDK: { client_session_key, conversation_id, config }
SDK->>WS: WebSocket upgrade using new client_session_key
WS->>DB: validate conversation + pipeline balance
WS->>Pipeline: resume conversation context
Pipeline-->>SDK: stream resumes with existing turn state
- The SDK automatically reconnects to an existing conversation if a
conversationIdis cached. - To start fresh, create a new client with
conversationId = null. - Re-authorizing rotates the
client_session_key, so old WebSocket URLs stop working once a resume happens.
sequenceDiagram
participant UI as Browser UI
participant SDK as LayercodeClient
participant WS as WebSocket Connection
participant Auth as POST /v1/agents/web/authorize_session
participant DB
participant Pipeline as Voice Pipeline Worker
WS-xSDK: network drop / close event
SDK->>SDK: _performDisconnectCleanup() (status=disconnected)
SDK-->>UI: onDisconnect() (show reconnect)
UI->>SDK: user clicks reconnect
SDK->>Auth: POST { agent_id, conversation_id }
Auth->>DB: update client_session_key, ensure balance
Auth-->>SDK: { client_session_key, conversation_id }
SDK->>WS: establish new WebSocket ?client_session_key=...
WS->>Pipeline: restart transport against same conversation
Pipeline-->>SDK: continue streaming and emit onConnect
- Device listeners, VAD, and amplitude monitors are rebuilt on reconnect.
- The cached
conversationIdpersists, so the nextauthorizecall resumes seamlessly. - To force a fresh run after a drop, instantiate a new client with
conversationId = nullbefore reconnecting.
Source: https://docs.layercode.com/explanations/how-layercode-works
The fastest way to add production-ready, low-latency voice to your AI agents.
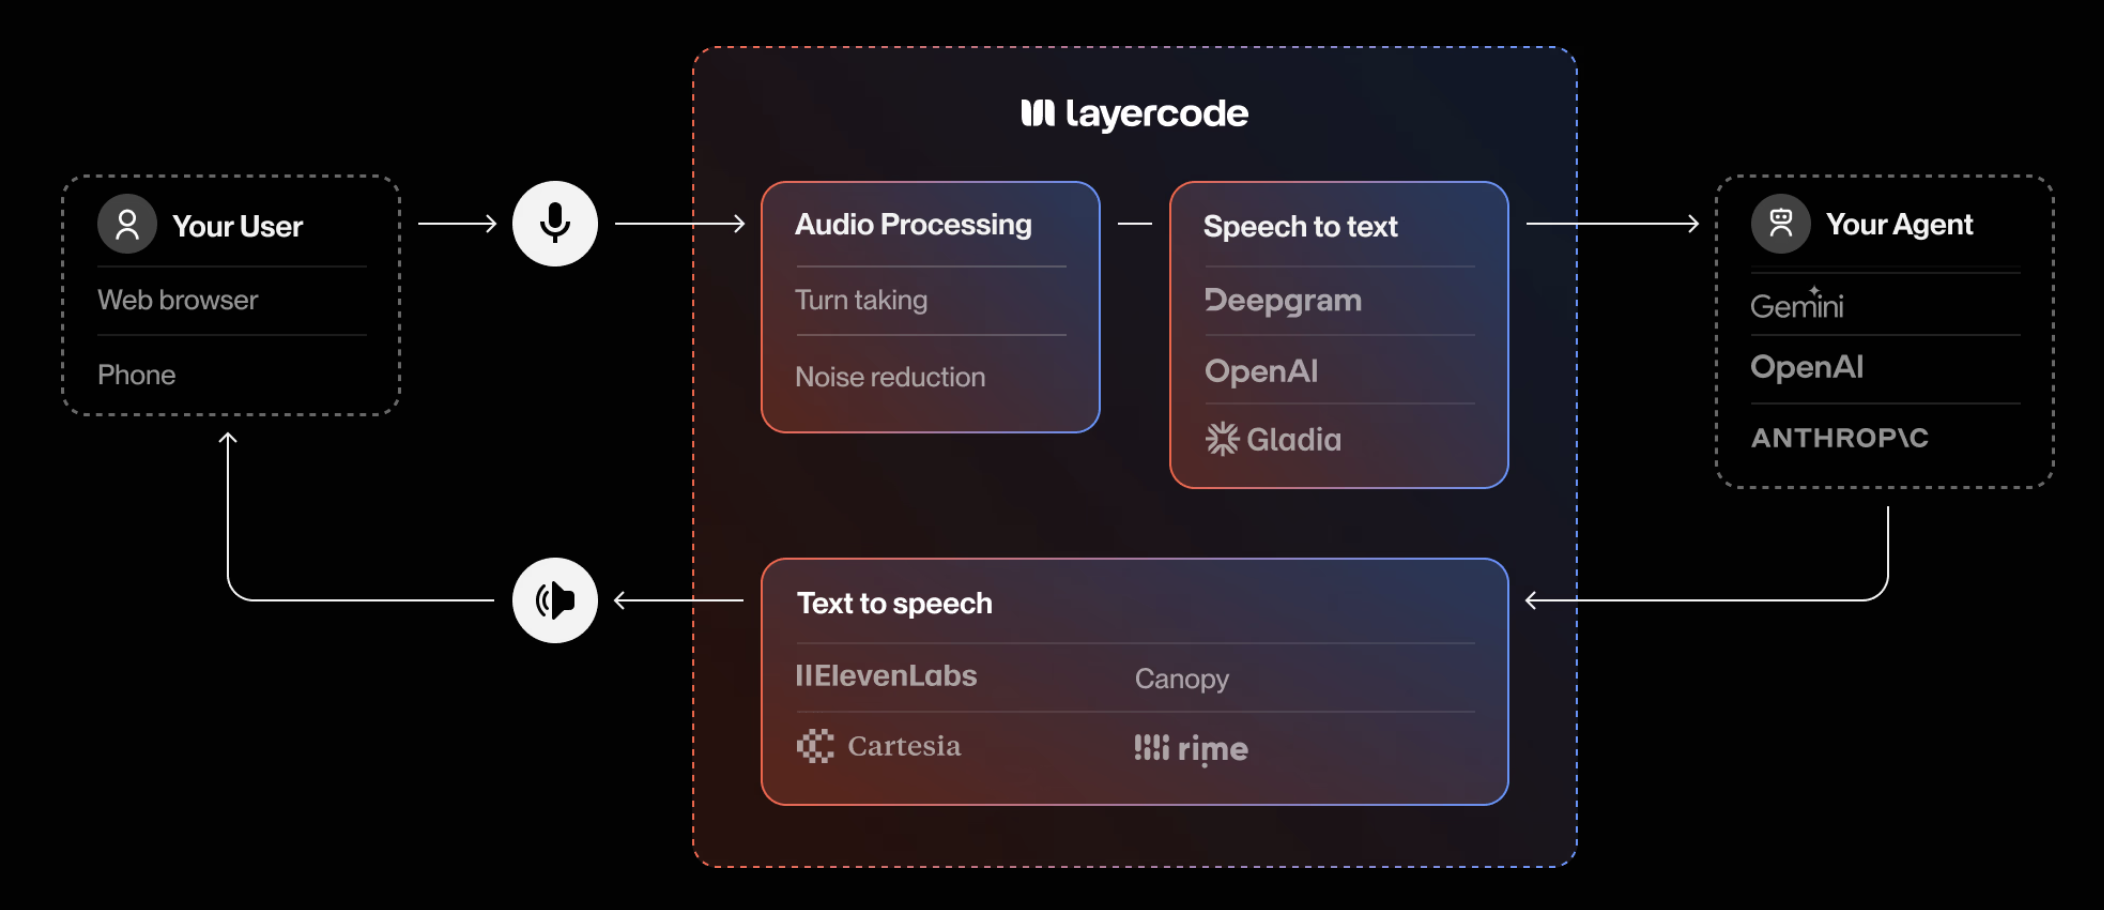
Our cloud platform powers the real-time infrastructure required to deliver responsive, engaging voice interfaces—so you can focus on building exceptional conversational experiences.
- Low-latency, production-grade voice agents
Deliver natural, real-time conversations to your users, wherever they are. - Full control, zero lock-in
Easily configure your agent, swap between leading voice model providers, and plug in your own agent backend with a single webhook. - Build voice agents for the web, mobile or phone
Add voice into your web and mobile apps. Coming soon: handle incoming and outgoing calls with your voice agent. - Powerful, flexible voice agents
Mix and match audio processing plugins, transcription, and text-to-speech models. Support for 32+ languages and 100+ voices. - Global scale and reliability
Our network spans 330+ locations worldwide, ensuring every interaction is smooth, fast and reliable - wherever your users are. - Transparent pricing and flexible billing Only pay for what you use, per minute. No concurrency limits. Cartesia and ElevenLabs text-to-speech now run on your own API keys, while we continue to consolidate remaining managed provider usage into a single bill.
Layercode is built for developers who want to:
- Add voice to LLM-powered agents and apps
- Build custom, multi-lingual voice assistants
- Support for web, mobile and phone (coming soon) voice agents
- Integrate voice into customer support, sales, training, and more
- Use the latest voice AI models - without vendor lock-in
Create your first real-time voice agent →
Source: https://docs.layercode.com/explanations/speech-to-text
Transcription engines available in the Layercode pipeline.
Layercode keeps speech recognition modular so you can match the right engine to each pipeline. Today we offer Deepgram's latest streaming stack as the single speech-to-text integration available in production, delivering the fastest and most accurate in-call transcription we support.
- Model:
nova-3, Deepgram's flagship speech-to-text model tuned for high-accuracy, low-latency conversational AI. - Real-time features: Smart formatting, interim hypotheses, and MIP opt-out are all enabled to optimize conversational turn taking out of the box. Nova-3's latency profile keeps responses within the sub-second expectations of interactive agents.
- Audio formats: We normalize audio to 8 kHz linear PCM or μ-law depending on transport requirements, so Nova-3 receives the clean signal it expects in both browser and telephony scenarios.
- Connectivity: Choose the managed Cloudflare route (provider
deepgram) or connect directly to Deepgram (deepgram_cloud). We merge your configuration with our defaults and set the appropriate authorization headers for each mode.
Add your Deepgram API key in Settings → Providers to unlock direct Deepgram access. If you do not supply a key, the pipeline uses our Cloudflare-managed path with the same Nova-3 model. Deepgram Nova-3 combines the accuracy improvements announced in their Nova-3 launch with Layercode's interruption handling to keep transcripts actionable in real time.
Source: https://docs.layercode.com/explanations/text-to-speech
How Layercode streams audio with Cartesia, ElevenLabs, and Rime.
Layercode supports three real-time text to speech (TTS) integrations. Each runs inside the same low-latency pipeline, but the configuration, pricing, and recommended use cases differ. Rime is the only managed (non-BYOK) option; Cartesia and ElevenLabs require your own credentials.
- Model:
sonic-2, the model we configure in the Layercode pipeline. - Voices: Starts with the "Mia" preset (
1d3ba41a-96e6-44ad-aabb-9817c56caa68), with support for any Cartesia voice ID. - Audio formats: Streams 16 kHz PCM by default and can downshift to 8 kHz μ-law for phone use.
- Timestamps: Word-level timestamps are enabled automatically, making Cartesia ideal when you need precise interruption handling.
Use Cartesia when you already manage a Cartesia account and want detailed timestamps with full access to Cartesia's voice library. Add your Cartesia API key on the Settings → Providers page to activate streaming; without a key we fall back to the managed Rime voice.
- Model:
eleven_v2_5_flash, the streaming model Layercode enables by default. - Voices: Defaults to the "Alloy" voice but accepts any ElevenLabs voice ID plus optional stability/similarity controls.
- Audio formats: Streams 16 kHz PCM for the web and 8 kHz μ-law for telephony scenarios.
- Timestamps: Character-level alignment is requested (
sync_alignment=true) so you receive live timestamps for captions and interruptions.
Choose ElevenLabs when you want to leverage your existing ElevenLabs voices or studio cloning features. Provide your ElevenLabs API key in Settings → Providers; pipelines without a key automatically move to the managed Rime voice.
- Model:
mistv2, the default managed voice inside Layercode. Mist v2 delivers unmatched accuracy, speed, and customization at scale—ideal for high-volume, business-critical conversations. - Voices: Ships with "Ana" out of the box, and we frequently use "Courtney" for fallbacks; any Rime speaker ID is supported to match the tone you need.
- Audio formats: Streams PCM, MP3, or μ-law depending on your transport, so it works for the web and PSTN without extra conversion.
- Timestamps: Provides streaming timestamps for accurate barge-in and captioning, helping you maintain fast turn taking.
Rime is the easiest way to get started: Layercode manages the credentials, so it works immediately even if you have not supplied any third-party keys. Mist v2's precision voices help convert prospects, retain customers, and drive sales with messages that resonate, making it a strong default when you prefer consolidated billing.
- Start with Rime if you want instant setup with managed billing.
- Switch to Cartesia when you own a Cartesia account and need high-fidelity voices with detailed timestamps.
- Use ElevenLabs when you need ElevenLabs' cloned voices or multilingual catalog and can provide your own key.
You can mix and match providers per pipeline, so experiment with different voices and formats to find the best fit for your experience.
Source: https://docs.layercode.com/explanations/tool-calling
How to set up tool calling with Layercode. Also known as function calling.
Function calling is one of the first things you will want to do after setting up your agent.
Because Layercode let's you work directly with text, you can use existing tools.
There are many frameworks which can help you with function calling.
- ai SDK
- mastra - see example here
We have written a guide on tool calling in Next.js with Layercode
Source: https://docs.layercode.com/explanations/turn-taking
Choosing the right turn taking strategy for your voice application is key to building a successful voice AI experience. Layercode supports multiple turn taking modes, so you can choose the best one for your use case. The best Turn Taking Mode to use depends on your voice application's use case and the environment your users are in. You may need to experiment with different modes to find the best fit for your application.
For most use cases, the default "Automatic" turn taking mode (with Can Interrupt enabled) is the best option to begin with. This will let users speak freely to the AI, and interrupt it at any time. But if your users are in a noisy environment you may find that this noise inadvertently interrupts the AI's response mid sentence.
One solution to this is to disable Can Interrupt. In this case the user's response will only be listened to after the AI has finished speaking. The user will not be able to interrupt the AI mid sentence, and will always have to wait for the AI to finish. The downside of this approach is that users may become impatient if the AI's responses are long.
When building voice AI for the web or mobile, you can enable Push to Talk mode. This mode requires a small config change in your web or app frontend (we include this in all our demo apps).
In this mode, the user must hold down a button to speak. When the user holds down the button, their speech is transcribed. When the user releases the button, the AI will respond. This mode is great for noisy environments, or situations where you want the user to have complete control over the conversation.
Source: https://docs.layercode.com/explanations/webhooks
How to receive events from Layercode
Layercode delivers conversation updates to your backend through HTTPS webhooks. Each time a user joins, speaks, or finishes a session, the voice pipeline posts JSON to the webhook URL configured on your agent.
In reply to this, your backend can stream text replies back with Server-Sent Events (SSE), and Layercode will use a text to speech model to return voice back to your user.
We tell your backend - in text - what the user said. And your backend tells Layercode - in text - what to speak back to the user.
In order to receive and process messages from your users, you need a backend endpoint that Layercode can communicate with.
For example, in Next.js it might look something like this:
export const dynamic = 'force-dynamic';
import { streamResponse, verifySignature } from '@layercode/node-server-sdk';
export const POST = async (request: Request) => {
const requestBody = (await request.json()) as WebhookRequest;
// Authorization goes here! (explained below)
const { text: userText } = requestBody;
console.log('user said: ', userText);
// This is where all your LLM stuff can go to generate your response
const aiResponse = 'thank you for your message'; // this would be dynamic in your application
await stream.ttsTextStream(aiResponse);
};Note: authorization is below
Now you have an endpoint to receive messages from Layercode, you need to tell Layercode where to send your events.
Go to Layercode's dashboard, create or use an existing agent.
Go to manual setup and type in the API endpoint that Layercode should send requests to.
If your endpoint is just in your root, then you would use the url of your host. If it's in /voice-agent use your host/voice-agent.
If you're using one of our Next.js examples, you will see the path to receive the requests from Layercode is /api/agent
If you're developing locally, you will need to run a tunnel such as cloudflared or ngrok and paste the tunnel URL into the dashboard (with the path of your endpoint in your app appended - for example tunnel-url/api/agent). Our tunnelling guide walks through the setup.
You should make sure that only authorized requests are sent to this endpoint. To do this, we expose a secret that you can find in the same location you used above.
You should save this secret with the other secrets in your backend and verify each incoming request to
export const dynamic = 'force-dynamic';
import { streamResponse, verifySignature } from '@layercode/node-server-sdk';
export const POST = async (request: Request) => {
const requestBody = (await request.json()) as WebhookRequest;
// Verify this webhook request is from Layercode
const signature = request.headers.get('layercode-signature') || '';
const secret = process.env.LAYERCODE_WEBHOOK_SECRET || '';
const isValid = verifySignature({
payload: JSON.stringify(requestBody),
signature,
secret
});
if (!isValid) return new Response('Invalid layercode-signature', { status: 401 });
const { text: userText } = requestBody;
console.log('user said: ', userText);
// This is where all your LLM stuff can go to generate your response
const aiResponse = 'thank you for your message'; // this would be dynamic in your application
await stream.ttsTextStream(aiResponse);
};You can see details on the data that Layercode sends to this endpoint here
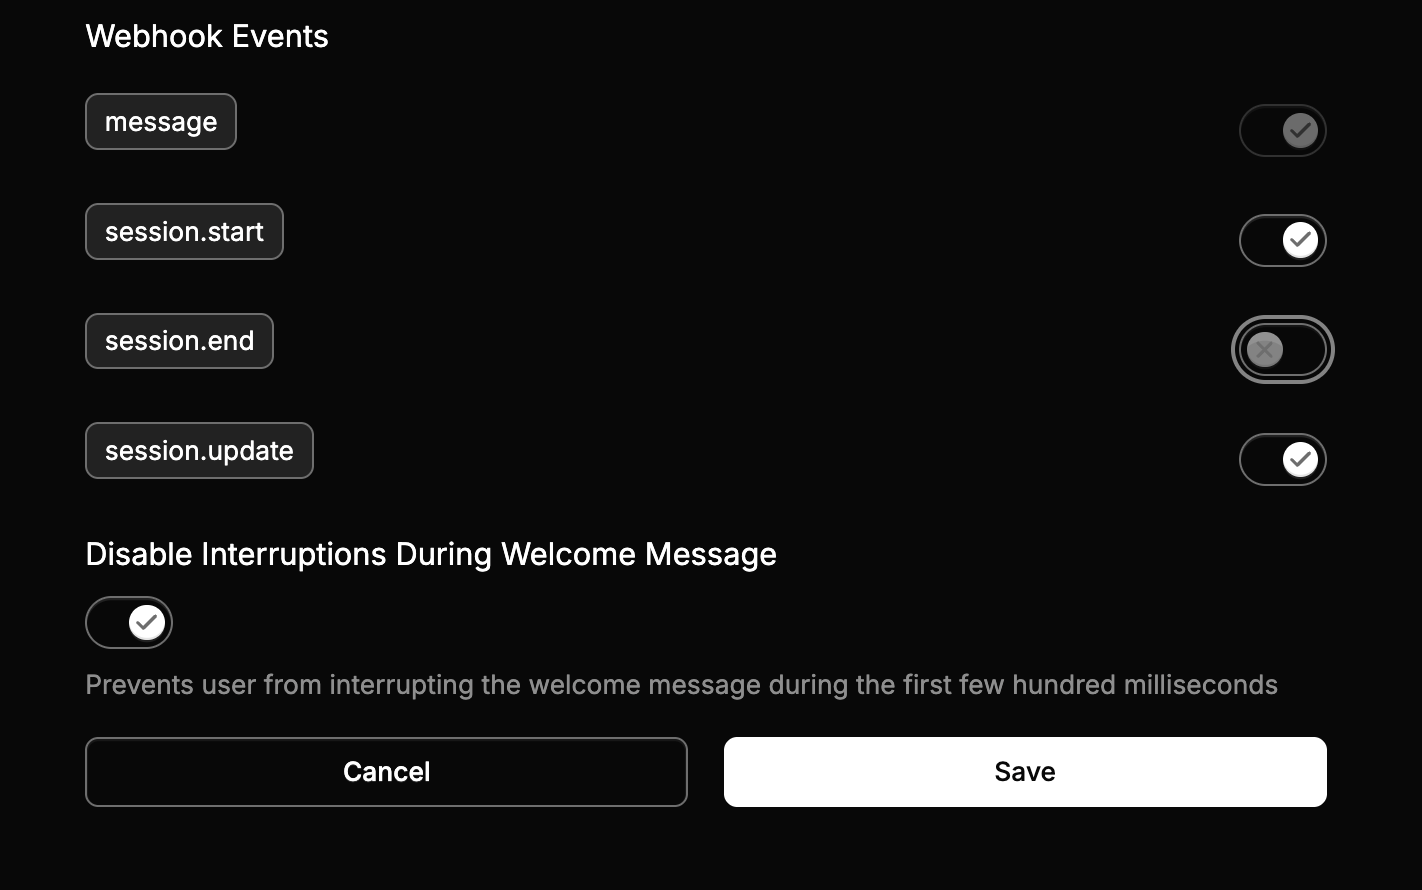
You can also toggle the events you want delivered:
message– (required) Fired after speech-to-text transcription completes for the user’s turn.session.start– Sent as soon as a session opens so you can greet the user proactively.session.end– Delivered when a session closes, including timing metrics and the full transcript.session.update– Sent asynchronously once a session recording finishes processing (requires session recording to be enabled for the org).
It's great to receive messages from users but of course you want to reply too.
We can use a method on Layercode's stream object to reply await stream.ttsTextStream("this is my reply");
Source: https://docs.layercode.com/how-tos/deploy-nextjs-to-cloudflare
Some tips when deploying a Next.js voice agent to Cloudflare
Layercode runs in our cloud, but you will need to deploy your Next.js application to provide your APIs and agent functionality (LLMs and tool calling).
Plus if you are building for web, your Next.js acts as the client.
This guide assumes you already have your Next.js application running locally with Layercode. If not, pleae follow our getting started guide
If you are using our Cloudflare getting-started project, you can simply run npm run deploy
Otherwise, you should run
npm i @opennextjs/cloudflareif it doesn't exist already, add a deploy script in your package.json
"deploy": "opennextjs-cloudflare build && opennextjs-cloudflare deploy"Then run
npm run deployYou will be asked to create/connect a Cloudflare account if you don't already have one connected.
note: you will need to use npm to deploy to Cloudflare because it expects a package-lock.json file*
You should see an ouput like this:
Total Upload: 5867.42 KiB / gzip: 1177.82 KiB
Worker Startup Time: 25 ms
Your Worker has access to the following bindings:
Binding Resource
env.ASSETS Assets
Uploaded jolly-queen-84e7 (16.45 sec)
Deployed jolly-queen-84e7 triggers (4.70 sec)
https://jolly-queen-84e7.jacksbridger.workers.dev
Current Version ID: 047446f6-055e-46b0-b67a-b45cb14fa8e8
Take that url (e.g. https://jolly-queen-84e7.jacksbridger.workers.dev) of your backend and save it into the Layercode agent backend settings under webhook url (append the appropriate path for your API e.g. https://jolly-queen-84e7.jacksbridger.workers.dev/api/agent)
Then your application should run. But please reach out if you run into any issues.
You can use Cloudflare Workers Builds to deploy your application on GitHub commits. You connect your GitHub repository to your Worker by following these steps.
In the Build settings:
- The "Build command" should be set to
npx opennextjs-cloudflare build. - The "Deploy command" should be set to
npx opennextjs-cloudflare deploy. - The environment variables you previously set in
.envmust be copied and set in the "Build variables and secrets" section. This is so thatnpm next buildexecuted by Workers Builds will have access to the environment variables. It needs that access to inline the NEXT_PUBLIC_... variables and access non-NEXT_PUBLIC_... variables needed for SSG pages. If you don't do this, you'll find the NEXT_PUBLIC_LAYERCODE_AGENT_ID env variable is missing and your voice agent won't work.
Note: do not change your package.json build command. It should stay as next build.
Source: https://docs.layercode.com/how-tos/deploy-nextjs-to-vercel
Some tips when deploying a voice agent to Vercel
Layercode runs in our cloud, but you will need to deploy your Next.js application to provide your APIs and agent functionality (LLMs and tool calling).
Plus if you are building for web, your Next.js acts as the client.
This guide assumes you already have your application running locally with Layercode. If not, pleae follow our getting started guide
To deploy to Vercel:
- push your changes to a remote repo (i.e. GitHub/GitLab).
- Sign up at Vercel, Click Add New project
- Then import your Git Respository
- Paste in your environmental variables from
.env - Deploy
- Take that url (e.g. https://fullstack-nextjs-vercel-five.vercel.app/) of your backend and save it into the Layercode agent backend settings under webhook url (append the appropriate path for your API e.g. https://fullstack-nextjs-vercel-five.vercel.app/api/agent)
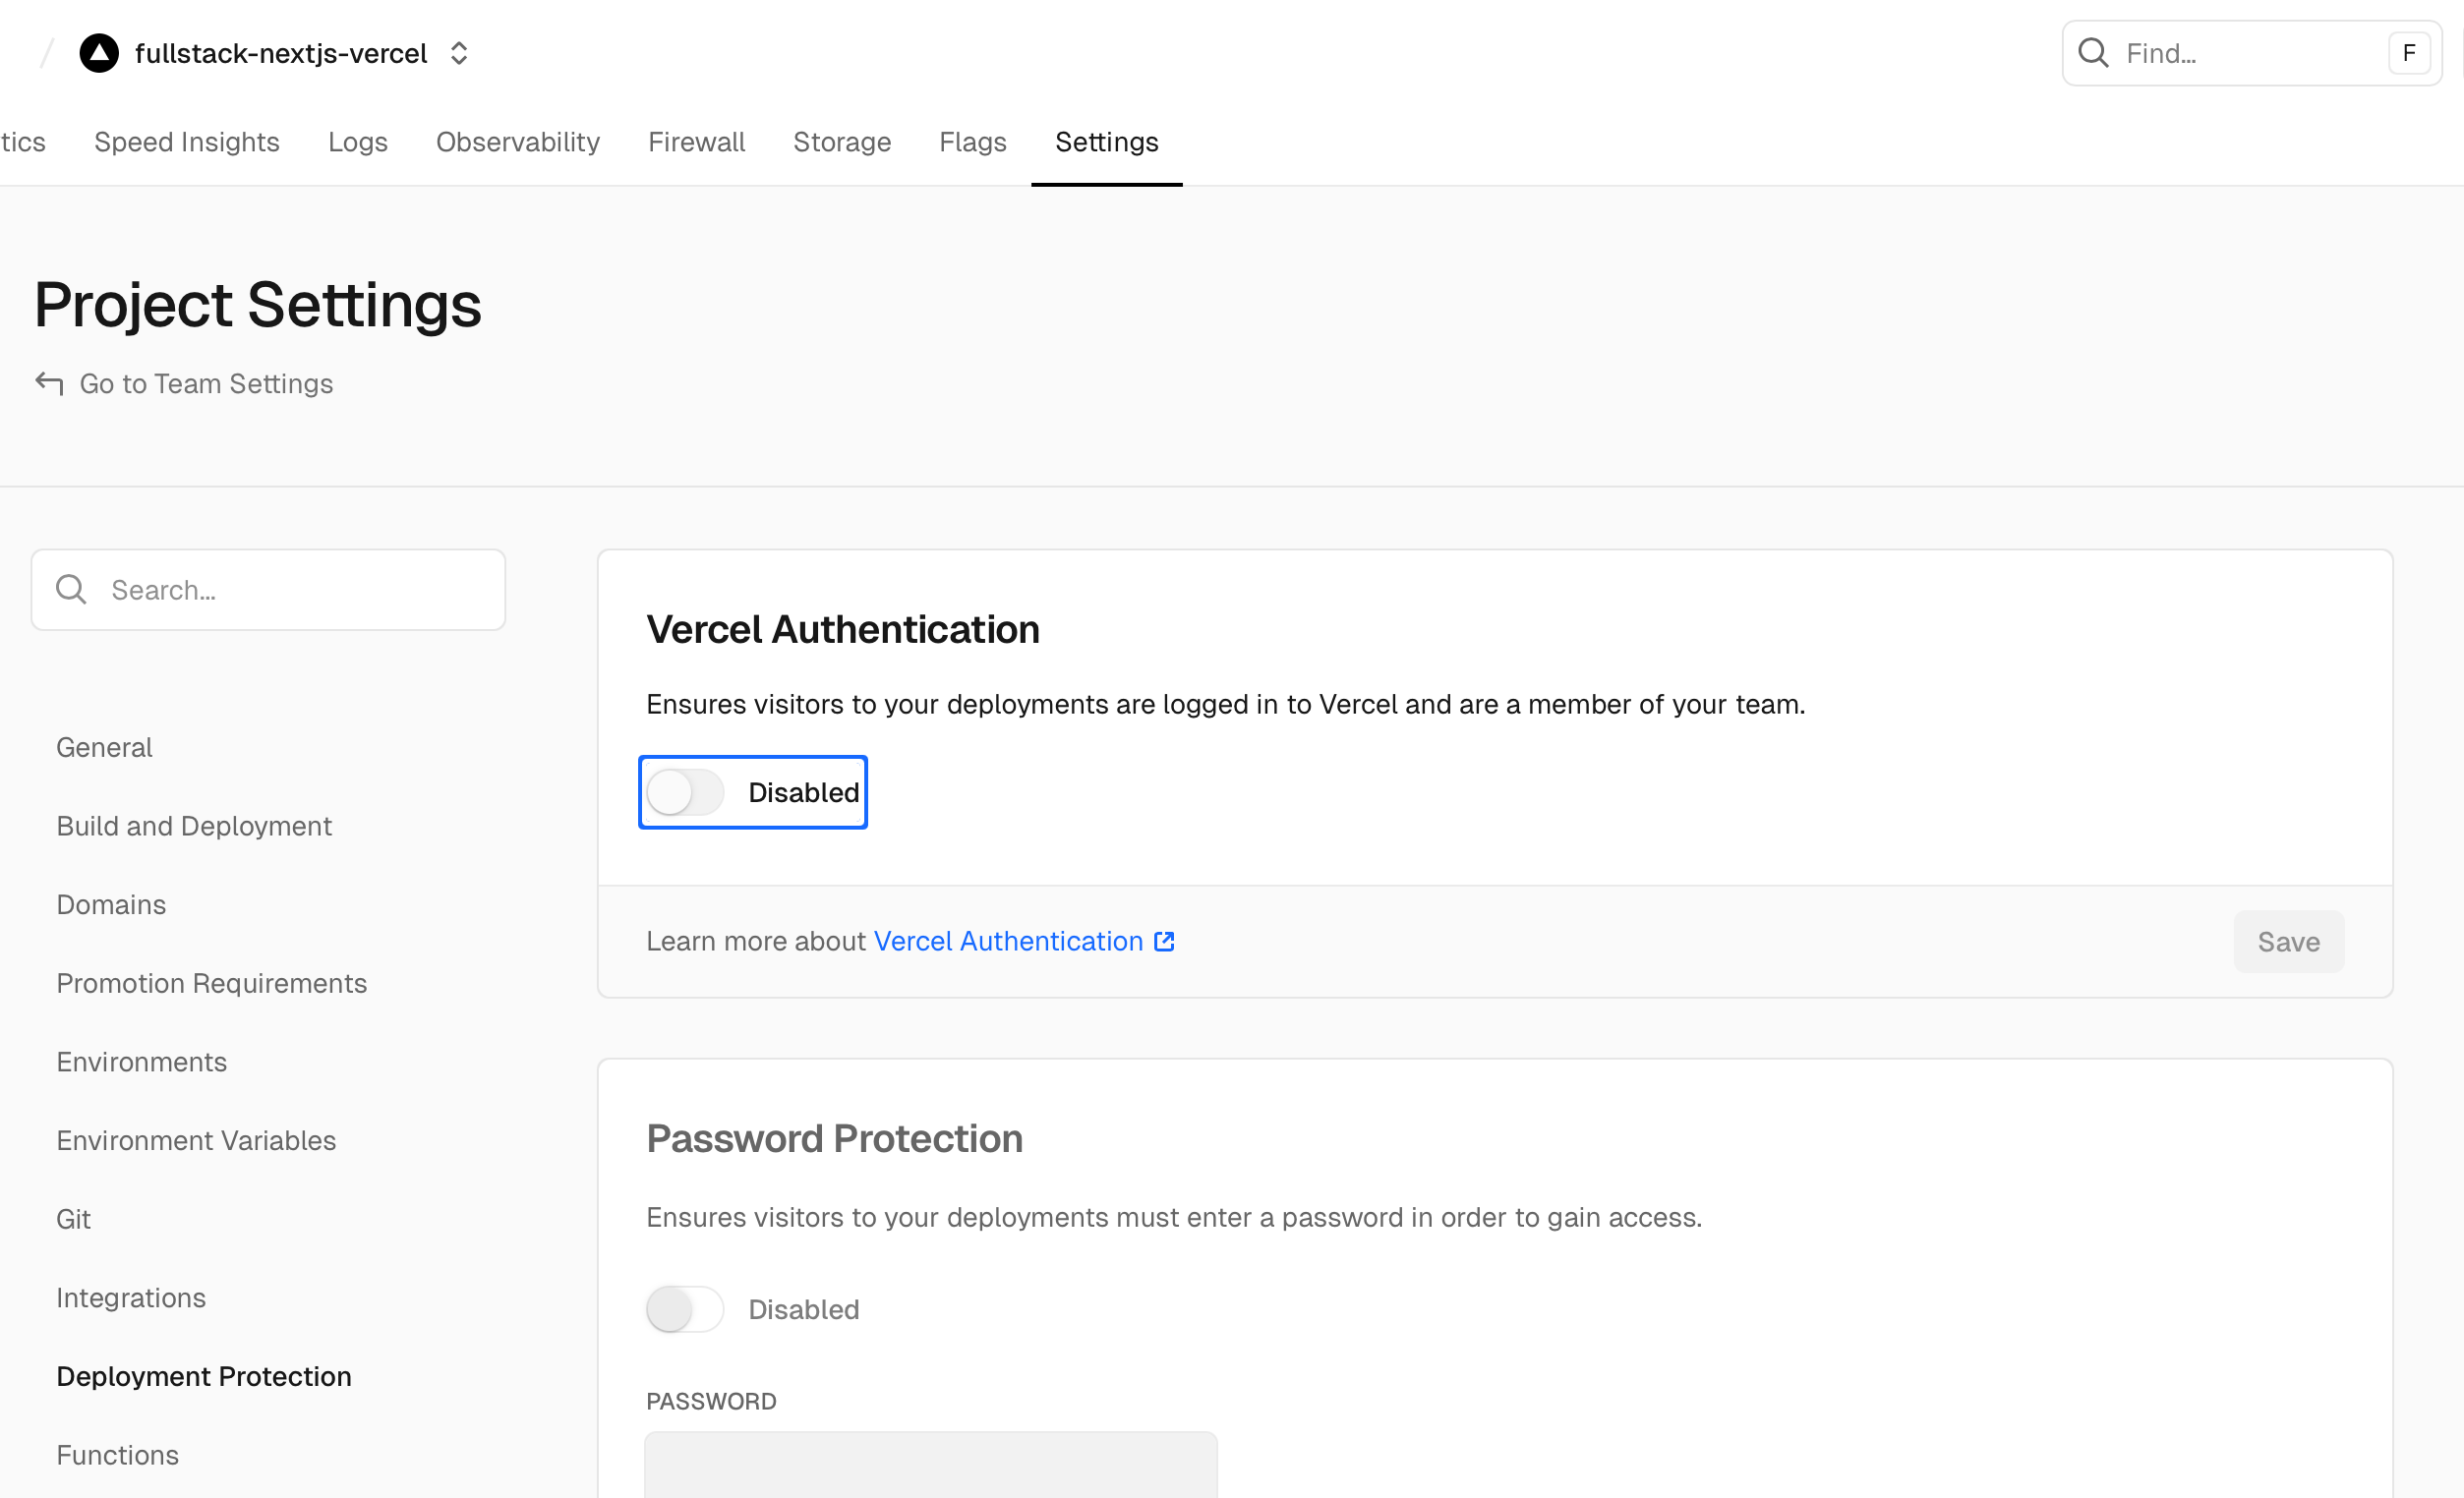
When deploying to Vercel, you MUST disable Vercel Authentication to allow Layercode webhooks to be received.
By default for pro plans, Vercel blocks external requests to your application /api routes.
This means that Layercode webhooks will not be received by your application, and your voice agent will not work. Disable Vercel Authentication by going to your project settings in the Vercel dashboard, then go to "Deployment Protection" in left sidebar menu, then turn off "Vercel Authentication" and Save. You do not need to redeploy.
You can check your Webhook Logs in the Layercode dashboard to ensure that webhooks are being received successfully. If you receive a 405 error response to webhooks, this indicates that Vercel Authentication is still enabled.
Note: if you're on a free tier, you may not need to make this change.
Source: https://docs.layercode.com/how-tos/deploying
Point Layercode to your production backend and manage environments
Use this guide when moving from local development (tunnel Webhook URL) to a stable production deployment.
In the Layercode dashboard:
- Open the agent you want to be your production agent and click Connect Your Backend
- Set your Webhook URL to your production endpoint, e.g.
https://your-domain.com/api/agent - Save changes
Keep signature verification enabled in your /api/agent route. This protects your app from spoofed requests.
Store your agent IDs in environment variables and swap values per environment. For example:
# .env
NEXT_PUBLIC_LAYERCODE_AGENT_ID=prod_agent_idUse a different value in development or staging so each environment connects to the correct agent.
Source: https://docs.layercode.com/how-tos/outbound-calls
Using your Layercode Agent to make outbound phone calls
You will need:- A Layercode Agent with an assigned Twilio phone number (see Inbound calls with Twilio)
This guide walks you through triggering an outbound phone call from your Layercode Agent.
To trigger an outbound call, use the https://api.layercode.com/v1/agents/AGENT_ID/calls/initiate_outbound endpoint. You can call this endpoint from your backend whenever you want to initiate a call. You must have already set up your Layercode Agent to work with Twilio. If you haven't done that yet, see Inbound calls with Twilio.
Goto REST API docs for more details about calling initiate_outbound.
  curl -X POST https://api.layercode.com/v1/agents/ag-123456/calls/initiate_outbound \
  -H 'Authorization: Bearer $LAYERCODE_API_KEY' \
  -H 'Content-Type: application/json' \
  -D '{
      "from_phone_number": "NUMBER_ASSIGNED_TO_YOUR_AGENT",
      "to_phone_number": "PHONE_NUMBER_TO_CALL"
}'Source: https://docs.layercode.com/how-tos/prompting
Some quick examples and tips for writing prompts for voice AI.
Using the right system prompt is especially important when building Voice AI Agents. LLMs are primarily trained on written text, so they tend to produce output that is more formal and structured than natural speech. By carefully crafting your prompt, you can guide the model to generate responses that sound more conversational and human-like.
You are a helpful conversation voice AI assistant.
You are having a spoken conversation.
Your responses will be read aloud by a text-to-speech system.
You should respond to the user's message in a conversational manner that matches spoken word. Punctuation should still always be included.
Never output markdown, emojis or special characters.
Use contractions naturally.
Pronounciation of numbers, dates, times, and special characters is also crucial for voice applications. TTS (text-to-speech) providers handle pronounciations in different ways. A good base prompt that guides the LLM to use words to spell out numbers, dates, addresses etc will work for common cases.
Convert the output text into a format suitable for text-to-speech. Ensure that numbers, symbols, and abbreviations are expanded for clarity when read aloud. Expand all abbreviations to their full spoken forms.

Example input and output:

"$42.50" → "forty-two dollars and fifty cents"
"£1,001.32" → "one thousand and one pounds and thirty-two pence"
"1234" → "one thousand two hundred thirty-four"
"3.14" → "three point one four"
"555-555-5555" → "five five five, five five five, five five five five"
"2nd" → "second"
"XIV" → "fourteen" - unless it's a title, then it's "the fourteenth"
"3.5" → "three point five"
"⅔" → "two-thirds"
"Dr." → "Doctor"
"Ave." → "Avenue"
"St." → "Street" (but saints like "St. Patrick" should remain)
"Ctrl + Z" → "control z"
"100km" → "one hundred kilometers"
"100%" → "one hundred percent"
"elevenlabs.io/docs" → "eleven labs dot io slash docs"
"2024-01-01" → "January first, two-thousand twenty-four"
"123 Main St, Anytown, USA" → "one two three Main Street, Anytown, United States of America"
"14:30" → "two thirty PM"
"01/02/2023" → "January second, two-thousand twenty-three" or "the first of February, two-thousand twenty-three", depending on locale of the user
Source: https://docs.layercode.com/how-tos/push-to-talk
Configure push-to-talk turn taking with the Layercode React SDK.
By default, Layercode agents use automatic turn taking. If you prefer explicit control—press and hold to speak—enable push-to-talk in your agent and wire up the callbacks in your UI.
In your agent panel on https://dash.layercode.com/ → Transcriber → Settings → set Turn Taking to Push to Talk → Save your changes.
When using push-to-talk, call triggerUserTurnStarted() when the user begins speaking (pressing the button), and triggerUserTurnFinished() when they stop (releasing the button).
'use client';
import { useLayercodeAgent } from '@layercode/react-sdk';

export default function VoiceAgentPushToTalk() {
  const { status, triggerUserTurnStarted, triggerUserTurnFinished } = useLayercodeAgent({
    agentId: process.env.NEXT_PUBLIC_LAYERCODE_AGENT_ID!,
    authorizeSessionEndpoint: '/api/authorize'
  });

  return (
    <button
      className="h-12 px-4 rounded-full flex items-center gap-2 justify-center bg-black text-white"
      onMouseDown={triggerUserTurnStarted}
      onMouseUp={triggerUserTurnFinished}
      onMouseLeave={triggerUserTurnFinished}
      onTouchStart={triggerUserTurnStarted}
      onTouchEnd={triggerUserTurnFinished}
    >
      {status === 'connected' ? 'Hold to Speak' : 'Connecting…'}
    </button>
  );
}Source: https://docs.layercode.com/how-tos/send-text-messages
Capture text input in your UI and hand it to a Layercode agent without streaming audio.
Layercode agents normally consume live microphone audio, but some experiences need a text fallback—think chat bubbles, accessibility flows, or quick corrections while the mic is muted. The WebSocket API and SDKs expose sendClientResponseText for exactly that: send the full utterance as text, close the user turn, and let the agent reply immediately.
This guide shows how to wire text messages in both Vanilla JS and React.
The LayercodeClient instance exposes sendClientResponseText. Add a simple form that forwards the entered text and clears the field when submitted.
<form id="text-response-form">
  <input id="client-response-text" type="text" placeholder="Type your reply" />
  <button type="submit">Send</button>
</form>

<script type="module">
  import LayercodeClient from 'https://cdn.jsdelivr.net/npm/@layercode/js-sdk@latest/dist/layercode-js-sdk.esm.js';

  window.layercode = new LayercodeClient({
    agentId: 'your-agent-id',
    authorizeSessionEndpoint: '/api/authorize'
  });

  window.layercode.connect();

  const form = document.getElementById('text-response-form');
  const input = document.getElementById('client-response-text');

  form.addEventListener('submit', (event) => {
    event.preventDefault();
    const message = input.value.trim();
    if (!message) return;
    window.layercode.sendClientResponseText(message);
    input.value = '';
  });
</script>
What happens when you call sendClientResponseText:
- The current user turn is closed, even if no audio was streamed.
user.transcriptevent is emitted so your UI stays in sync.- The agent receives the text message through the regular webhook path and responds immediately.
The React SDK exposes the same capability via the useLayercodeAgent hook. Grab the sendClientResponseText method from the hook and call it from your form handler.
'use client';
import { FormEvent } from 'react';
import { useLayercodeAgent } from '@layercode/react-sdk';

export function TextReplyForm() {
  const { status, sendClientResponseText } = useLayercodeAgent({
    agentId: process.env.NEXT_PUBLIC_LAYERCODE_AGENT_ID!,
    authorizeSessionEndpoint: '/api/authorize'
  });

  const handleSubmit = (event: FormEvent<HTMLFormElement>) => {
    event.preventDefault();
    const form = event.currentTarget;
    const data = new FormData(form);
    const message = (data.get('message') as string).trim();
    if (!message) return;
    sendClientResponseText(message);
    form.reset();
  };

  return (
    <form onSubmit={handleSubmit}>
      <input type="text" name="message" placeholder="Type a reply" disabled={status !== 'connected'} />
      <button type="submit" disabled={status !== 'connected'}>
        Send
      </button>
    </form>
  );
}Source: https://docs.layercode.com/how-tos/sending-data-to-client
How to send data to your client via the Layercode stream
Sometimes you will want your Layercode stream to include additional data.
For example, you might want to update the user that the LLM is thinking or looking something up.
To do this, you can use the stream.data method. For example:
stream.data({
  status: 'thinking'
});
And on the client side, you can receive the data you send:
const {} = useLayercodeAgent({
  agentId: 'your-agent-id',
  authorizeSessionEndpoint: '/api/authorize',
  onDataMessage: (data) => console.log('Received data:', data) //  {status: 'thinking'}
});Source: https://docs.layercode.com/how-tos/setting-up-twilio
Setting up a voice agent to receive phone calls for you
You will need:- A Twilio account
- A Twilio phone number (can be a trial number)
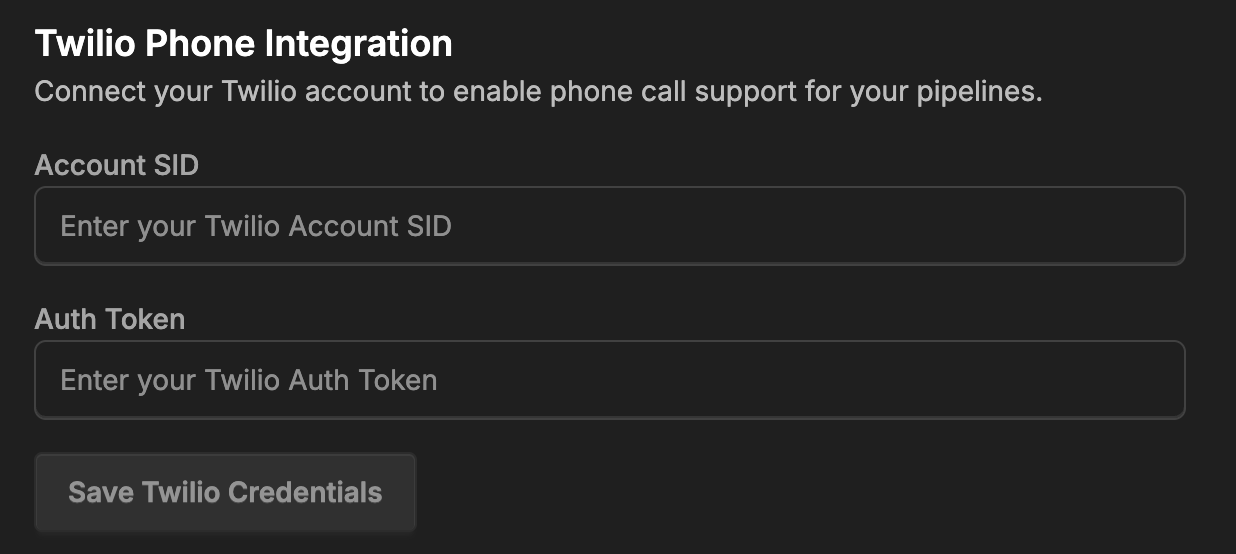
- Your Twilio Account SID and Auth Token
This guide walks you through configuring Layercode to answer calls to your Twilio phone number.
If you'd like to trigger outbound calls from your Layercode Agent, see [Outbound calls with Twilio](/how-tos/outbound-calls).- Go to the Layercode dashboard at https://dash.layercode.com and select your agent.
- Open the client settings, enable Twilio phone calls, and then save changes.

- Go to the Layercode settings at https://dash.layercode.com/settings.
- Add your Twilio Account SID and Auth Token, then save.
- Return to your agent's client settings. You should now be able to select a Twilio phone number.
from/to phone numbers (and country codes) on the session. See the [REST API](/api-reference/rest-api#sessions) for retrieving these details along with transcripts and recordings.
-
Test by calling the number. For a quick check, set a short welcome message in Layercode (for example, "Hello from Layercode").
-
To run Twilio in production, you will need a backend where you can run your LLM flow. You should review one of our backend tutorials, for example, check out our Next.js quick start. And you can consult the reference on webhooks to see how you can receive the
from_phone_numberandto_phone_number.
Source: https://docs.layercode.com/how-tos/tool-calling-js
How to setup tool calling in Next.js with Layercode and ai sdk.
Here's how to set up tool calling in Next.js.
Make sure you have ai and zod installed.
pnpm install ai zodyarn install ai zodbun install ai zodIn your backend, where your agent is running, import tool and stepCountIs from ai and import zod.
Note: you probably already imported streamText and ModelMessage
import { streamText, ModelMessage, tool, stepCountIs } from 'ai';
import z from 'zod';
Inside the callback of your layercode streamResponse in the case of a message received, initialize a tool. For instance, weather
const weather = tool({
  description: 'Get the weather in a location',
  inputSchema: z.object({
    location: z.string().describe('The location to get the weather for')
  }),
  execute: async ({ location }) => ({
    location,
    temperature: 72 + Math.floor(Math.random() * 21)
  })
});
Then set
tools: {
  weather;
}
as a property inside streamText
You should also set these properties
toolChoice: 'auto',
stopWhen: stepCountIs(10),
You can find more info in the ai sdk docs.
Once you have this, make sure your prompt mentions the tool is available. For example add "you can use the weather tool to find the weather for a given location."
And now, it should let you query the weather and you'll see it's a different temperature (between 72 and 92) each time because it has some randomness in the function.
One thing many many developers wish to do is update the user that tool calling is happening so they don't expect an immediate response.
To do this, your tools can notify the client that there is a tool call happening. This guide will show you how you can do that.
Source: https://docs.layercode.com/how-tos/troubleshooting-nextjs
Some releavant tips and gotchas when building with Next.js and Layercode
For instance
'use client';
import dynamic from 'next/dynamic';

// Dynamically import the VoiceAgent component with SSR disabled
const VoiceAgent = dynamic(() => import('./ui/VoiceAgent'), { ssr: false });

export default function Home() {
  return <VoiceAgent />;
}
You can see an example here
Source: https://docs.layercode.com/how-tos/tunnelling
Expose your local backend to Layercode using Cloudflare Tunnel.
Layercode needs to send a webhook to your backend to generate agent responses. If you're running your backend locally, you'll need to expose it to the internet using a tunnel service.We recommend using cloudflared, which is free for development.
* **macOS:** `brew install cloudflared` * **Windows:** `winget install --id Cloudflare.cloudflared` * [Other platforms](https://developers.cloudflare.com/cloudflare-one/connections/connect-networks/downloads/) Run the following command to expose your local server:```bash
cloudflared tunnel --url http://localhost:YOUR_PORT
```
```
https://my-tunnel-name.trycloudflare.com
```

Add the path of your backend's webhook endpoint to the URL, e.g.:

```
https://my-tunnel-name.trycloudflare.com/api/agent
```

`/api/agent` is just an example. Your actual endpoint may be different depending on your backend configuration.
Open the agent Playground tab and start speaking to your voice agent!
If you're having trouble, make sure your backend server is running and listening on the specified port (e.g., 3000). You can also visit the Webhook Logs tab in the agent to see the webhook requests being sent and any errors returned. Every time you restart the cloudflared tunnel, the assigned public URL will change. Be sure to update the webhook URL in the Layercode dashboard each time you restart the tunnel.Besides cloudflared, you can also use other tunneling solutions like ngrok to expose your local backend.
By default, Vite blocks requests from other hosts, so you will need to add your Cloudflared (or ngrok, etc.) address to vite.config.ts in server.allowedHosts.
For example:
allowedHosts: ['suggesting-sri-pair-hugh.trycloudflare.com'];Source: https://docs.layercode.com/sdk-reference/node-js-sdk
API reference for the Layercode Node.js Backend SDK.
The Layercode Node.js Backend SDK provides a simple way to handle the Layercode webhook in your backend. In particular, it makes it easy to return SSE events in the Layercode webhook response format. It supports all popular JavaScript runtime environments, including Node.js, Bun, and Cloudflare Workers.
npm install @layercode/node-server-sdkimport { streamResponse } from '@layercode/node-server-sdk';
//... inside your webhook request handler ...
return streamResponse(request, async ({ stream }) => {
stream.tts('Hi, how can I help you today?'); // This text will be sent to Layercode, converted to speech and spoken to the user
// Call stream.tts() as many times as you need to send multiple pieces of speech to the user
stream.end(); // This closes the stream and must be called at the end of your response
});
// ...The streamResponse function is the main entry point for the SDK. It takes the request body (from the Layercode webhook request) and a handler function as arguments. The handler function receives a stream object that can be used to send SSE events to the client.
function streamResponse(requestBody: Record<string, any>, handler: StreamResponseHandler): Response;requestBody: The request body from the client. See Webhook Request Payload.handler: An async function that receives astreamobject.
stream.tts(content: string): Sends a text to be spoken to the user (tts stands for text-to-speech).stream.data(content: any): Sends any arbitrary data to the frontend client. Use this for updating your frontend UI.stream.end(): Closes the stream. Must be called at the end of your response.
Source: https://docs.layercode.com/sdk-reference/python-sdk
API reference for the Layercode Python Backend SDK.
We're working on the Python SDK. But the Layercode webhook is simple enough, that you can implement it in just a few lines of code. See the FastAPI Backend Guide for a full walkthrough.
Source: https://docs.layercode.com/sdk-reference/react-sdk
Connect your React application to Layercode agents and build web and mobile voice AI applications.
The useLayercodeAgent hook provides a simple way to connect your React app to a Layercode agent, handling audio streaming, playback, and real-time communication.
// Connect to a Layercode agent const { // Methods triggerUserTurnStarted, triggerUserTurnFinished, sendClientResponseText,
// State
status,
userAudioAmplitude,
agentAudioAmplitude,
} = useLayercodeAgent({ agentId: "your-agent-id", authorizeSessionEndpoint: "/api/authorize", conversationId: "optional-conversation-id", // optional metadata: { userId: "user-123" }, // optional onConnect: ({ conversationId }) => console.log("Connected to agent", conversationId), onDisconnect: () => console.log("Disconnected from agent"), onError: (error) => console.error("Agent error:", error), onDataMessage: (data) => console.log("Received data:", data), });
</RequestExample>

## Hook Options

<ParamField path="agentId" type="string" required>
The ID of your Layercode agent.
</ParamField>

<ParamField path="authorizeSessionEndpoint" type="string" required>
The endpoint to authorize the session (should return a `client_session_key` and `session_id`).
Note: From Mon Sep 1, 12:00 UTC, the response will include `conversation_id` instead of `session_id` (see REST API page).
</ParamField>

<ParamField path="conversationId" type="string">
The conversation ID to resume a previous conversation (optional).
</ParamField>

<ParamField path="metadata" type="object">
Any metadata included here will be passed along to your backend with all webhooks.
</ParamField>

<ParamField path="onConnect" type="function">
Callback when the connection is established. Receives an object: `{ conversationId: string | null }`.
</ParamField>

<ParamField path="onDisconnect" type="function">
Callback when the connection is closed.
</ParamField>

<ParamField path="onError" type="function">
Callback when an error occurs. Receives an `Error` object.
</ParamField>

<ParamField path="onDataMessage" type="function">
Callback for custom data messages from the server (see `response.data` events from your backend).
</ParamField>

## Return Values

The `useLayercodeAgent` hook returns an object with the following properties:

### State

<ParamField path="status" type="string">
The connection status. One of `"initializing"`, `"disconnected"`, `"connecting"`, `"connected"`, or `"error"`.
</ParamField>

<ParamField path="userAudioAmplitude" type="number">
Real-time amplitude of the user's microphone input (0-1). Useful for animating UI when the user is speaking.
</ParamField>

<ParamField path="agentAudioAmplitude" type="number">
Real-time amplitude of the agent's audio output (0-1). Useful for animating UI when the agent is speaking.
</ParamField>

### Turn-taking (Push-to-Talk)

Layercode supports both automatic and push-to-talk turn-taking. For push-to-talk, use these methods to signal when the user starts and stops speaking:

<ParamField path="triggerUserTurnStarted" type="function">
**triggerUserTurnStarted(): void** Signals that the user has started speaking (for [push-to-talk mode](/explanations/turn-taking#push-to-talk-mode)). Interrupts any agent audio
playback.
</ParamField>

<ParamField path="triggerUserTurnFinished" type="function">
**triggerUserTurnFinished(): void** Signals that the user has finished speaking (for [push-to-talk mode](/explanations/turn-taking#push-to-talk-mode)).
</ParamField>

### Text messages

Use this method when the user submits a chat-style message instead of speaking.

<ParamField path="sendClientResponseText" type="function">
**sendClientResponseText(text: string): void** Ends the active user turn and forwards `text` to the agent. The `user.transcript` event is emitted before the agent responds, keeping UI components in sync.
</ParamField>

## Notes & Best Practices

* The hook manages microphone access, audio streaming, and playback automatically.
* The `metadata` option allows you to set custom data which is then passed to your backend webhook (useful for user/session tracking).
* The `conversationId` can be used to resume a previous conversation, or omitted to start a new one.

### Authorizing Sessions

To connect a client (browser) to your Layercode voice agent, you must first authorize the session. The SDK will automatically send a POST request to the path (or url if your backend is on a different domain) passed in the `authorizeSessionEndpoint` option. In this endpoint, you will need to call the Layercode REST API to generate a `client_session_key` and `conversation_id` (if it's a new conversation).

<Info>If your backend is on a different domain, set `authorizeSessionEndpoint` to the full URL (e.g., `https://your-backend.com/api/authorize`).</Info>

**Why is this required?**
Your Layercode API key should never be exposed to the frontend. Instead, your backend acts as a secure proxy: it receives the frontend's request, then calls the Layercode authorization API using your secret API key, and finally returns the `client_session_key` to the frontend.

This also allows you to authenticate your user, and set any additional metadata that you want passed to your backend webhook.

**How it works:**

1. **Frontend:**
 The SDK automatically sends a POST request to your `authorizeSessionEndpoint` with a request body.

2. **Your Backend:**
 Your backend receives this request, then makes a POST request to the Layercode REST API `/v1/agents/web/authorize_session` endpoint, including your `LAYERCODE_API_KEY` as a Bearer token in the headers.

3. **Layercode:**
 Layercode responds with a `client_session_key` (and a `conversation_id`), which your backend returns to the frontend.

4. **Frontend:**
 The SDK uses the `client_session_key` to establish a secure WebSocket connection to Layercode.

**Example backend authorization endpoint code:**

<CodeGroup>
```ts Next.js app/api/authorize/route.ts [expandable]
export const dynamic = "force-dynamic";
import { NextResponse } from "next/server";

export const POST = async (request: Request) => {
  // Here you could do any user authorization checks you need for your app
  const endpoint = "https://api.layercode.com/v1/agents/web/authorize_session";
  const apiKey = process.env.LAYERCODE_API_KEY;
  if (!apiKey) {
    throw new Error("LAYERCODE_API_KEY is not set.");
  }
  const requestBody = await request.json();
  if (!requestBody || !requestBody.agent_id) {
    throw new Error("Missing agent_id in request body.");
  }
  try {
    const response = await fetch(endpoint, {
      method: "POST",
      headers: {
        "Content-Type": "application/json",
        Authorization: `Bearer ${apiKey}`,
      },
      body: JSON.stringify(requestBody),
    });
    if (!response.ok) {
      const text = await response.text();
      throw new Error(text || response.statusText);
    }
    return NextResponse.json(await response.json());
  } catch (error: any) {
    console.log("Layercode authorize session response error:", error.message);
    return NextResponse.json({ error: error.message }, { status: 500 });
  }
};
import { Context } from 'hono';
import { env } from 'cloudflare:workers';

export const onRequestPost = async (c: Context) => {
  try {
    const response = await fetch('https://api.layercode.com/v1/agents/web/authorize_session', {
      method: 'POST',
      headers: {
        'Content-Type': 'application/json',
        Authorization: `Bearer ${env.LAYERCODE_API_KEY}`
      },
      body: JSON.stringify({ agent_id: 'your-agent-id', conversation_id: null })
    });
    if (!response.ok) {
      console.log('response not ok', response.statusText);
      return c.json({ error: response.statusText });
    }
    const data: { client_session_key: string; conversation_id: string; config?: Record<string, any> } = await response.json();
    return c.json(data);
  } catch (error) {
    return c.json({ error: error });
  }
};
import type { RequestHandler } from 'express';
export const onRequestPost: RequestHandler = async (req, res) => {
try {
const response = await fetch('https://api.layercode.com/v1/agents/web/authorize_session', {
method: 'POST',
headers: {
'Content-Type': 'application/json',
Authorization: `Bearer ${process.env.LAYERCODE_API_KEY}`
},
body: JSON.stringify({ agent_id: 'your-agent-id', conversation_id: null })
});
if (!response.ok) {
console.log('response not ok', response.statusText);
return res.status(500).json({ error: response.statusText });
}
const data: { client_session_key: string; conversation_id: string; config?: Record<string, any> } = await response.json();
res.json(data);
} catch (error) {
res.status(500).json({ error: (error as Error).message });
}
};import os
import httpx
from fastapi.responses import JSONResponse
@app.post("/authorize")
async def authorize_endpoint(request: Request):
api_key = os.getenv("LAYERCODE_API_KEY")
if not api_key:
return JSONResponse({"error": "LAYERCODE_API_KEY is not set."}, status_code=500)
try:
body = await request.json()
except Exception:
return JSONResponse({"error": "Invalid JSON body."}, status_code=400)
if not body or not body.get("agent_id"):
return JSONResponse({"error": "Missing agent_id in request body."}, status_code=400)
endpoint = "https://api.layercode.com/v1/agents/web/authorize_session"
try:
async with httpx.AsyncClient() as client:
response = await client.post(
endpoint,
headers={
"Content-Type": "application/json",
"Authorization": f"Bearer {api_key}",
},
json=body,
)
if response.status_code != 200:
return JSONResponse({"error": response.text}, status_code=500)
return JSONResponse(response.json())
except Exception as error:
print("Layercode authorize session response error:", str(error))
return JSONResponse({"error": str(error)}, status_code=500)Source: https://docs.layercode.com/sdk-reference/vanilla-js-sdk
API reference for the Layercode Vanilla JS Frontend SDK.
The LayercodeClient is the core client for all JavaScript frontend SDKs, providing audio recording, playback, and real-time communication with the Layercode agent.
window.layercode = new LayercodeClient({ agentId: "your-agent-id", conversationId: "your-conversation-id", // optional authorizeSessionEndpoint: "/api/authorize", metadata: { userId: "123" }, // optional onConnect: ({ conversationId }) => console.log("connected", conversationId), onDisconnect: () => console.log("disconnected"), onError: (err) => console.error("error", err), onDataMessage: (msg) => console.log("data message", msg), onUserAmplitudeChange: (amp) => console.log("user amplitude", amp), onAgentAmplitudeChange: (amp) => console.log("agent amplitude", amp), onStatusChange: (status) => console.log("status", status), });
window.layercode.connect();
</RequestExample>

### Usage Example

### Constructor Options

<ParamField path="options" type="object" required>
Options for the LayercodeClient.
</ParamField>

<ParamField path="options.agentId" type="string" required>
The ID of your Layercode agent.
</ParamField>

<ParamField path="options.conversationId" type="string">
The conversation ID to resume a previous conversation (optional).
</ParamField>

<ParamField path="options.authorizeSessionEndpoint" type="string" required>
The endpoint to authorize the session (should return a `client_session_key` and `session_id`).
Note: From Mon Sep 1, 12:00 UTC, the response will include `conversation_id` instead of `session_id` (see REST API page).
</ParamField>

<ParamField path="options.metadata" type="object">
Optional metadata to send with the session authorization request.
</ParamField>

<ParamField path="options.onConnect" type="function">
Callback when the client connects. Receives an object: `{ conversationId: string | null }`.
</ParamField>

<ParamField path="options.onDisconnect" type="function">
Callback when the client disconnects.
</ParamField>

<ParamField path="options.onError" type="function">
Callback when an error occurs. Receives an `Error` object.
</ParamField>

<ParamField path="options.onDataMessage" type="function">
Callback for custom data messages from the server.
</ParamField>

<ParamField path="options.onUserAmplitudeChange" type="function">
Callback for changes in the user's microphone amplitude (number, 0-1).
</ParamField>

<ParamField path="options.onAgentAmplitudeChange" type="function">
Callback for changes in the agent's audio amplitude (number, 0-1).
</ParamField>

<ParamField path="options.onStatusChange" type="function">
Callback when the client's status changes. Receives a string: `"disconnected" | "connecting" | "connected" | "error"`.
</ParamField>

### Methods

<ParamField path="connect" type="function" required>
**connect(): Promise\<void>** Connects to the Layercode agent, authorizes the session, and starts audio capture and playback.
</ParamField>

<ParamField path="disconnect" type="function" required>
**disconnect(): Promise\<void>** Disconnects from the Layercode agent, stops audio capture and playback, and closes the WebSocket.
</ParamField>

### Turn-taking (Push-to-Talk)

Layercode supports both automatic and push-to-talk turn-taking. For push-to-talk, use these methods to signal when the user starts and stops speaking:

<ParamField path="triggerUserTurnStarted" type="function">
**triggerUserTurnStarted(): Promise\<void>** Signals that the user has started speaking (for [push-to-talk mode](/explanations/turn-taking#push-to-talk-mode)). Interrupts
any agent audio playback.
</ParamField>

<ParamField path="triggerUserTurnFinished" type="function">
**triggerUserTurnFinished(): Promise\<void>** Signals that the user has finished speaking (for [push-to-talk mode](/explanations/turn-taking#push-to-talk-mode)).
</ParamField>

### Text messages

Use this method when the user submits a chat-style message instead of speaking.

<ParamField path="sendClientResponseText" type="function">
**sendClientResponseText(text: string): void** Ends the active user turn and forwards `text` to the agent. The `user.transcript` event is emitted before the agent responds, keeping UI components in sync.
</ParamField>

## Events & Callbacks

* **onConnect**: Called when the connection is established. Receives `{ conversationId }`.
* **onDisconnect**: Called when the connection is closed.
* **onError**: Called on any error (authorization, WebSocket, audio, etc).
* **onDataMessage**: Called when a custom data message is received from the server (see `response.data` events from your backend).
* **onUserAmplitudeChange**: Called with the user's microphone amplitude (0-1).
* **onAgentAmplitudeChange**: Called with the agent's audio amplitude (0-1).
* **onStatusChange**: Called when the status changes (`"disconnected"`, `"connecting"`, `"connected"`, `"error"`).

<ParamField path="options.onDeviceSwitched" type="function">
Callback when the active input/output device changes in the browser. Useful for handling device disconnects and switches.
</ParamField>

<ParamField path="options.onUserIsSpeakingChange" type="function">
Callback when VAD detects user speech start/stop. Receives a boolean.
</ParamField>

## Notes & Best Practices

* The SDK manages microphone access, audio streaming, and playback automatically.
* The `metadata` option allows you to set custom data which is then passed to your backend webhook (useful for user/session tracking).
* The `conversationId` can be used to resume a previous conversation, or omitted to start a new one.

### Authorizing Sessions

To connect a client (browser) to your Layercode voice agent, you must first authorize the session. The SDK will automatically send a POST request to the path (or url if your backend is on a different domain) passed in the `authorizeSessionEndpoint` option. In this endpoint, you will need to call the Layercode REST API to generate a `client_session_key` and `conversation_id` (if it's a new conversation).

<Info>If your backend is on a different domain, set `authorizeSessionEndpoint` to the full URL (e.g., `https://your-backend.com/api/authorize`).</Info>

**Why is this required?**
Your Layercode API key should never be exposed to the frontend. Instead, your backend acts as a secure proxy: it receives the frontend's request, then calls the Layercode authorization API using your secret API key, and finally returns the `client_session_key` to the frontend.

This also allows you to authenticate your user, and set any additional metadata that you want passed to your backend webhook.

**How it works:**

1. **Frontend:**
 The SDK automatically sends a POST request to your `authorizeSessionEndpoint` with a request body.

2. **Your Backend:**
 Your backend receives this request, then makes a POST request to the Layercode REST API `/v1/agents/web/authorize_session` endpoint, including your `LAYERCODE_API_KEY` as a Bearer token in the headers.

3. **Layercode:**
 Layercode responds with a `client_session_key` (and a `conversation_id`), which your backend returns to the frontend.

4. **Frontend:**
 The SDK uses the `client_session_key` to establish a secure WebSocket connection to Layercode.

**Example backend authorization endpoint code:**

<CodeGroup>
```ts Next.js app/api/authorize/route.ts [expandable]
export const dynamic = "force-dynamic";
import { NextResponse } from "next/server";

export const POST = async (request: Request) => {
  // Here you could do any user authorization checks you need for your app
  const endpoint = "https://api.layercode.com/v1/agents/web/authorize_session";
  const apiKey = process.env.LAYERCODE_API_KEY;
  if (!apiKey) {
    throw new Error("LAYERCODE_API_KEY is not set.");
  }
  const requestBody = await request.json();
  if (!requestBody || !requestBody.agent_id) {
    throw new Error("Missing agent_id in request body.");
  }
  try {
    const response = await fetch(endpoint, {
      method: "POST",
      headers: {
        "Content-Type": "application/json",
        Authorization: `Bearer ${apiKey}`,
      },
      body: JSON.stringify(requestBody),
    });
    if (!response.ok) {
      const text = await response.text();
      throw new Error(text || response.statusText);
    }
    return NextResponse.json(await response.json());
  } catch (error: any) {
    console.log("Layercode authorize session response error:", error.message);
    return NextResponse.json({ error: error.message }, { status: 500 });
  }
};
import { Context } from 'hono';
import { env } from 'cloudflare:workers';

export const onRequestPost = async (c: Context) => {
  try {
    const response = await fetch('https://api.layercode.com/v1/agents/web/authorize_session', {
      method: 'POST',
      headers: {
        'Content-Type': 'application/json',
        Authorization: `Bearer ${env.LAYERCODE_API_KEY}`
      },
      body: JSON.stringify({ agent_id: 'your-agent-id', conversation_id: null })
    });
    if (!response.ok) {
      console.log('response not ok', response.statusText);
      return c.json({ error: response.statusText });
    }
    const data: { client_session_key: string; conversation_id: string; config?: Record<string, any> } = await response.json();
    return c.json(data);
  } catch (error) {
    return c.json({ error: error });
  }
};
import type { RequestHandler } from 'express';
export const onRequestPost: RequestHandler = async (req, res) => {
try {
const response = await fetch('https://api.layercode.com/v1/agents/web/authorize_session', {
method: 'POST',
headers: {
'Content-Type': 'application/json',
Authorization: `Bearer ${process.env.LAYERCODE_API_KEY}`
},
body: JSON.stringify({ agent_id: 'your-agent-id', conversation_id: null })
});
if (!response.ok) {
console.log('response not ok', response.statusText);
return res.status(500).json({ error: response.statusText });
}
const data: { client_session_key: string; conversation_id: string; config?: Record<string, any> } = await response.json();
res.json(data);
} catch (error) {
res.status(500).json({ error: (error as Error).message });
}
};import os
import httpx
from fastapi.responses import JSONResponse
@app.post("/authorize")
async def authorize_endpoint(request: Request):
api_key = os.getenv("LAYERCODE_API_KEY")
if not api_key:
return JSONResponse({"error": "LAYERCODE_API_KEY is not set."}, status_code=500)
try:
body = await request.json()
except Exception:
return JSONResponse({"error": "Invalid JSON body."}, status_code=400)
if not body or not body.get("agent_id"):
return JSONResponse({"error": "Missing agent_id in request body."}, status_code=400)
endpoint = "https://api.layercode.com/v1/agents/web/authorize_session"
try:
async with httpx.AsyncClient() as client:
response = await client.post(
endpoint,
headers={
"Content-Type": "application/json",
"Authorization": f"Bearer {api_key}",
},
json=body,
)
if response.status_code != 200:
return JSONResponse({"error": response.text}, status_code=500)
return JSONResponse(response.json())
except Exception as error:
print("Layercode authorize session response error:", str(error))
return JSONResponse({"error": str(error)}, status_code=500)Source: https://docs.layercode.com/tutorials/getting-started
Create your first AI voice agent in minutes.
Let's build a production-ready voice agent that can respond to users and trigger function calls.
Here's a preview of what you will build:
- Real-time speech-to-text, text-to-speech, turn-taking, and low-latency audio delivery powered by Layercode's edge platform.
- A sample agent backend that monitors conversation transcripts and responds based on your prompt and the tool calls you define. Deployable anywhere.
After the CLI finishes, you will see something like this:

<img className="mx-auto mb-8" src="https://mintcdn.com/layercode/lpNR2D-ChEBfaQs7/images/outcome-cli.png?fit=max&auto=format&n=lpNR2D-ChEBfaQs7&q=85&s=81fbeea4a19ede0e9e5cef700e09971f" alt="Outcome of the CLI" data-og-width="1242" width="1242" data-og-height="596" height="596" data-path="images/outcome-cli.png" data-optimize="true" data-opv="3" srcset="https://mintcdn.com/layercode/lpNR2D-ChEBfaQs7/images/outcome-cli.png?w=280&fit=max&auto=format&n=lpNR2D-ChEBfaQs7&q=85&s=b6b24f06bd46187204410a600a113e53 280w, https://mintcdn.com/layercode/lpNR2D-ChEBfaQs7/images/outcome-cli.png?w=560&fit=max&auto=format&n=lpNR2D-ChEBfaQs7&q=85&s=0517bf75110990d3907a396c719842c1 560w, https://mintcdn.com/layercode/lpNR2D-ChEBfaQs7/images/outcome-cli.png?w=840&fit=max&auto=format&n=lpNR2D-ChEBfaQs7&q=85&s=5d2b08f1f3ff49ea22e16890fefbf929 840w, https://mintcdn.com/layercode/lpNR2D-ChEBfaQs7/images/outcome-cli.png?w=1100&fit=max&auto=format&n=lpNR2D-ChEBfaQs7&q=85&s=1e01a0a08a69b6738842d2ad7e239e7c 1100w, https://mintcdn.com/layercode/lpNR2D-ChEBfaQs7/images/outcome-cli.png?w=1650&fit=max&auto=format&n=lpNR2D-ChEBfaQs7&q=85&s=ccc0df75c6a2df5d363579379d0e7918 1650w, https://mintcdn.com/layercode/lpNR2D-ChEBfaQs7/images/outcome-cli.png?w=2500&fit=max&auto=format&n=lpNR2D-ChEBfaQs7&q=85&s=c471feaad3b7e7c9d9a707cef6e93f3a 2500w" />

### Try it out

Once everything boots, you can start a conversation locally (typically at [http://localhost:3000/](http://localhost:3000/)).

<img className="mx-auto mb-8" src="https://mintcdn.com/layercode/lpNR2D-ChEBfaQs7/images/layercode-running.png?fit=max&auto=format&n=lpNR2D-ChEBfaQs7&q=85&s=062b42997e06364b4869a64f6298cf27" alt="Layercode running a conversation" data-og-width="2736" width="2736" data-og-height="1890" height="1890" data-path="images/layercode-running.png" data-optimize="true" data-opv="3" srcset="https://mintcdn.com/layercode/lpNR2D-ChEBfaQs7/images/layercode-running.png?w=280&fit=max&auto=format&n=lpNR2D-ChEBfaQs7&q=85&s=bef8e9339c688715e0c6249c2c5965f1 280w, https://mintcdn.com/layercode/lpNR2D-ChEBfaQs7/images/layercode-running.png?w=560&fit=max&auto=format&n=lpNR2D-ChEBfaQs7&q=85&s=15f61bdfad1c9617d7c13633522bc9e1 560w, https://mintcdn.com/layercode/lpNR2D-ChEBfaQs7/images/layercode-running.png?w=840&fit=max&auto=format&n=lpNR2D-ChEBfaQs7&q=85&s=cfed4d0973d44e7b03124b0067293978 840w, https://mintcdn.com/layercode/lpNR2D-ChEBfaQs7/images/layercode-running.png?w=1100&fit=max&auto=format&n=lpNR2D-ChEBfaQs7&q=85&s=230e568100fef6f972397fcd86550767 1100w, https://mintcdn.com/layercode/lpNR2D-ChEBfaQs7/images/layercode-running.png?w=1650&fit=max&auto=format&n=lpNR2D-ChEBfaQs7&q=85&s=472ed27398ecf339cc4d8393ad30d57d 1650w, https://mintcdn.com/layercode/lpNR2D-ChEBfaQs7/images/layercode-running.png?w=2500&fit=max&auto=format&n=lpNR2D-ChEBfaQs7&q=85&s=931b3cebebedb7c153c7269a9992ab36 2500w" />

## Video walkthrough

Prefer a walkthrough? Watch the quick demo below.

<iframe className="w-full aspect-video rounded-xl" src="https://www.youtube.com/embed/bMFNQ5RC954" title="Layercode CLI walkthrough" frameBorder="0" allow="accelerometer; autoplay; clipboard-write; encrypted-media; gyroscope; picture-in-picture" allowFullScreen />
## Sign up, log in, and grab your keys

1. Visit [dash.layercode.com](https://dash.layercode.com) and log in or sign up if you haven't already.
2. Create a new agent or use the agent that Layercode auto-creates for you.
3. Copy the agent ID for later.
4. Click **Connect your backend**, copy the **Webhook secret**, and save it for later.
5. In **Account settings**, copy your **Layercode API key** and save it for later.

## Choose your stack

<Tabs>
  <Tab title="Next.js with Cloudflare (recommended)">
    <Note>
      You will need an OpenAI API key (and with small tweaks, you can use any other LLM provider).
    </Note>

    ## Clone our example repo

    ```bash
    git clone https://github.com/layercodedev/fullstack-nextjs-cloudflare.git
    cd fullstack-nextjs-cloudflare
    ```

    ### Install dependencies

    <CodeGroup>
      ```bash npm
      npm install
      ```

      ```bash pnpm
      pnpm install
      ```

      ```bash yarn
      yarn install
      ```

      ```bash bun
      bun install
      ```
    </CodeGroup>

    Create an `.env` file (you can copy `.env.example`).

    Populate the variables with the values you grabbed from Layercode in the first step.

    ```
    NEXTJS_ENV=development
    NEXT_PUBLIC_LAYERCODE_AGENT_ID=
    LAYERCODE_API_KEY=
    LAYERCODE_WEBHOOK_SECRET=
    OPENAI_API_KEY=
    ```

    Now run your project with `npm run dev`.

    ### Set up a tunnel

    To let Layercode reach your app, expose it to the internet during development.

    We recommend <a href="https://github.com/cloudflare/cloudflared">Cloudflared</a>, Cloudflare's tunneling utility. Follow our [Cloudflare Tunnel guide](/how-tos/tunnelling) to install it.

    Once it is installed, run:

    ```bash
    cloudflared tunnel --url http://localhost:*PORT_NUMBER*
    ```

    ### Get your Cloudflared tunnel URL

    The logs include a URL similar to `https://phone-tom-applying-individually.trycloudflare.com`.

    <img className="mx-auto mb-8" src="https://mintcdn.com/layercode/M7xHCbGftyn9wx8C/images/cloudflared-logs.png?fit=max&auto=format&n=M7xHCbGftyn9wx8C&q=85&s=662527e2c7712867d3f4d1d1cf33a427" alt="Cloudflared logs output" data-og-width="1280" width="1280" data-og-height="720" height="720" data-path="images/cloudflared-logs.png" data-optimize="true" data-opv="3" srcset="https://mintcdn.com/layercode/M7xHCbGftyn9wx8C/images/cloudflared-logs.png?w=280&fit=max&auto=format&n=M7xHCbGftyn9wx8C&q=85&s=b9fc67cfe4d29b320cdb5d18ed96edbd 280w, https://mintcdn.com/layercode/M7xHCbGftyn9wx8C/images/cloudflared-logs.png?w=560&fit=max&auto=format&n=M7xHCbGftyn9wx8C&q=85&s=519a69bad9a4ad63bb10a08be80ab627 560w, https://mintcdn.com/layercode/M7xHCbGftyn9wx8C/images/cloudflared-logs.png?w=840&fit=max&auto=format&n=M7xHCbGftyn9wx8C&q=85&s=ce8b4d3c8266ca46d837e9c14d763e6b 840w, https://mintcdn.com/layercode/M7xHCbGftyn9wx8C/images/cloudflared-logs.png?w=1100&fit=max&auto=format&n=M7xHCbGftyn9wx8C&q=85&s=01ac7e307a7e2d92c4da7d81578d5636 1100w, https://mintcdn.com/layercode/M7xHCbGftyn9wx8C/images/cloudflared-logs.png?w=1650&fit=max&auto=format&n=M7xHCbGftyn9wx8C&q=85&s=37070e79da6436d9a11c23d3972c750b 1650w, https://mintcdn.com/layercode/M7xHCbGftyn9wx8C/images/cloudflared-logs.png?w=2500&fit=max&auto=format&n=M7xHCbGftyn9wx8C&q=85&s=432a9ba61055bce2af88a7d48c84da35 2500w" />

    ### Save your URL in the dashboard

    Append **`/api/agent`** to the URL (for example, `https://phone-tom-applying-individually.trycloudflare.com/api/agent`).

    Head to the **Layercode dashboard** at [https://dash.layercode.com/](https://dash.layercode.com/).

    Open the agent you are working with, click **Connect your backend**, and paste the URL into **Webhook URL**. Save your changes.

    <img className="mx-auto mb-8" src="https://mintcdn.com/layercode/M7xHCbGftyn9wx8C/images/set-webhook-url.png?fit=max&auto=format&n=M7xHCbGftyn9wx8C&q=85&s=aa5a48617d1782b1de80e4250d95220b" alt="Set your webhook url" data-og-width="1470" width="1470" data-og-height="1586" height="1586" data-path="images/set-webhook-url.png" data-optimize="true" data-opv="3" srcset="https://mintcdn.com/layercode/M7xHCbGftyn9wx8C/images/set-webhook-url.png?w=280&fit=max&auto=format&n=M7xHCbGftyn9wx8C&q=85&s=1480b9e7d34429a2fc85341893091ceb 280w, https://mintcdn.com/layercode/M7xHCbGftyn9wx8C/images/set-webhook-url.png?w=560&fit=max&auto=format&n=M7xHCbGftyn9wx8C&q=85&s=2eeda41ccdb52d6901ffd2f99025c88b 560w, https://mintcdn.com/layercode/M7xHCbGftyn9wx8C/images/set-webhook-url.png?w=840&fit=max&auto=format&n=M7xHCbGftyn9wx8C&q=85&s=1f704ee5ab3760cdd6b8a7209d07b0fb 840w, https://mintcdn.com/layercode/M7xHCbGftyn9wx8C/images/set-webhook-url.png?w=1100&fit=max&auto=format&n=M7xHCbGftyn9wx8C&q=85&s=3b67e098263cfb7b290de4fc59bce366 1100w, https://mintcdn.com/layercode/M7xHCbGftyn9wx8C/images/set-webhook-url.png?w=1650&fit=max&auto=format&n=M7xHCbGftyn9wx8C&q=85&s=73ea7c2b2263e2bb74ad496c36da7bd1 1650w, https://mintcdn.com/layercode/M7xHCbGftyn9wx8C/images/set-webhook-url.png?w=2500&fit=max&auto=format&n=M7xHCbGftyn9wx8C&q=85&s=1bb285e56344f591d8f7b2fffd573c0c 2500w" />

    (yes I did roll the secret)

    Refresh your app and test it. It should work—and if you get stuck, <a href="mailto:support@layercode.com">email us</a> and we'll help.

    ## It lives

    Your agent should now be working—go check it out!
  </Tab>

  {/* <Tab title="Python & React">
            <PythonGettingStarted />
        </Tab> */}
</Tabs>
### Backend guides

* [Node.js (Express)](/tutorials/nodejs)
* [Python (Fastify)](/tutorials/python)

### Frontend guides

* [Vanilla JS](/tutorials/vanilla-js)
* [React](/tutorials/react)
Keep iterating—here are the next things builders usually tackle.
Adjust the prompt or welcome_message in layercode.config.json.
{
  "layercode_agent_id": "ibcjp4z0",
  "prompt": "You are having a spoken conversation with the user.",
  "welcome_message": "Hey, how can I help you today?"
}The project ships with an example tool in /app/api/agent/route.ts. Modify it or add your own.
const weather = tool({
  description: 'Get the weather in a location',
  inputSchema: z.object({
    location: z.string().describe('The location to get the weather for')
  }),
  execute: async ({ location }) => {
    stream.data({ isThinking: true });
    // do something to get the weather
    stream.data({ isThinking: false });

    return {
      location,
      temperature: 72 + Math.floor(Math.random() * 21) - 10
    };
  }
});
Learn more about tool calling in Next.js or review the general tool calling guide.
Set up persistent storage for transcripts. A fast database or data store such as Cloudflare D1 or Redis works well. A dedicated guide is coming soon.
Layercode runs the voice pipeline in our cloud, but your backend APIs (and frontend, if you are not using Next.js or telephony) need to be deployed.
Use the deployment guides:
Remember to set your environment variables in the hosting platform and update the Layercode dashboard with the deployed webhook URL.
Follow the Twilio setup guide to add phone-call support.
We provide a tunnel utility for local development.
# Start a tunnel for agent dtv3x3d2 on port 5173 with the API located at /api/voice-agent
npx @layercode/cli tunnel --agent=dtv3x3d2 --port=5173 --path=/api/voice-agent --tail